| |
| |
MagicQ supports a comprehensive palette system for easy access to your favourite looks. When heads are patched, the console automatically generates palettes for the patched heads.
There are four types of palettes corresponding to Intensity, Colour, Beam and Position. Each palette supports up to 1000 different entries.
There are four types of palettes corresponding to Intensity, Colour, Beam and Position. Each palette supports up to 1000 different entries.
To use a palette, select the heads you wish to apply the change to. Then open the required palette by selecting one of the Intensity, Colour, Beam or Position Windows.
From within the window select a palette entry. That palette entry will be applied to all the selected heads.
In the Beam Window the first 5 soft buttons above the touch screen are used for selecting the Beam Page 1 to 5 – the rest of the soft buttons are used for selecting the palette entries.
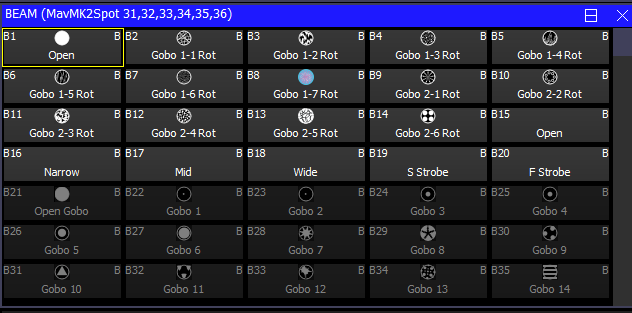
Palette entries that contain data for the currently selected heads are shown in white. Palette entries that do not have any data for the currently selected heads are shown in grey.
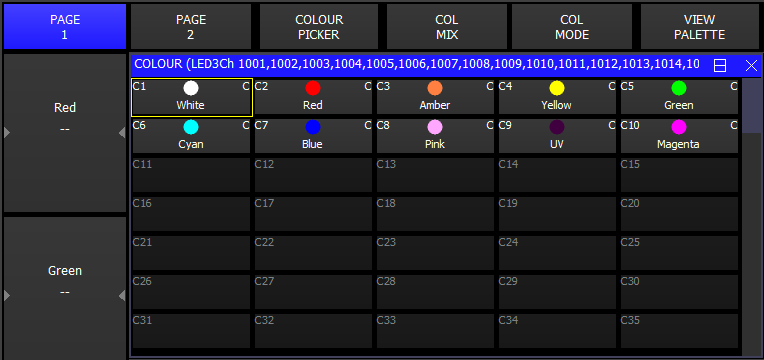
In the Colour Window the top soft buttons Col Norm, Col CMY, Col RGB and Col HSI determine how the colour mix encoder wheels are used to modify the colour.
Col Mix is used to select between Palettes and the Lee, Rosco and Generic colour charts and also to select the colour mixing rainbows.
To record a palette entry, select the heads you wish to apply the change to. Then open the required palette by selecting one of the Intensity, Colour, Beam or Position Windows.
Modify the attributes of the heads until you are happy with them. Then record the palette entry by pressing RECORD and then selecting the palette entry in the window.
When you record a palette entry that has already been used in programming of Cues and Cue Stacks then the Cues and Cue Stacks will be updated to reflect the changes. This is useful, for example, for touring shows that play many different venues. If the Cues use positions from the Position palette, then each day it is only necessary to change the palette entries, rather than having to re-record all the Cues.
When palettes are recorded, only the attributes appropriate to the palette are recorded. So when recording to the colour palette, only colour attributes are stored. By default, the console records all the attributes appropriate to the palette, regardless of whether you have adjusted them in the programmer.
Palette values are shown in the Output, Programmer and Cue windows by a small black rectangle in the bottom left corner.

You may wish only to record only certain attributes into a palette entry – e.g. only the shutter attribute into the beam palette. You can modify the way the console records palettes using masking in the Record Options window. Open the Record Options Window when recording by holding SHIFT and pressing RECORD. Alternatively press the REC OPTIONS soft button in the Programmer Window.
Press the REC INT, REC POS, REC COL, REC BEAM soft buttons to apply masking based on attribute type. Select attributes in the window to apply masking based on individual attributes. For instance to store only the shutter attribute, press the SHUTTER attribute.
In some circumstances you may wish to record other attributes into a palette – e.g. intensity into a beam palette. Simply press the appropriate buttons in the Record Options Window. The Palette entry shows I, P, C, B to indicate which attributes are stored in the Palette.
Once the Palette entry is recorded the masking options are returned to their defaults. You can lock the mask so that it is not returned to the defaults by pressing the LOCK MASK soft button in the Record Options Window.
By default when recording palette entries, changes are only made for selected heads. The modifications are merged with the existing palette entries.
To ensure that all heads that have been changed are updated, press CTRL + ALL to select all heads in the programmer before re-recording the palette entry.
It is possible to set the "Recording to Palettes" option to "All Heads in Programmer" to force all heads that are active in the programmer to be updated in the palette rather than just the selected heads.
The Intensity window has a View Palettes view similar to the Position, Colour and Beam windows. Palettes can be recorded, moved, copied and removed and used within Cues just as with Position, Colour and Beam palettes.
By default only Intensity parameters are recorded into the Intensity Palettes regardless of whether other attributes are in the programmer. A record mask (SHIFT + RECORD) can be used to override which attributes are recorded.
The only difference with Intensity Palettes compared to Position, Colour and Beam palettes is that by default the record type is set to all heads that have intensity in the Programmer being recorded into the Palette not just the selected heads. This avoids the need to always select heads (e.g. by selecting the All Dimmers group) before recording an Intensity Palette. The record type can be changed by pressing SHIFT RECORD and selecting RECORD TYPE.
To record intensity into a Colour, Beam or Position Palette hold SHIFT and press RECORD to open the Record Options Window (as above) and select the REC INT soft button.
In normal operation heads with duplicated elements are treated as if there is only one element of each attribute. MagicQ automatically copies the output from the 1st element to the duplicated elements. This enables the head to be treated in a simple way like any other head.
If you have element specific data in the Programmer then it will be recorded into a Palette during the normal Palette record operation.
If you recall the palette without a duplicated element selection active, then it will only recall for the 1st element - so the duplicated elements will be the same as the main element. If you sub select all duplicated elements before applying the palette then you can recall the element specific data.
You can sub select all duplicated elements by doing e.g. .1 THRU 3 to sub select the 3 elements.
From v1.2.7.1 it is possible to store the duplicated element selection in Groups - so you could make a group with no duplicated element selection and one with all duplicated elements selected.
To select all elements of duplicated heads.
OR
To go back to normal selection (i.e. no duplicated elements selected)
OR
A palette can be named when it is recorded by keying in the name before selecting the palette entry to record.
A palette can be named at any time by keying in the name, pressing SET and selecting the palette entry. If you are not using an external keyboard the select the palette entry, press SET and enter the name on the on screen keyboard.
A palette can be updated simply be selecting some heads, applying the palette and then re-recording the palette. MagicQ automatically merges into the changes from the Programmer into the existing Palette.
Only the heads that are selected when you re-record the palette will be modified in the palette - other heads recorded in the palette will not be changed.
The attributes active in the Programmer for that attribute type (Intensity, Pos, Colour, Beam) are added to the palette regardless of whether they were in the Palette before. From v1.9.2.0 it is possible to specify a RECORD UPDATE whereby only attributes that are already in the Palette are updated. Hold UPDATE and press RECORD or press SHIFTand RECORD to select REC UPDATE.
A complete palette can be edited using Include and Update. Press Include and then select the Palette entry to include the entire palette into the programmer. The console automatically selects all the heads that are in the Palette entry. Modifications can then be made in the programmer, and when complete pressing Update stores the changes back to the Palette.
Palette entries can be moved and copied just like any other window item.
When a palette entry is moved, programming follows the palette entry - i.e. if you have a Cue which uses a Colour palette entry, then moving that Colour palette entry, will cause the Cue to be updated to continue to reference the palette entry.
You can delete an entire palette entry by using REMOVE as with any window item.
To remove specific attributes from a palette entry you can use the REC REMOVE record option. This works in a similar way to the normal record mode – except that where items in the programmer are normally merged into the palette entry, they are now removed.
The MASK IPCB and MASK ATTRIB record options enable selection of which options are deleted as for normal recording of palette entries.
For example, to remove the shutter attribute from a previously recorded beam palette entry; clear the programmer, select the heads, and modify the shutter attribute only. Then press SHIFT and RECORD, and select the REC REMOVE and MASK ATTRIB, Shutter record options. Then select the palette entry.
You can view the contents of a palette entry at any time by pressing the VIEW PALETTE soft button in the Intensity, Pos, Colour, and Beam windows. This opens the Palette View window and shows the contents of the palette entry that the cursor was on.
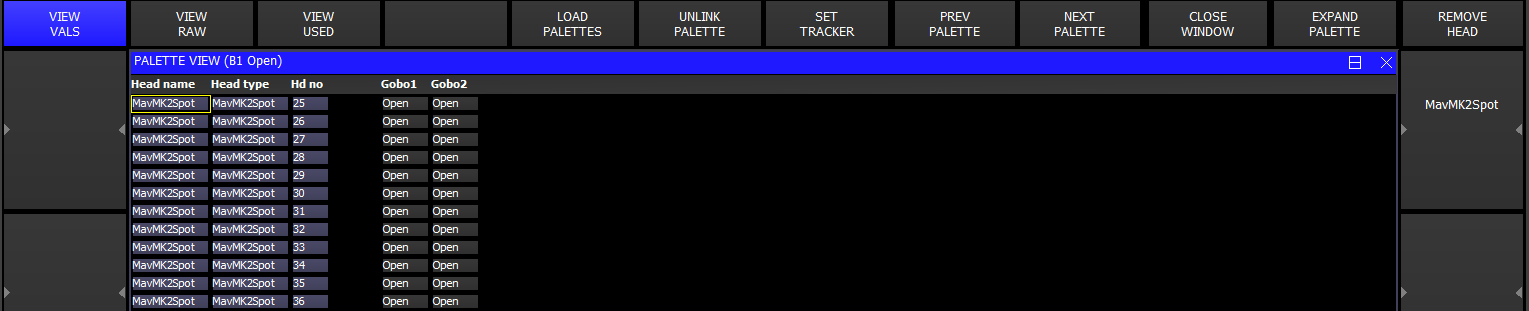
Note that the View Palette window shows the entire contents of the palette entry regardless of which heads are currently selected. You can modify the contents of the palette entry by editing the values in the spread-sheet. You can remove values, entire heads, or entire attributes from the palette entry using the REMOVE button.
The View Palette, View Used window can be used to determine how many times Palettes have been used within a show.
The View Palettes window shows whether Palettes are linked to other Palettes (highlighted in Red). There is a button to unlink the specific Palettes or using SHIFT, to unlink all the Palettes of that type (Position, Colour or Beam). Unlinking removes links within the Palettes to other Palettes – it does not affect the links within Cues.
It is possible to step through the different Palettes using the Next Palette and Previous Palette buttons.
If you select a Palette and then record it as another Palette without changing any of the attributes then all the values in the new Palette will be linked to the first Palette. Changing any of the attributes in the first Palette will change the attributes in the new Palette. This is a linked Palette. MagicQ shows a L in the Palette entry to indicate a linked Palette.
When you change attributes using the encoder wheels or soft buttons then the Palette will contain hard values instead of links.
Only one level of linking is allowed – a Palette can link to another Palette, but it is not possible to link to further Palettes.
It is possible to unlink a Palette from the Intensity, Pos, Colour and Beam Window and also from the View Palette Window.
Put the cursor on the palette to unlink, or cursor select multiple palettes. Then press UNLINK PALETTE.
To unlink all palettes of that type (Intensity, Position, Colour or Beam) press SHIFT + UNLINK ALL PALETTE.
Palettes can be applied with a time by simply typing in a number of seconds before selecting the Palette - this is very useful for quickly setting fade times when recording Cues or for busking in effects. In addition you can use FAN mode to quickly spread different times across a number of heads.
For example, typing in 3 before selecting a position will cause a fade to the position over 3 seconds.
Typing 0 THRU 3 before selecting a position causes the heads to move to the position with a spread of 3 seconds - i.e. the first head moves immediately whilst the last head takes 3 seconds.
To fan delays, rather than fade times, type delay / fade – e.g. for 1 second fade but delayed from 0 to 3 seconds type 0 THRU 3 / 1 before selecting the palette.
A short-cut can be used to perform fanned delay/fades – type a time followed by * before selecting the Palette to fan the fade across the currently selected heads.
<time> * | Fan times across selected heads |
<time> * / | Reverse fan |
<time> * + | Into centre fan |
<time> * - | Centre out fan |
<time> *. | Random |
* | Use last fan time |
The above shortcuts fade each of the selected Heads in turn - thus the fade time of each Head is the total time divided by the number of Heads. To specify a fade time for each of the Heads the shortcuts can be extended with a Head fade time, for example:
<time> / <head time> *
Applying Palettes with times and fanned times can be applied to all Palette types including Beam and Colour. For example to perform a gradual fade from one colour to the next over all your colour mixing heads, select the heads, 0 THRU 5 before selecting a colour palette entry.
You can modify the order that a fan is applied to heads by selecting the heads in the appropriate order - at any time you can invert the order using the Selection soft button in the Group Window.
Whenever a Palette is selected with a time the times are stored in the programmer. This makes it very easy to build up Cues with times. Simply select the Palettes you want with the required times and Record the Cue. The Cue will playback with the required times.
MagicQ v1.7.1.5 has a shortcut for symmetric fans from centre - for older versions hold ALL and select CENTRE OUT and then hold FAN and select SEGMENTS 2.
The following short cuts are supported when applying Palettes for normal Cues and when using Group Cues:
*.. | Fade left to right across Group Grid |
*// | Fade right to left across Group Grid |
*++ | Fade out to in on Group Grid |
*-- | Fade in to out on Group Grid |
*+- | Fade centre out to in on Group Grid |
*-+ | Fade centre in to out on Group Grid |
*… | Fade top to bottom across Group Grid |
*/// | Fade bottom to top across Group Grid |
* + + + | Fade top out to in on Group Grid |
*--- | Fade top in to out on Group Grid |
So for example to fade Colour palette 2 left to right across the Group Grid over 3 seconds enter
COL 2 / 3 * +
As with the existing shortcuts the fade time can be controlled by entering <total time> / <fade time> before the short cut, e.g. perform an inter centre fade to Colur 2 with each pixel fading for 3 seconds with total 10 second fade enter:
COL 2 / 10 / 3 * + -
When using Group Cues these timing short cuts are stored in the Cues so changing the Group (and Group Grid) will automatically update the Cues.
You can set both delay and fade times in FAN mode by entering delay / fade. For example to move all your heads onto a position in turn, type 2 / 2 before selecting the position.
Minimum fade times can be applied using the + operator, for example to perform a fade of between 2 and 6 seconds to a new position on a group of heads enter FAN mode, type 2+4 and select the new position. The first head will fade over 2 seconds whilst the last will fade over 6 seconds.
To use both minimum delay and fade times type, for example, 2+4/3+5. This gives delay times of between 2 and 6, and fade times of between 3 and 8 seconds.
You can copy one or more palettes from the Position, Colour or Beam windows to a Playback (use SHIFT + cursor keys to select multiple items). This enables quick generation of Cue Stacks based on your palettes.
The Cue Stack will include one Cue for every Palette selected. The Cues will contain values from the Palette for the currently selected heads. Other attributes can be added using Record Merge.
If a Cue Stack already exists on the Playback, then the extra Cues are appended to the end of the Cue Stack.
Copying a Group to a Playback makes a Cue with Intensity at 100% for all the channels in the Group. Selecting multiple groups using the cursor (SHIFT + cursor keys) and then copying to a Playback creates a multi step Cue Stack of intensities – one Cue step for each group. This is an easy way to create, for example an intensity chase of your different moving light groups or your different par can colour groups.
You can select palettes from the keypad. Enable the Setup Option, "Select channels in Beam, Col, Pos". To select a palette use:
COL 5 ENTER
BEAM 3 ENTER
Timed fades can be entered at the same time – e.g. to apply colour palette 5 with a time of 4 seconds spread across all the selected heads:
COL 5 / 4 * ENTER
It is possible to record, include and remove Palettes from the keypad:
RECORD GROUP <group number> ENTER
RECORD POS <palette entry> ENTER
RECORD COL<palette entry> ENTER
RECORD BEAM <palette entry> ENTER
It is possible to merge Palettes from any previous show that uses the same type of heads - you can select the palettes from a specific head or all the heads that match with your current show.
It is possible to select Intensity, Position, Beam or Colour palettes, or combinations of the three attribute types.
To import the Palettes, press the LOAD PALETTES soft button in the View Palette window.
Select Add to only add the Palettes as new Palettes, or select Merge to merge those that match existing Palettes names and icons and add the unmatched ones as new Palettes.
Select All to load Palettes for all Heads in the show file, or Choose to select which Heads from the show file to use. Select Default Pal to only load Default Palette info from the show file.
When MagicQ merges Palettes with existing Palettes it ignores any default Palette information in the loaded Palettes, retaining default Palette information from the existing Palette. When adding Palettes any default Palette information is loaded into the new Palette.
Select Match DMX to only import Palettes that match the DMX address of those in the show. Select Match Head No to only import Palettes that match the head number of those in the show. Select Expand Head Type to import the Palettes for all heads of that head type in the show.
Alternatively from the Setup Window press the SHIFT + IMPORT SHOW soft button and select Palettes.
When palettes are recorded they become part of the show data and can be used during programming of the show. Recording palettes does not affect the personality file. This ensures that changes you make for the purposes of the show do not affect future shows.
It is sometimes necessary to update the personality file - either because the data in the personality file is incorrect, or to add extra palettes entries to the personality.
Pressing SHIFT when you select the palette entry to record, causes the changes to be copied through into the personality.
Note that if you have confirmations turned on then press SHIFT when you click on Yes in the confirm box rather than when you select the item.
When recording through into the personality file, the console takes the first selected head and copies the data associated with the palette entry you selected into the personality file. If the palette entry is already in the personality file (i.e. there is a palette entry with the same name as the one you selected) then that palette entry is replaced. Otherwise a new palette entry is created in the file.
You can examine the personality file, by going into the Patch Window and pressing the Edit Head soft button. Then press the Select Head button to choose the personality to examine.
Note that we recommend Importing Palettes rather than modifying the Personalities wherever possible. This ensures that you benefit from any updates ChamSys make to the personality.
You can program palettes by capturing real DMX data from another consoles. This provides a handy way of converting show data from one console type to another, or to back up data from one console on another.
In order to use DMX Capture the Input Universes in Setup, View DMX I/O must be set up to correctly receive data from the network or from MagicDMX.
First select the heads you are interested in. If no heads are selected then data will be captured for all heads.
In View Palette window use the PREV or NEXT buttons to move to an empty palette. Then use the CAPTURE PALETTE soft button to capture the values of this palette type (Intensity, Pos, Colour, Beam) and record them into the Palette.
If no heads are currently selected then capture is for all heads, otherwise only data for heads that are currently selected will be captured.
For auto capture, press SHIFT + AUTO CAPTURE. MagicQ will now automatically capture a palette of this palette type and save it to a free palette entry every time the DMX input changes. Press STOP capture to stop auto capturing palettes.
To use this function with another console first set up the DMX input then press AUTO CAPTURE and on the other console select all the different palettes for capture in turn. MagicQ will detect when it is receiving different data and will record a new palette for each one.
Change to the appropriate Palette Window - Intensity, Position, Colour or Beam.
Press CTRL and RECORD then select a Palette entry – this will load the DMX input data for the selected heads into the programmer and record it into the specified Palette entry.
Alternatively use Include to get the data into the programmer and record the Palette entry in the normal way for recording palette entries.
Press CTRL and INCLUDE and then ENTER. This will include the DMX input data for the selected heads into the programmer. The data can then be stored into a Palette in the usual way using RECORD.
You can grab all attributes of a moving head by changing to the Group window, pressing CTRL and INCLUDE, then ENTER.
The Expand Palette function allows data in Cues to be expanded to use all attributes from a Palette. For example, consider a show that is using heads with RGB colour mixing but now has been morphed to heads with extra colour wheels. The Cues programmed into the show do not have the extra colour wheel info - they just have RGB attributes. With Expand Palette it is possible to program the extra colour wheel attributes into the Palette and then expand the Palettes into all the Cues that use the Palette.
In the Intensity, Position, Colour or Beam Window press EXPAND PALETTE.
All programmed Cues that contain heads that use the Palette are expanded. Only heads that are already in the Cue, and that have at least one attribute using the Palette are expanded - it does not affect heads that are not in the Cue or heads that have no attributes from the Palette in the Cue.
To expand a range of palettes, open the Intensity, Position, Colour or Beam window, cursor select the required palettes and then press EXPAND PALETTE.
Heads that have some attributes in the Cue referencing the Palette but others using hard values, will convert the hard values to use the values from the Palette.
Heads that have some attributes in the Cue referencing the Palette but others using other Palettes, will not change the attributes that are using other Palettes.
To expand all the Palettes of a particular type press SHIFT + EXPAND ALL PALETTE. This will expand all of the Palettes in that Window.
Expanding Palettes is also supported in the View Palettes window.
To replace Palettes in one or more Cues in a Cue Stack with different Palettes, for example to change all the channels using the Green palette to use the Red palette.
In the Intensity, Position, Colour or Beam windows press REPLACE PALETTE. Then select the palette to replace, the new palette, and then the Plahyback to replace in.
If heads are selected in the programmer then the change will only affect the selected heads. If no heads are selected then all heads that use the palette are affected.
It is possible to select a specific Cue or a range of Cues by entering the Cue numbers before selecting the Cue Stack. If no Cues are specified then MagicQ will prompt whether to use the current Cue or all Cues in the Cue Stack.
Only channels that were already in the Cue will be changed - no new channels will be added. Channels that are using the original Palette but which are not in the new Palettes are unchanged.
Both levels using Palettes and FX using Palettes are changed.
To replace in multiple Cue Stacks or Cues then follow the steps above but instead of selecting a Playback, open the Stack Store or the Cue Store, cursor select the required Cue Stacks or Cues and the press ENTER.
Tracker Palettes are special palettes that use a remote tracker device rather than absolute values stored in the palette. MagicQ supports several different remote tracker protocols and can receive information for up to 20 Trackers. See Setup, View Settings, Network, Tracker rx.
By setting a Palette to be a Tracker Palette then wherever the Palette is used the channels follow the tracker device with an optional offset. Tracker palettes recorded with values of 128 for the pan and tilt attributes (0 degrees pan and tilt) will have no offset. Any other values will function as an offset to the tracker device.
To set a Palette as a Tracker Palette go to View Palette and press the SET TRACKER soft button. Then select Tracker and enter a tracker ID.
To unset a Palette as a Tracker Palette press SHIFT UNSET TRACKER or press SET TRACKER and select none.
The Tracker controls the base position. It is therefore possibel to add a FX on top of the tracker position - for example spots could be set to run a circle around the Tracker position of a moving car.
When a channel changes from control by an absolute value or normal Palette to a Tracker Palette then it uses the fade times to crossfade between the original position and the tracker position.
When a channel changes from control by a Tracker Palette to a absolute value or normal Palette then MagicQ used the fade times to crossfade from the tracker position to the new position.
Palettes can now have default values. Default Palette values are not specific to a particular head and can exist in a Palette even when there are no channels from Heads in the Palette. This is particularly useful for Group Cues where Heads may be removed from a show and new Heads added.
Default Palettes are automatically created whenever a Palette is recorded or updated according to the Auto Create Default Palettes setting. Prior to v1.9.4.2, default palettes were only created if Group Cues was enabled. Default Palette generation can be controlled by the Auto create Default Palettes option in Setup, View Settings, Cue Storage.
The Palette defaults are shown on the top row of the Palette View window. Default Palette values can be created using the DEFAULT PALETTE soft button in the Palette View window. MagicQ uses the existing channel data in the palette to create the values for the default attributes. Where attributes have range with range types - e.g. narrow iris, then then the attribute will be stored as a range type ratherthan a hard channel value. This enables the default to be correctly applied to new Heads added to the Palette.
Colour Palettes have additional information - they store a CIE X/Y value for the colour from the palette. Creating a Default Palette for a Colour Palette automatically creates a CIE X/Y value for the Palette. MagicQ uses the existing channel data to calculate the CIE value.
Press SHIFT + DEFAULT ALL PALETTE to add default values to all Palettes.
Press REMOVE on the Default Palette row to remove the Default Palette. To remove the Default Palette (including CIE X/Y values) from all Palettes press SHIFT + REMOVE DEF ALL PALETTES.
If required, the CIE value can be set on a Colour Palette without creating a Default Palette - press the SET CIE soft button to set a CIE value for the Palette. Press SHIFT + UNSET CIE to remove the CIE value.
The Palette default value is automatically used in Palette FX and Group Cues where there is no explicit channel data stored for selected heads in the Palette. This avoids the need for having explicit Palette data for all heads which reduces the show file size.
The Palette Default values are not currently used by Cues using individual Head data Palettes - this requires explicit channel data in the Palette.
To expand a Palette to all patched Heads press the EXPAND HEADS soft button. This adds attributes for all patched heads to the Palette using the default values. If no default values exists then it automatically creates default values first using the existing channel values in the Palette. Channels that already have explicit values in the Palette are not affected by EXPAND HEADS. If you wish to fully recreate a Palette from the DEefault Values then first remove the channel data (but not the Default Palette).
Default Palettes can be imported from any previous show file which used Default Palettes. In the Int, Pos, Col or Beam Windows press VIEW PALETTE to open the Palette View window, and then press LOAD PALETTES and select DEFAULT PAL.
MagicQ has a setting to automatically expand Palettes in Setup, View Settings, Cue Storage. This has been renamed to "Expand Heads in Palette". Previously this only expanded Heads of the same type. Now there are additional options to expand to all Heads.
| | ||