| |
| |
MagicQ software runs on PCs and Macs and can be downloaded free from the ChamSys web site www.chamsys.co.uk/download.
MagicDMX devices do NOT need any additional drivers – they use HID drivers within the operating system. Simply plug in the device and start MagicQ.
To confirm that the MagicDMX is operating correctly go to Setup, View System, View status, Interfaces. The MagicDMX Status should say "Connected" and "DMX out".
MagicDMX is enabled as DMX output by default. It can be disable/enabled from Setup, View Settings, Ports, MagicDMX.
There are two versions of MagicDMX interfaces with either a USB-A or USB-C connector, with the version with USB-C version being the newer version.
MagicDMX USB-C version: When first plugged in the MagicDMX alternates its LED between White and Red. When MagicQ is started and connects to the device then the LED flashes in Red only. When receving DMX the LED flashes in White. It is possible to patch the LED of the MagicDMX if a Generic 3ch RGB head is patched to address 510 on Universe 1.
MagicDMX USB-A version: When first plugged in the MagicDMX alternates green and orange LEDs every second. When MagicQ is started and connects to the device then the green LED is on permanently and the orange flashes faster as it receives data from MagicQ.
When using MagicDMX Basic and MagicDMX Full interfaces demo mode will continue to be shown at the top of the MagicQ window. This does not affect the programming of MagicQ or restrict the output if you have a MagicDMX Full interface. Demo mode does restrict some advanced MagicQ functions which are unlocked with MagicQ hardware (Not MagicDMX).
Current MagicQ Wings & Interfaces including Stadium Connect, Compact Connect and Mini Connect and the older PC Wing Compact and Extra Wing Compact do not require special driver installation.
Ensure the setting "Setup, View Settings, Ports, MagicQ Wings & Interfaces" is set to "Yes (auto DMX)"
Older MagicQ Wings (Mini wing, PC Wing, Maxi Wing, Extra Wing, Playback Wing, Execute Wing) and MagicQ DMX interfaces (Dual DMX, Audio, MIDI/SMPTE) use a USB chipset made by FTDI. PC Wing Compact & Extra Wing Compact should not require any manual drive For other MagicQ Wings & Interfaces or if for any reason MagicQ does not detect Compact wings, drivers can be manually updated using the steps below.
Note that the drivers for MagicQ Wings and MagicQ DMX interfaces are not applicable to MagicDMX Basic or MagicDMX Full. Do not attempt to install drivers for MagicDMX.
The GeNetix GN2, GN5 and GN10 have optional USB connection, enabling them either to be used in USB or Network mode.
When a GeNetix node is connected via USB to a PC (Windows, Mac or Linux) with MagicQ running then the GeNetix node runs in USB mode as a MagicQ interface connected directly to the MagicQ application.
In USB mode it is treated just like a MagicQ Wing or Interface with the configuration being controlled from within MagicQ rather than from within the GeNetix node. In this mode the node configuration is unused, although it is retained for when the node is used again in Network mode.
When in USB mode, the DMX outputs are configured in MagicQ from the Setup Window, VIEW DMX I/O. For GN5 and GN10 the MIDI, Timecode and 10Scene port are configured in MagicQ from the Setup Window, VIEW SETTINGS. The configuration is stored in the MagicQ show file as normal.
The node indicates USB mode on its front panel when in USB mode.
The node continues in USB mode even if the USB link is lost or MagicQ is stopped. To restart the node in Network mode, disconnect the USB or shut down the MagicQ and then power the GeNetix node on and off.
Note that the GN2 can run in network mode but still be powered from USB - provided that it is not connected to a PC running MagicQ – if MagicQ is detected it will be switched to USB mode.
MagicQ supports Windows 8, Windows 10 and Windows 11.
MagicQ Connect products do not need any drivers installed.
MagicDMX devices do not need any drivers - see Section 2.2, “MagicDMX”.
MagicQ runs on all types of Windows PC including both Intel and ARM based Microsoft Surface.
The drivers for older MagicQ products are included in the MagicQ download.
C:\Program Files (x86)\ChamSys Ltd\MagicQ\MagicQ Wing Drivers
Disconnect all MagicQ Wings and Interfaces except the one you are trying to install the driver for.
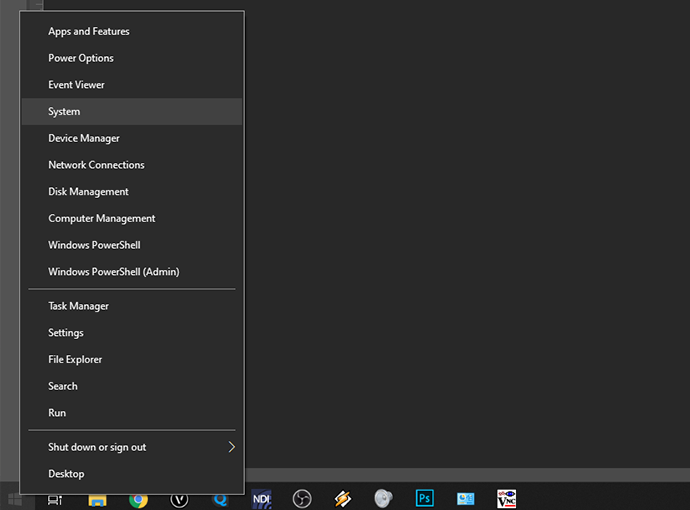
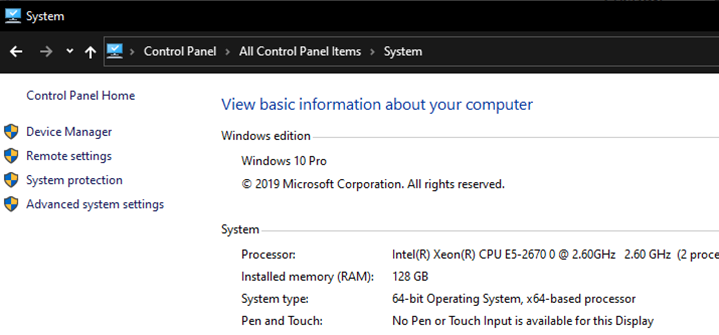
Open Device Manager. This is found in different places depending on the version of Windows, but it can normally be accessed by opening Control Panel and then selecting System, and then selecting Device Manager.
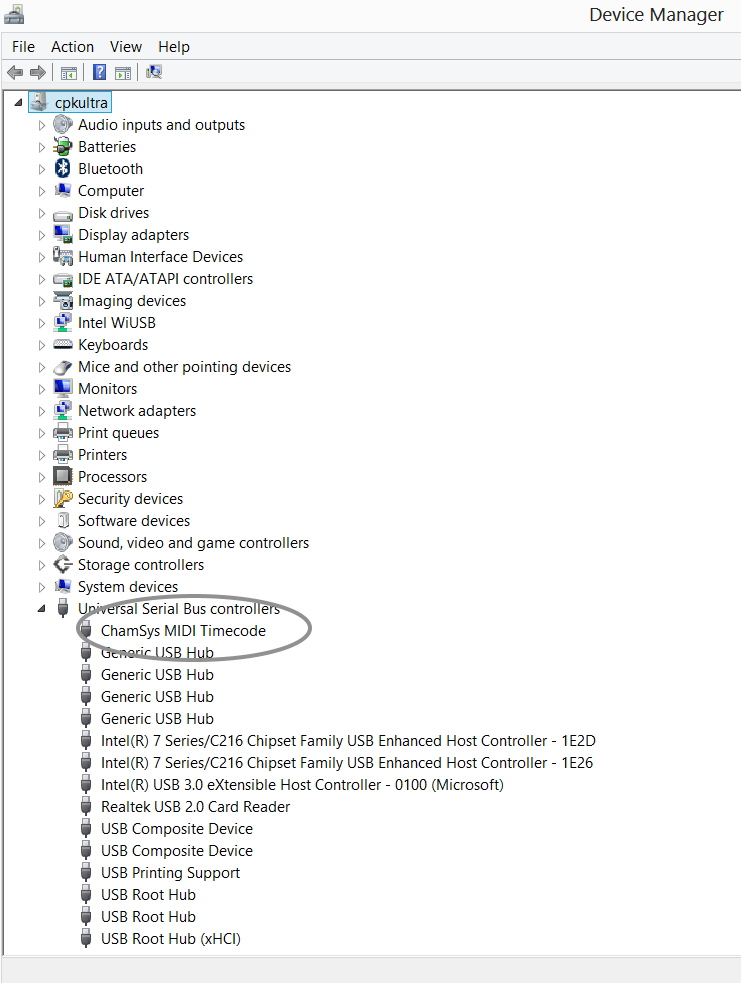
Device Manager lists all the devices on your system. The MagicQ device is normally listed at the bottom under Universal Serial Bus Controllers but it may be under any other section. It may be listed as a ChamSys or MagicQ device or just as a FTDI device. If you can not find it then try disconnecting and reconnecting the USB cable to the device - the listing should update and indicate to you which device is being plugged/unplugged.
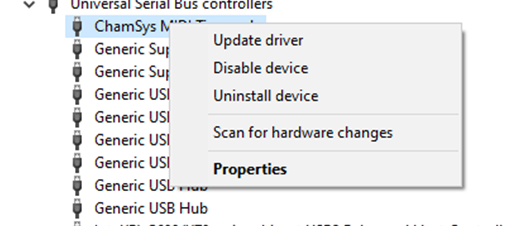
When you have identified the device then right click and press Update Driver.
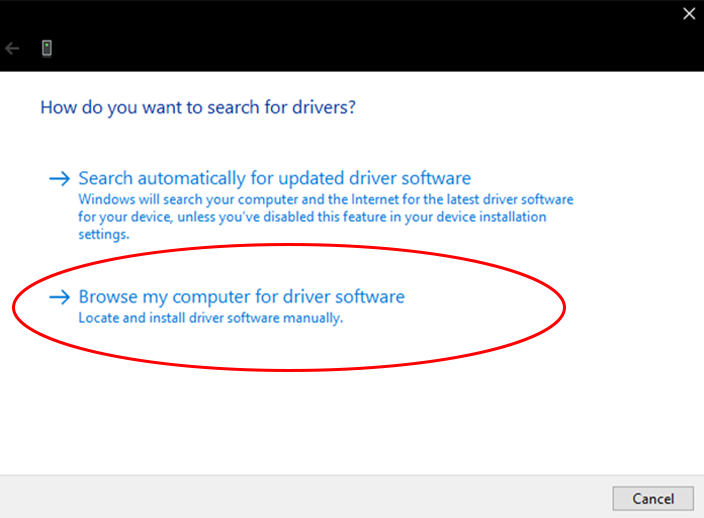
Select "Browse My Computer for Driver Software (Locate and Install Driver Software Manually)". Do not let Windows search for a driver.
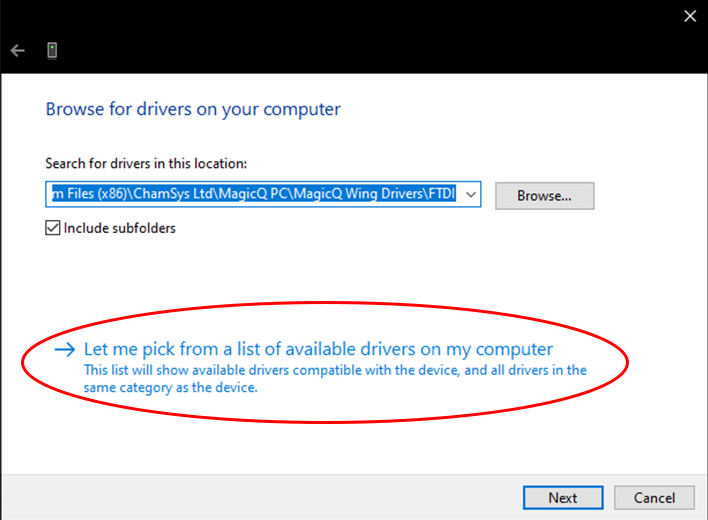
Select the option "Let me pick from a list of device drivers on my computer".
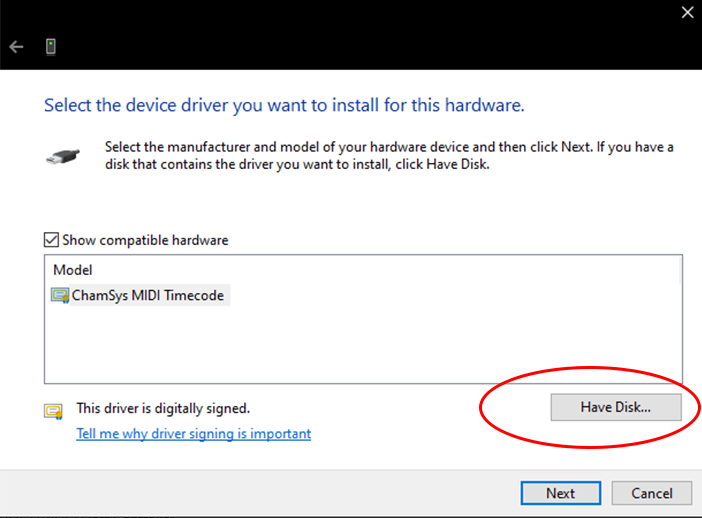
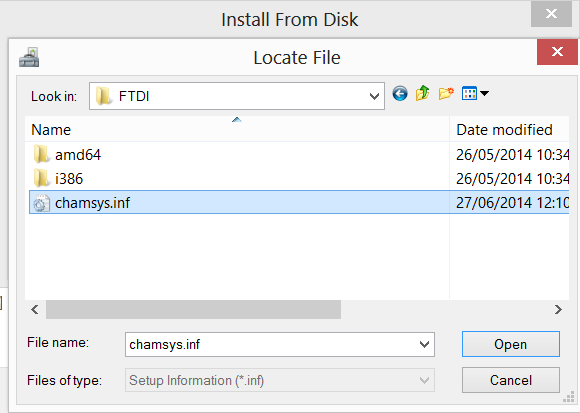
Select "Have Disk". If you cannot find "Have Disk" then click on items in the list until you get it.
For PC Wing Compacts the drivers are in
C:\Program Files (x86)\ChamSys Ltd\Magicq\MagicQ Wing Drivers\PC Wing Compact\CDM 2.08.24 WHQL Certified\ftdibus.inf
PC Wing Compacts require MagicQ software version 1.5.8.0 or above.
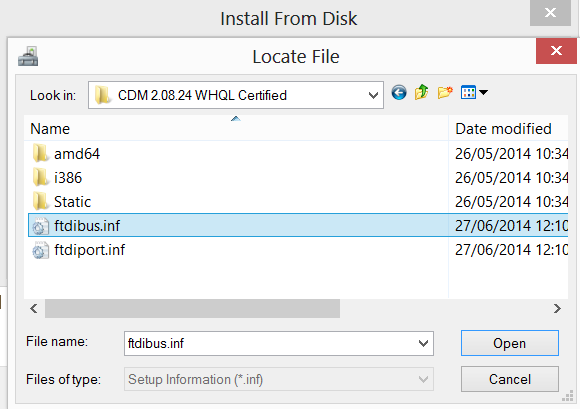
For all other products the drivers are in
C:\Program Files (x86) \ChamSys Ltd\Magicq\MagicQ Wing Drivers\FTDI\chamsys.inf
If the MagicQ USB wing periodically disconnects and restarts then check the Windows settings for your USB ports - Windows may be shutting down the USB ports when it incorrectly thinks they are idle. Click on Control Panel, System, Device Manager and scroll to the bottom to get a list of the USB devices. For each USB Root Hub click on Properties, Power Management and make sure that the option "Allow the computer to turn off this device to save power" is NOT selected.
On some Windows systems the Update Drivers dialog will not show the driver files even though they are correctly in the MagicQ Wing Drivers folder. In this case try copying the whole MagicQ Wing Drivers folder to the desktop (using Windows Explorer) and then try to update the drivers again.
On new installs of MagicQ, show files are stored in Documents/MagicQ/show/ in your home folder.
If you have upgraded MagicQ from an old version, then your show files may instead be stored in one of the folling locations:
C:\Users\username\AppData\Local\VirtualStore\Program Files\ChamSys Ltd\MagicQ PC\show
C:\Program Files (x86)\ChamSys Ltd\MagicQ PC\show
If MagicQ does not store settings after a restart - it forgets the number of universes, IP address or DMX I/O settings - then this is likely caused by Windows restricting write access to the folders where MagicQ stores this data. Check permissions.
To check if permission settings are causing issues, try to run MagicQ as administrator. Right click on the MagicQ desktop icon and select run as administrator from the options menu.
MagicQ should not be run as an administrator in normal operation - this is only recommneded as a troubleshooting step. Complete functionality is available as a normal user. |
Windows controls the level of access to system folders through the User Account Control Settings. This can be found in Control Panel, User Accounts, Change User Account Control settings. Setting this to "Never Notify" will make Windows less restrictive. Note that for security reasons this is only recommended for stand alone systems dedicated to MagicQ which are not connected to the internet - please make sure you understand the implications for your computer, before changing this setting.
MagicQ Supports macOS 10.12 and 10.13, 10.14, 10.15, 11 and 12.
Note when using Apple M1 hardware ensure that MagicQ is installed via Rosetta.
No driver installation is required for MagicQ wings and interfaces.
On MagicQ v1.9.0.5 and older, wings and interfaces must be powered up and connected before MagicQ is started.
On MagicQ v1.9.0.5 and older (except for PC Wing Compact and Extra Wing Compact), wings and interfaces require going to SETUP → VIEW SETTINGS → Ports → MagicQ Wings & Interfaces and changing to FTDI + VCP driver, auto DMX.
MagicQ downloads for unsupported versions of macOS are available from the Legacy Downloads page.
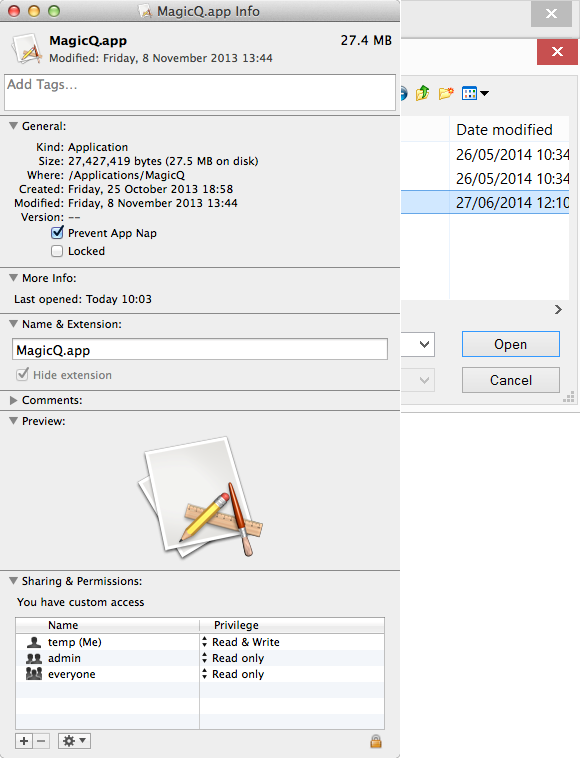
On all versions we recommend you disable Computer sleep and turn off App Nap to avoid MagicQ being shut down inadvertently.
/Applications/MagicQ/ folder
If you get the message "Cannot write file" when trying to save a show file, or your settings changes are not saved then check that the MagicQ folder and all its subfolders have both read and write permission.
If you get a message starting with "MagicQ needs to write to the install folder…", you will need to check the permissions of the "MagicQ" folder. There are detailed steps in the troubleshooting chapter.
MagicQ can be installed on current Ubuntu LTS releases (14.04, 16.04 18.04 and 20.04) 64 bit.
You can download MagicQ for Linux from the bugtracker.
Using older MagicQ wings and interfaces requires the ftdi_sio kernel driver which is included as standard on most Linux distributions.
We cannot provide support for Linux specific issues; the best place to ask questions is on community forums and social media websites.
MagicQ for Linux is only available for 64 bit AMD/Intel systems. We no longer provide downloads for 32 bit Linux from version 1.8.0.3. MagicQ will not run on other architectures (e.g. ARM). |
To install the downloaded .deb file, run the following command in a terminal:
sudo dpkg -i magicq_ubuntu_vx_x_x_x.deb
Replacing the filename above the the name of the downloaded file.
Automatic scaling for high resolution screens is disabled by default as with some screens it made the MagicQ user interface too big.
From version 1.8.0.4 you can create a file called .magicq_init.sh in your home directory (/home/USERNAME/.magicq_init.sh) and make sure it has executeble permissions.
# ~/.magicq_init.sh
# Uncomment the following line if you want MagicQ to try to scale automatically
#export QT_AUTO_SCREEN_SCALE_FACTOR=1
# Uncomment and adjust the following line if you want to manually decide how to scale MagicQ
# You can specify a fractional number (e.g. specify 1.5 to make it 50% bigger)
#export QT_SCALE_FACTOR=1.0
# If you have multiple screens that need different scaling, uncomment and set the following
# line to a semicolon-separated list of scale factors
#export QT_SCREEN_SCALE_FACTORS=1.5;1.0
See https://doc.qt.io/qt-5/highdpi.html#high-dpi-support-in-qt for more information on the environment variables in this file.
| | ||