| |
| |
Each media layer can display either a movie, a static image, or play audio. A mask can be used to control which parts of the layer are visible.
The DMX parameters for the layer allow you to control the following features.
Intensity is used to fade the layer into, or out of, the output. As a layer’s intensity reduces, lower layers will show through.
Intensity also controls the audio volume for the layer.
Scale increases or reduces the size of the layer in the output.
Note that when magnified, low resolution content can look poor.
Rotation allows a layer to be rotated around its centre point. The centre point is controlled by Position.
Mirror and flip allow the layer to be flipped (reversed horizontally or vertically), mirrored (reflected about the centre line, horizontally or vertically), or both.
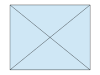
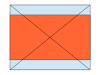
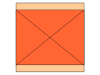
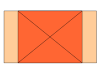
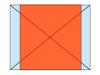
Stretch controls how the layer fills the screen. Every media file has an associated aspect ratio and this might not match the aspect ratio of the screen or projector. Stretch controls how the two aspect ratios are reconciled:
| Mode | Screen | Media | Result | Note |
|---|---|---|---|---|
Fill X |
|
|
| Media aspect ratio maintained |
Fill X |
|
|
| Media aspect ratio maintained. Overflows Y |
Fill Y |
|
|
| Media aspect ratio maintained. Overflows X |
Fill Y |
|
|
| Media aspect ratio maintained. |
Fill X & Y |
|
|
| Media stretched in Y. Aspect ratio lost |
Fill X & Y |
|
|
| Media stretched in X. Aspect ratio lost |
Colour effect, along with the associated R, G and B effect parameters, allows you to alter the colour of the layer in a number of ways. Full details are in the DMX parameter.
Here are some examples:
| Colour Effect | FX R | FX G | FX B | Result |
|---|---|---|---|---|
Posterise | 3 | 3 | 3 | Each of R,G,B quantised to 4 levels. |
Colourise | 255 | 130 | 40 | Sepia |
Colourise | 0 | 255 | 0 | Black & Green (“night vision”) |
Mask | 0 | - | - | The layer is used as a mask. The lighter the image, the more transparent it is. If the image is black and white, white will show the layer below, and black will not (and will show as black). |
Key | 85 | 128 | 255 | “Green screen” : any pure green will become transparent. |
RGB Select | 3 | 2 | 1 | RGB → BGR colour swap |
RGB Select | 5 | 6 | 7 | Inverted colour |
RGB Select | 8 | 8 | 8 | Inverted black and white |
RGB Select | 0 | 2 | 0 | Green only (similar to Black & Green) |
RGB Select | 0 | 4 | 0 | Black & Green |
A large number of effects are possible, and the best way to understand the parameters is to experiment. The ChamSys masks media folder (folder 3) includes an HSL colour chart and a TV test image. Both of these include solid colours and are very useful for testing out colour effects. |
Blend controls how each layer is blended with the one below, in terms of colour and intensity. Blending takes place from the lowest layer upwards: Layer 2 blends with Layer 1, then Layer 3 blends with the result of 1 and 2, and so on.
Normally layers are simply blended by brightness and transparency: when a layer is completely opaque (full intensity, no mask), nothing can be seen through it. Normally, as a layer is faded, it becomes transparent so things below it start to show through. If a mask is applied, dark areas of the mask make the layer transparent, allowing layers beneath to show through.
These allow the media for the layer to be selected. If either are zero, the layer is switched off.
Start and end frame allow frame-wise control of which part of a clip is played. The default values are a start frame of zero and an end frame of 16777215 (224-1) which mean the whole file is to be used. If the end frame is less than the length of the clip, playback will stop (or loop) when the end frame is reached. Similarly playback can be started at any point in the file by setting the start frame.
To set the start and end frame accurately, you can use the First Frame or Last Frame Play Mode whilst changing the start or end frame values respectively.
To take complete control of playback speed (e.g. to bounce a clip between two points in time to a beat), use First Frame play mode, then apply a ramp effect to the start frame channel.
|
Turning on the HUD for the layer being programmed will help since the start and end frame markers are shown on the media bar. |
Use the speed parameter to control the speed and direction of media playback. Negative speeds cause playback in reverse. A speed of 0 stops playback (although see pause mode).
Up to 2 times normal speed, every frame is played. Bear in mind, therefore, that playing an HD clip x1.9 faster will nearly double the processing load for that layer. Above x2, frames are dropped to reduce the processing load. There is still an increased load for all but whole number multipliers: at x4.7, 3 out of every 4 frames are dropped, so the remaining load is x1.7.
Since there is an inherent loss of quality at high playback speeds (because the human brain can’t process the imagery so well), consider the quality and resolution of the source material carefully.
Play mode allows a movie clip to be played in a number of different ways:
The movie is played one, from the start frame to the end frame, controlled by the speed parameter.
Playback finishes on the last frame, which is held. If playback is in reverse (negative speed) the last frame is actually the start frame.
The same as Once, except the layer automatically blacks out after the last frame. This removes the need to set, and accurately time, a second cue to fade the layer at the end.
The same as Once, except playback loops to the first frame after the last frame.
When playing forwards, first = start and last = end. When backwards, first = end and last = start.
The same as Loop, except the direction automatically changes each time.
Note that the speed parameter is automatically reversed, so that changes in magnitude do not suddenly reverse the direction if the sign of the speed does not match the direction. i.e. once the first reverse has taken place, only the magnitude of the speed parameter has any effect unless the speed crosses zero, where the direction of bounce would also change.
The same as Once however playback jumps back to the first frame when intensity is reduced to 0 and then increased.
The same as Once-then-black however playback jumps back to the first frame when intensity is reduced to 0 and then increased.
The same as Loop however playback jumps back to the first frame when intensity is reduced to 0 and then increased.
The same as Bounce however playback jumps back to the first frame when intensity is reduced to 0 and then increased.
The current first frame is always shown. Although playback is therefore not “dynamic”, the start frame parameter can be altered in real time to control playback.
The current last frame is always shown. Although playback is therefore not “dynamic”, the end frame parameter can be altered in real time to control playback.
Playback is paused at whatever the current frame is. This mode can be used in conjunction with other modes, and cues, to achieve more complex playback effects. For example it allows playback to be paused without setting the speed to zero, so playback can be restarted with the previous speed. The “resume” cue does not need to have the playback speed programmed.
Advances the frame that is displayed, according to the speed parameter (i.e. direction and frame skipping for high speeds still apply), then automatically pauses. The mode must be changed away (e.g. to Pause), then back, before this mode can change the frame again.
Pause can be used in conjunction with Next Frame (or other modes) to achieve more complex playback effects such as moving through a slide show. |
This parameter controls how opaque the mask is. If the opacity is full, the mask has complete control over the transparency of the layer. As the opacity is reduced, the mask has less effect: black areas that would have been completely transparent becomes less so, allowing less of the lower layers to show through. As opacity reduces to zero, the mask is effectively switched off.
These allow the mask for the layer to be selected. If either are zero, no mask is selected. If a non-image file is selected (i.e. a movie, audio or text file) the mask will have no effect.
This parameter allows the intensity of the mask to be inverted. This means that what would be fully transparent becomes fully opaque and vice-versa.
The same mask can be used in two layers, inverted in one layer, to produce synchronised masking effects, as shown in this example.
This allows the orientation of the mask to be controlled independently from that of the media file for the layer.
If anything other than this simple level of control is required, the mask must be used by itself in a different layer so that it can be independently positioned and rotated.
This parameter governs how the aspect ratio of the mask image is matched to that of the layer’s media. As far as the mask is concerned, the screen that it is being stretched to is actually the media file. If, for example, the media is appearing letter-boxed, setting mask stretch to Fill X & Y stretches the mask to the same extent as the media thereby altering the mask’s aspect ratio.
This parameter controls the audio level for the layer. A gain of zero turns off the audio playback. Note that the range is 0 to 10. For most purposes 0.5 to 2.0 will suffice. High gains can be used to boost very quiet clips.
This parameter is mainly intended to allows clips with different peak levels to be equalised.
This parameter allows a variety of physical effects to be applied to the layer, independently from the Colour Effect. Full details are in the DMX parameter.
| | ||