| |
| |
Media refers to movies, images, audio, and text files. MagicHD can display all common image formats, and play almost any format of movie or sound file, although a number of restrictions apply. If you want to do anything other than play the entire movie forwards at normal speed the movie must contain only I-frames. This is because playing backwards, skipping frames, or randomly accessing points within the clip requires that any frame can be displayed by itself. Performance will also be affected by file size, so consideration must be given to the quality (i.e. degree of compression) of the media.
Media is always addressed by a pair of DMX channels: folder and file. Wherever a media file can be selected, you will find the folder/file parameters. If MagicHD can’t make sense of the selected file, in the context, it will be ignored. For example an audio file could be selected as a mask, but it will not have any effect because it is not an image. When selecting media, if either the folder or file is zero, the effect is ‘no selection’.
MagicHD translates DMX folder/file values into actual filenames by looking in an index file. For MagicHD to be able to open a media file, the file must be in the index. The index file is automatically generated and the user is not expected to read or edit it.
MagicHD is supplied with a library of basic content to get you started, but most users will want to add their own content. Folders 1 to 9 are reserved for ChamSys libraries, and you are free to use folders 10 to 255 in any way you like. Folder and file numbers do not have to be sequential.
Internally MagicHD stores media in numbered folders. Within each folder the file names start with a number. The folder and file number are the DMX folder/file parameters used to select that file. An index file is used to tell MagicHD which files to actually use. For MagicHD to be able to use a new file it must be named correctly, placed in the right folder, and added to the index. To simplify this process, it is automated:
MagicHD monitors a folder called convert. When media files are added to that folder they are automatically converted (if required) then moved to the show’s media folders. Once converted, the files are added to MagicHD’s media index and can be used right away (without restarting).
Files must be placed in a subfolder, under convert, whose name starts with a number (nnn, below). This number is taken to be the folder number of the resulting media file. The rest of the folder name is optional and is ignored by MagicHD. The file’s name must start with a number (fff, below) then an underscore. This number is taken to be the media’s number within its folder. The rest of the filename, after the underscore, is copied with spaces converted to underscores. User folders start from 10 and file numbers start from 1:
    .../MagicQ PC
          `- convert
                +- nnn_folder_name
                :    `- fff_file_name.mov
Monitoring for new files, and converting them, are background activities and do not impact playback. MagicHD only looks for changes to files, or the addition of files or folders. Any files already in place when MagicHD starts will be ignored. To trigger conversion of existing files just edit the file or folder name: adding or removing a leading zero is sufficient. From the MagicQ PC menu, Media Player → Convert Media can be used to force MagicHD to re-convert everything in the convert folder. This can be useful if new media has been prepared in situ before starting MagicHD. The criteria for triggering conversion (rather than just copying the media) are:
| Movie content | Action |
|---|---|
Non I-frames | Converted to a VP9 encoded video with all keyframes. Note that this process decompresses the video, usually resulting in a much larger file than the original. |
Audio | Converted to 2-channel stereo 16 bit PCM if present. |
Video codec | Any content encoded with the jpeg2000 or cinepak codecs is converted to VP9. These codecs have been found to cause problems with thumbnail extraction. |
Pixel Format | MagicHD can only decode a fixed number of pixel formats (the representation of colour data within each frame). Content that uses unknown formats is converted to VP9 with a known pixel format. |
Pictures and text files are copied unchanged, as are any movies or sound files that already meet the criteria above.
If you wish to exercise full control over the quality and format of your content, prepare it offline before placing it in the conversion area. If the content meets the basic criteria of all I-frames and no audio, it will not be converted, thus preserving the original quality and format.
This diagram illustrates the relationship between the convert folder and the resulting media:
User files                      Resulting media

.../MagicQ PC                   .../MagicQ PC
     |                               +- show
     +- convert                          +- media
         +- 10myclips                        +- 010
         |   +- 1_sky.avi                    |   +- 001_sky.avi
         |   +- 2_planets.mp4                |   +- 002_planets.mp4
         |   `- 3_concert.mov                |   `- 003_concert.mp4 (1)
         +- 011_masks                        +- 011
         |   +- 10_mask1.bmp                 |   +- 010_mask1.bmp
         |   +- 30_mask2.jpg                 |   +- 30_mask2.jpg (2)
         |   +- 30_mask2a.jpg                |   +- 030_mask2a.jpg (2)
         |   `- 40_mask3.png                 |   `- 040_mask3.png
         +- 99text                           `- 099
             +- 001_banner.txt                   +- 001_banner.txt
             +- 2_story.txt                      +- 002_story.txt
             `- 9_orion_lyrics.txt               `- 009_orion_lyrics.txt
Note:
None of the following files would be converted, for the reasons given:
.../Magic PC
    +- convert_files
    |   +- 1_one.avi             wrong root folder
    +- convert
        +- 2_two.mp4             not under a numbered folder
        +- clips
        |   `- 3_three.avi       folder has no number
        +- 1_folder_one
        |   `- 4_four.png        only folder numbers 10 to 255 are allowed
        +- 10_new_media
        |   +- five.txt          file has no number
        |   +- 0_six.txt         only file numbers 1 to 255 are valid
        |   +- 7_seven.doc       only .txt files are allowed for text
        |   `- 300_seven.txt     only file numbers 1 to 255 are valid
        +- 20_more_movies
            +- E_eight.mp4       'E' is not a number
`- 9nine.mp4 number not separated by an underscoreTo simplify the conversion process you can use the "Convert File" menu option. This allows you to choose a file, then choose where it goes in the media index. MagicHD will then convert or copy the file and add it to the index.
To simplify deploying the media for a show, and deploying media from one player to another, MagicHD performs some automatic housekeeping processes in the background:
Because of these automatic checks, it is possible to manage your media content directly in the show folder by editing the folder and file numbering. When finished, simply delete the index file and thumbnail folder, then start MagicHD. Alternatively, use the menu options Media → Rebuild Index and Media → Rebuild Thumbnails.
Please note the following points:
The conversion process is:
 |
You can monitor conversion progress by bringing up the HUD. |
To force MagicHD to reload a file that has changed, select a different file, then select the original one. |
To force conversion of an existing file, edit the filename and add/remove a 0 at the start. This doesn’t change the file’s number, but does cause a change that MagicHD will notice. |
Each media file has a small thumbnail image associated with it. These thumbnails are used by MagicQ to display the contents of each media folder in the media window.
If any thumbnail file is found to be missing, or older than the corresponding media file, it will be automatically regenerated.
| Media | Thumbnail |
|---|---|
Movie | Frame at 10% duration(1) |
Picture | The picture |
Sound with attached picture(2) | The attached picture |
Sound | Fixed audio thumbnail |
Text | Fixed text thumbnail |
(1) Note that there is no way for MagicHD to know whether the chosen frame is representative or useful!
(2) For example, MPEG-4 audio file format (.m4a) supports attached pictures.
Thumbnail regeneration can be forced from the menu. |
If the media index file is missing MagicHD will automatically regenerate it from the media files in the show.
Note that all media will be included in the index. There is no way to mark a file as not part of the show, other than obscuring its folder and/or file number (e.g. add _ or hide. at the start of the folder or file name).
If multiple files or folders have the same number, MagicHD will take the youngest one. This favours recently added or changed media. The old media will still be there, but will not be in the index. This also means that if you make a mistake during conversion or file copying, you will not lose any media (unless the file name is exactly the same).
Index regeneration can be forced from the menu. |
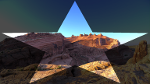
A mask is simply an image whose intensity is used to control the brightness of some other media behind it. White areas are totally opaque and black totally transparent. Shades of grey scale between the two. Any image can be used as a mask. Colour is converted to transparency by taking the black & white intensity of the image. The simplest masks have just black and white areas, and hide the layer (allowing lower layers to be seen) where they are black.
Each media layer can select a mask whose position is automatically synchronised with the media for that layer. As the layer is scaled, positioned or rotated, the mask is too. This is the easiest way to use a masks.
Any media can be used as an independent mask by loading it as the media in its own layer. If the media has transparency, this will reveal the layer below automatically. If you wish to control how the mask works, use the Mask colour effect.
Using a layer as a dedicated mask means that movies can be used as masks as well as images. |
The output layer can select a mask which is applied over all the media layers. This can be used for static effects such as shuttering or edge blending; or dynamic effects that apply to all layers at once.
For best results create your masks at the same resolution as your media, and use anti-aliasing to minimise visible pixellation around curves etc. |
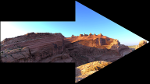
If we look at one frame of video and a simple black & white arrow as a mask, the results are as follows:
| + |
| = |
|
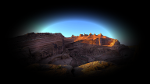
If we have a more complicated grey scale mask, the effect is as follows:
| + |
| = |
|
And if we use a coloured mask, this is the result:
| + |
| = |
|
The examples above have the mask fully opaque. Reducing the mask’s opacity reduces its effect. Here is a mask at 0.33 opacity:
| + |
| × 0.33 = |
|
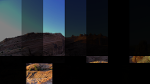
One image can produce a number of different masks depending on its flip and invert parameters:
| Normal | Horizontal Flipped | Vertical Flipped | H&V flipped | |
|---|---|---|---|---|
Normal |
|
|
|
|
Inverted |
|
|
|
|
If the same mask is used on two layers, inverted in one, the layers can be blended together as follows:
Layer 1 |
| + |
| = |
|
Layer 2 |
| + |
| = |
|
Output Layer |
|
Note that it is not actually necessary to use the mask on layer 1, since layer 2 overlays it anyway. The effect of the mask in layer 1 is that as layer 2 is faded out, layer 1 retains the black masked out area.
Whatever the aspect ratio of an image used as a mask, its “screen” is the extent of the media for that layer. If the mask is stretched to Fill X & Y it will fill the area occupied by the media, not necessarily the whole screen. This can be overridden by the mask stretch parameter for the layer.
MagicHD can play most common audio formats directly. Audio files should be added just like any other media.
If audio is present in a movie file, it will automatically be converted to the correct format when the media is converted (even if the video is already in the correct format). MagicHD will then play the audio content if the following criteria are met:
| Parameter | Value |
|---|---|
Direction | Forwards |
Speed | Normal (i.e. +1.0) |
Mode | Once, Once+Black, Loop |
Gain | > 0 |
Intensity | > 0 |
Audio Codec | 16 bit PCM |
MagicHD does not play audio backwards or at different speeds, so Play Mode or speed that are not compatible will result in the audio output stopping for that layer.
Each media layer has an audio gain and an audio pan control. Gain sets the level for audio playback and should be used to balance the volume of the clip against other clips in the show. It can be used to boost quiet clips or attenuate loud ones. Pan moves the stereo signal from left to right. The volume for each media layer is automatically faded with the layer’s intensity. Sections of audio-only media can be selected using the start and end frames, just like any other media. In this case MagicHD uses a simulated 25 frames-per-second.
|
The output layer has an audio volume control. The overall volume of all layers is controlled by the output layer’s volume, which is also faded with the output layer intensity.
The audio output device can be chosen from the MagicHD application menu (Media → Audio devices). The list of devices is provided by the operating system: MagicHD simply allows the user to choose one. The output device can be changed while MagicHD is running, but of course this will interrupt any audio that is playing. MagicHD remembers the selected device in the show file (combined version) or its settings file (stand-alone version).
If the list of audio devices changes, MagicHD won’t change audio output, but the menu might not show the right selection. Select a different device to ensure the setting is correct. Similarly, if the list of devices changes when MagicHD is not running, the setting it has saved in the show file might be out of synch with the new device list.
The HUD shows audio level superimposed on the layer’s intensity, next to its thumbnail. If the level is peaking, the display goes bright.
If a layer has audio but it is not being played for some reason (e.g. gain is zero) a "no audio" icon is displayed over the thumbnail indicating lack of audio.
If a layer has audio but no video an animated thumbnail is shown on the HUD and in the MagicQ media window. This shows you that an audio file is selected.
If you are having problems playing audio use the HUD to examine the status. |
| | ||