| |
| |
MagicQ supports an automation system to enable it to automatically respond to both external, internal and timed events. MagicQ can trigger on external events such as MIDI notes, DMX input, serial input, timecode, and the remote contact input. MagicQ can also trigger on internal events such as system startup, system shutdown and system powerfail. In addition MagicQ can trigger on timed (scheduled) events.
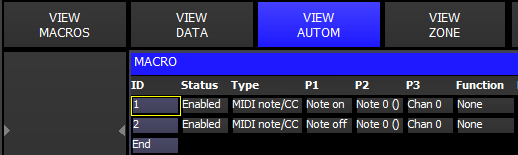
The Automation Window (Macro, View Autom) is used to manage all of the automated events. The Automation Window supports multiple events with each event being subject to specified parameters.
Each event then triggers a particular MagicQ function – this can be a function on a Playback, a Cue Stack, a Cue, a Page, a Macro or a Layout.
MagicQ can take a parameter from the event trigger and pass it to the function – for example, it could take the velocity from a MIDI note event and trigger a Playback, Cue Stack, Cue or Execute level using that velocity.
Automation is only supported on MagicQ PC/Mac when connected to a MagicQ USB Wing, MagicQ USB Interface or SnakeSys product.
Automations can be globally enabled or disabled from the Autom setting in Setup, Vierw Settings, Mode.
From MagicQ v1.9.0.0 onwards Automations were expanded, so that MagicQ now supports up to 1000 Automations.
Each event can have up to 3 parameters (P1,P2,P3) to filter the event further.
| Event | P1 | P2 | P3 |
|---|---|---|---|
Scheduled | Time | Date mask | |
MIDI note | Mode - on, off or both | Note | Channel – 0 for all |
MIDI sysex | number of bytes to match | P2 is byte string | P3 is the byte to pass to the function |
MIDI clock | Divisor | ||
Timecode | Start timecode range | End timecode range | |
Remote | Mode - on, off or both | ||
DMX | Level | Channel | |
Serial port | number of characters to match | P2 is character string | P3 is the character to pass to the function |
Tracker | Type - inside, outside, enter, exit | Tracker ID | MagicVis object |
Scene Setter Button | Button number 1 to 16 | ||
OSC | OSC Command maximum 15 characters | ||
Startup | |||
Shutdown | |||
Power fail | |||
Emergency | |||
Breaker | Mode - on, off, both, tripped, faulty | Lyntec Device | Circuit |
External Autom events can be simulated within MagicQ using the keyboard.
For MIDI note events type testmidi followed by the 3 MIDI bytes - e.g. to test note on for note 10 at velocity 127 enter testmidi 144,1,127
For MIDI system exclusive events type testsysex followed by the required MIDI bytes in hexadecimal representation, e.g. testsysex BABE to match 0xBA for the first byte and 0xBE for the second byte
For OSC events type testosc followed by the OSC string, e.g. to go PB1 enter testosc /pb/1/go
For serial events type testser followed by the serial bytes, e.g. to simulate the bytes 1,2,3 enter testser 1,2,3
For remote remote input event, type testinput followed by polarity and option input number, e.g. to simulate remote input closed enter testinput 1
For breaker events type testbreaker followed by Lyntec device ID, Lyntec circuit and then the Status. Status is 0 for On, 1 for Off, 2 for On and Off, 3 for Tripped and 4 for Faulty
For emergency hot takeover, use SHIFT and SET EMERGENCY ON and SET EMERGENCY OFF soft buttons in Setup, View DMX I/O.
The following functions are supported with each function having up to 3 function parameters F1, F2, F3.
Function | F1 | F2 | F3 |
PB a,r,level | Playback num | ||
PB level | Playback num | ||
PB activate | Playback num | ||
PB release | Playback num | ||
PB act full | Playback num | ||
PB go | Playback num | Cue ID | |
PB go cue ID = level | Playback num | ||
PB back | Playback num | ||
PB ffwd | Playback num | ||
PB fbck | Playback num | ||
PB jump | Playback num | ||
Stack toggle | Cue Stack ID | ||
Stack activate | Cue Stack ID | Cue ID | |
Stack release | Cue Stack ID | ||
Stack a,r,level | Cue Stack ID | Cue ID | |
Stack random | Start Cue Stack ID | End Cue Stack ID | |
Cue toggle | QID in Cue Store | ||
Cue activate | QID in Cue Store | ||
Cue release | QID in Cue Store | ||
Cue a,r,level | QID in Cue Store | ||
Exec toggle | Exec Grid ID | Item ID | |
Exec activate | Exec Grid ID | Item ID | |
Exec release | Exec Grid ID | Item ID | |
Exec level | Exec Grid ID | Item ID | |
Run macro | Macro ID | ||
Change layout | Layout num | ||
Display message | |||
Change page | Page num | PB to activate | |
Change page release main | Page num | PB to activate | |
Change page release all | Page num | PB to activate | |
Speed Master Tap | Speed Master ID | ||
Speed Master Step | Speed Master ID | ||
Lyntec zone on | Device ID | Zone | |
Lyntec zone off | Device ID | Zone | |
Lyntec circ on | Device ID | Circuit | |
Lyntec circ off | Device ID | Circuit | |
Emergency On | |||
Emergency Off | |||
Emergency State | |||
Reboot PC | |||
Power Off |
For Playback (PB) functions, F1 is the Playback number. MagicQ consoles support control of all 202 playbacks. MagicQ PC supports control of the first 10 playbacks (PB1 to PB10).
For Stack functions, F1 is the Stack number. F2 is a Cue ID for Stack activate, and Stack a,r,level only.
For Cue functions, F1 is the Cue number (Qid) within the Cue Store.
Stack random enables the activation of one Cue Stack in the Cue Stack range F1 to F2. Each time the automation triggers all Cue Stacks in the range are deactivated, and one Cue Stack in the range is selected by random and activated.
For Macros, F1 is the keyboard macro ID. 0 means stop all playing keyboard macros.
For Page functions, F1 is the Page Number and F2 specifies a Playback to be activated on the Page Change (0 = none) and a Cue Id to jump to on PB go and PB jump.
For Display Message, the Description field is used to specify the message.
For Speed Master Tap and Speed Master Step the Speed Master ID is SP1 to SP100.
For Lyntec functions, F1 is the Lyntec Dev ID in Net Manager, VIEW LYNTEC. F2 is the Zone from 1 to 12 for Zone functions and the Circuit from 1 to 210 for Circuit functions.
For Emergency State, if the incoming level from the Event is greater or equal to 128 then the Emergency will be set on.
The current state of the function is shown in the Status field.
If you add MIDI events then these override the miditable.txt file – the file is completely ignored.
The MIDI Clock enables triggering from the MIDI clock. The divisor can be specified to trigger on half note, full note or higher.
If you add serial port events then these override the normal ChamSys serial remote protocol functions. The serial port settings in Setup, View Settings, Ports must be set up with Serial Remote Protocol set to ChamSys RX.
MagicQ matches the serial data received to the string you specify in the P2 field using the same format as in the Cue Stack Macros but without the X. So if you set the P2 field in the Autom to
1,2,3 it will match the serial data received 1,2,3
If there is a x preceding the number then all following numbers are considered as hexadecimal (e.g. xBABE will consist of the byte 0xBA followed by 0xBE)
Note that the string entered in the P2 field must be encased with "". For example "1,2,3" MagicQ will display " as an '. You must use " when encasing the string.
P1 is the number of characters to match and P3 determines which character is passed onto the Autom function.
So if you want to set up MagicQ to respond to serial commands to set the level of Playback 1 using the serial commands "L1" to "L100" you would set up the Autom as:
Type Serial Port
P1 1 // Match 1 character
P2 "L" // Character to match
P3 2 // 2nd character of received string
Function PB Level
F1 1
MagicQ matches MIDI Sysex messages in a similar way to serial messages above
MagicQ matches the MIDI Sysex messages to the string you specify in the P2 field using the same format as in the Cue Stack Macros but without the X. So if you set the P2 field in the Autom to
1,2,3 it will match the serial data received 1,2,3
If there is a x preceding the number then all following numbers are considered as hexadecimal (e.g. xBABE will consist of the byte 0xBA followed by 0xBE)
Note that the string entered in the P2 field must be encased with "". For example "1,2,3" MagicQ will display " as an '. You must use " when encasing the string.
P1 is the number of characters to match and P3 determines which character is passed onto the Autom function. As MIDI is 7 bit data the character passed is doubled before it is passed onto the Autom function - enabling a MIDI Sysex value of 127 to set a playback to full level.
Note that MIDI Show Control messages will always be handled internally by MagicQ to trigger Cues and Cue Stacks unless the MIDI Show Control type is set to "None" - in which case MIDI Show Control messages can be handled by automs.
MagicQ supports timed events for trigger Cues at specific times of the day or days of the week. Any Cue in a Cue Stack can be set to trigger based on a scheduled event rather than following on from the previous Cue. This enables time of day and date based events to be run automatically.
Scheduled events are supported on MagicQ consoles and on MagicQ PC when connected to a MagicQ Wing.
19/30/5 for 19 hours 30 minutes and 5 seconds
or
*/10/0 to have the event occur every hour at 10 minutes past the hour
or
*/*/0 for every minute
From v1.9.2.1 software, when MagicQ starts up it checks for any scheduled Automs and sets the state according to the current time and date. For example if there is an Automation that runs at 7.00am each day and the system restarts at 9.00am then it will automatically trigger the 7.00am automation. The Automs are triggered in the order of oldest to newest as they would have been done if the system had been running at that time.
Automations, including scheduled events can be disabled (for example when Programming) on an individual basis or from the global Macro enable option in Setup.
It is also possible to set dates in P2 using the following format:
day/month/year
Asterisks (*) can be used. Examples:
24/12/2005 - specific date (24 December 2005)
1/*/* - 1st day of every month
*/6/* - everyday in June
Alternatively you can specify days of the week using the characters A to G where A is Monday, B is Tuesday, C is Wednesday etc.
So for an event every Monday and Tuesday enter:
AB
MagicQ has the capability to trigger events based on the sunrise and sunset at the particular location.
In order for sunrise and sunset events to occur correctly MagicQ must be configured with the correct longitude, latitude and time zones. These parameters are configured in Setup, View Settings, Mode. The sunrise and sunset times for the current location can be checked in Setup, View System, View Status.
To set a scheduled event based on sunrise or sunset first set the time starting with R for sunrise or S for sunset.
It is possible to set offsets on the sunrise and sunset times so the event is triggered a certain time before or after the sunrise or sunset.
For example to trigger 20 minutes after sunrise enter
R+0/20/0
To trigger 30 minutes before sunset enter
S-0/30/0
MagicQ can trigger events based on a XYZ Tracker position related to a MagicVis object. This enables receive XYZ position from an external system and using that position information to control other attributes - e.g. ramping up intensity of a fixed luminaire when performer moves into an area on the stage. We tie it into areas of the stage that we can define in our MagicVis visualisation so we can control attributes - intensity, colour, zoom etc… based on how close the performer is to a point or to a line.
When the trigger type is set to Inside then as the XYZ tracker moves inside the MagicVis object the trigger event level goes from 0 at the edge to to 255 at the centre of the object.
When the trigger type is set to Outside then when the XYZ tracker is outside the MagicVis object the trigger event level is at 255. When it moves inside it goes from 255 at the edge to 0 at the centre of the object.
When the trigger type is set to Enter then as the XYZ tracker moves inside the MagicVis object the event is triggered.
When the trigger type is set to Exit then as the XYZ tracker moves outside the MagicVis object the event is triggered.
MagicQ includes several options for automated start of Playbacks and Executes. These options are available on MagicQ consoles and on MagicQ PC systems when connected to a MagicQ USB Wing or Interface. See Setup, View Settings, Playback, Activate Playbacks On Start.
Keyboard macros enable you to record sequences of key presses and to replay the sequence at the press of a single button. Keyboard macros can be assigned to any button on the console (including to a SHIFT+button and CTRL+button) or to buttons on an external keyboard. The first 10 keyboard macros are available on the Quick Macro Tool Bar.
Macros can be inhibited from the Setup Window using the "Inhibit Macros" option.
To record a keyboard macro, go to the Macro Window, press RECORD and select a macro to record. Alternatively moe the cursor to a free item in the window and press the START MACRO soft button.
The console then records all of the following key sequences until you press the Macro Window button and the END MACRO soft button.
The title bar shows "Recording" whilst recording is in progress. MagicQ automatically removes the MACRO and END MACRO soft button press from the end of the recording.
In software prior to v1.7.1.3 MagicQ stored raw key presses. From v1.7.1.3 MagicQ supports several different formats for storing the keys - by default it now uses the internal MQ keys. The internal MQ keys have the advantage that they are the same across all MagicQ consoles - therefore a keyboard macro that is recorded on a MQ80 will always run correctly on a Pro 2014 and vice versa.
Choose the Record Options by pressing soft button A in the Macro window. The options are "Keys", "MQ Keys" and "Functions".
Macros can be played by simply pressing the item in the Macro Window.
To stop a macro that is playing open the Macro Window, View Macros, put the cursor on the macro and press the STOP MACRO soft button. To stop all macros that are playing press SHIFT + STOP ALL MACROS.
Keyboard macros can be triggered from Cue Stacks using the Cue Stack Macro B, e.g. B1 plays macro B1. B0 stops all macros.
Playback of keyboard macros can use the times that the macro was recorded with or using external time code sources. By default macros are played back using "Step per tick" timing. Use the SET TIMING soft button to change the timing. The options are:
Immediate | All steps are executed immediately. The fastest play back, but in some cases where windows are opened/closed the macro may not play back as expected |
Step per tick | Executes the macro one step per tick. Ensures macro plays back as expected |
Ext Time Code | Executes according to external time code |
Int Time Code | Executes with the internal timing it was recorded at |
Old macros | Executed with old system timing - do not use for new macros |
The timing type can be changed after the macro has been recorded – however if external time code timing is required then this should be selected before the macro is recorded. This enables the console to record the key and button presses according to the received time code signal.
Times can be modified in the View Data view of the Macro Window using the keypad and Encoder E. Multiple items in the macro can be changed at one time using SHIFT and the cursor keys to select the items.
When using time code timing, the + and – operators can be used to offset the timing of a sequence of items.
Macro steps can be deleted using the REMOVE key. Note when a button is pressed there is a "press" and a "release" – both should be removed – otherwise the button state will become confused.
It is possible to move steps in the Macro, View Data view – press MOVE and then select the source followed by the destination. Multiple steps can be moved using SHIFT and the cursor keys.
The RETIME soft button can be used to change the times for steps that are out of sequence - any times that are not in order are changed to a new time that is within order. The sequence that the keys are played back in is maintained.
The REORDER soft button changes the sequence of keys to match the timing. Note that this will affect the result of playing the macro.
To assign a macro to a button, press the ASSIGN MACRO soft button and press a key to assign it to (e.g. one of the 6 spare keys). Keyboard macros can also be assigned to a combination of keys – for example if you hold one key and press another key. Keyboard macros are saved into show files and also when you Save Settings, so it is possible to personalise your console.
If you accidentally assign a keyboard macro to the wrong button then you can easily change the assignment. Open the Macro Window, move the cursor to the macro you want to change the assignment for and press the ASSIGN MACRO soft button. Now press the button that you really wanted to assign it to.
A macro assignment can be removed using the DEASSIGN MACRO soft button.
The Quick Macro Tool Bar is accessed by pressing the screen in the Status Display (the area of the screen above Playbacks PB1 to PB5 with the Clock). The Macro Tool Bar can be closed by pressing in the Status Display again.
The Macro Tool Bar shows the Key Macros 1 to 10.
Macros support fader moves and encoder changes as well as button presses. This enables complete recording and playback of macro segments. Macro timing and playback uses a high resolution internal clock enabling accurate playback of recorded sequences.
MagicQ optimises fader moves to remove redundant steps.
MagicQ supports a number of in-built macros which carry out common programming key sequences including quite a few that would normally require multiple key presses or simultaneous pressing of more than one key. The In-built Macros can be useful on touch systems where it is not possible to touch 2 keys at one time.
Press the In built Macro soft button and choose the macro to assign to the current item in the Macro Window.
Cue Stacks can be used to program a list of scheduled events. To use this feature, set the Halt field of each of the Cues in the Cue Stack Window to "Sched". Double click to change the field. Then enter the time in the Wait field. The times can have wildcards and sunrise/sunset times as per Autom events.
If dates are required then they are entered into the macro field starting with Z and ending with Z. For example to have an event on the
24 December 2005 enter:
Z24/12/2005Z
You can also specify particular days of the week using the characters A to G where A is Monday, B is Tuesday, C is Wednesday etc…
So for an event every Monday and Tuesday enter:
ZABZ
For an event on the first day of every month enter
Z1Z
| | ||