| |
| |
A system diagram of the console is shown in the diagram below
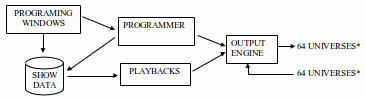
MagicQ stores show data in a single show file stored on the hard drive of the MagicQ console, PC or Mac. The show file contains all the show settings, patch, palettes, cues and cue stack data. It also stores copies of all the personalities that are used within the show.
A MagicQ show can be transferred between MagicQ consoles and MagicQ PC or Mac systems simply by copying the show file. MagicQ show files are compatible across all MagicQ products. MagicQ maintains forward and backward compatibility for show files - enabling users to load shows created on any version of MagicQ software into any other version of MagicQ software.
Favourite shows, personalities, palettes and FX patterns can be imported into new shows to simplify and speed up show programming.
Show files can be copied using USB memory sticks or the network can be used to access the file system of MagicQ consoles.
When the user saves the show using the SAVE SHOW menu item or soft button MagicQ stores the show file with a .shw file extension. At all other times MagicQ automatically backs up the show data whenever changes are made to a (.sbk) file.
Depending on the console, MagicQ software supports up to 256 universes output over Ethernet.
This allows up to 131,072 channels of lighting to be controlled. Ethernet to DMX Interfaces are used to convert from Ethernet to DMX512 as required.
Lighting consoles are often limited in the number of DMX channels or the number of intelligent heads they can control independently. MagicQ allows control of all DMX channels individually, whilst utilising grouping and programming functions to enable control of multiple heads or dimmers together.
MagicQ provides a library of over 35,000 personalities – data for each of the different types of intelligent head available. This data determines how the different attributes of an intelligent head are controlled by the console.
ChamSys adds new personalities for heads as the information becomes available. If a personality is not available then it can be requested from ChamSys. Users also have the ability to create the personality themselves in the inbuilt Head Editor.
The console supports two types of channels, highest takes precedence (HTP) and latest takes precedence (LTP). Generally HTP channels are used for channels controlling dimmers and for the dimmer channel of intelligent heads. LTP channels are used for the attributes of intelligent heads such as pan, tilt, colour, gobo etc…
For HTP channels the value that is output is the highest value of that channel on all of the active playbacks and the programmer. The console can be configured so that if a HTP channel is in the programmer it always overrides any active playbacks.
For LTP channels the value output is the value from the last active playback unless that channel is active in the programmer in which case the value output is the value stored in the programmer.
The last active playback is the last playback to be raised above zero, which is still above zero. Playbacks that are bumped in using ADD or SWAP buttons automatically become the last active playback until the button is released.
The type of channel used by the console is determined by the personality used to patch the dimmer or intelligent head.
Intensity channels should always be patched as HTP. In addition Red, Green, Blue channels in fixtures that do not have an Intensity channel are patched as HTP. All other channels are patched as LTP.
Playbacks can be set so that all channels controlled by the Playback act in a LTP way, thus allowing Intensity channels to be overridden by a single Playback.
The Patch HTP also affects the operation of channel releasing, Grand Master and DBO as in the table below:
Feature | Patch HTP | Patch HTP (Cue Stack All Chans Controlled LTP) | Patch LTP |
Channel mixing | HTP | LTP | LTP |
Channels release to 0 | Yes | Yes | No |
Fader controls level | Yes | Yes | No |
GM/DBO controls level | Yes | Yes | No |
The console stores lighting states as Cues – each Cue stores
The Cue stores level information for each of the channels recorded into it. If the channel level was set using a Palette, then a reference to the Palette is also stored so that the Cue can keep track of changes to the Palette.

The Cue stores timing information for the channels that have been recorded into it. Two types of timing information are stored:
General Times: Stored for each type of attribute (Int In, Int Out, Position, Colour, Beam)
Individual Times: Stored on an individual channel basis
The Cue stores FX information for each of the FX that has been recorded into the Cue. The FX information includes the type of FX, the heads that the FX is applied to, and the FX parameters for each head.
Each Cue has a number (e.g. Q1) and an optional name.
Cue Stacks are used to manage sequences of Cues. Cue Stacks keep track of the order of the Cues and the options for how they are played back. A Cue Stack can have a single Cue associated with it or may have a whole list of Cues.
The Cue Stack stores a Cue Id and a text field for each Cue so that the different steps in the stack can be labelled. The Cue Id and text field are shown on the playback display when the Cue Stack is played back which enables operators to keep track of the current position in the show.
Cue Stacks can be configured to run as a chase rather than as a simple list of Cues. The difference is that as a chase the timing of all Cues is determined by the chase speed and chase contrast rather than by the individual delay and fade times for each Cue.
Each Cue Stack has a number (e.g. CS1) and an optional name.
The console enables playing of recorded show data through Playbacks. Playbacks are associated with physical faders and buttons – each Playback can have one Cue Stack assigned to it.
The console supports 202 Playbacks; 10 main Playbacks situated below the touch screen and up to 8 extension wings each with 24 Playbacks.
On models where less than 8 wings are fitted, the not fitted playbacks can be utilised through the touch screen and associated buttons.
The console supports multiple pages of Playbacks enabling Playback faders to have different functions depending on the current page. Typically one page is used for each song in a show.
The current page is selected through the NEXT PAGE and PREV PAGE buttons on the main playback section or by selecting a page in the Page Window.
The 24 Playbacks on each wing are divided up into two rows of 12 Playbacks. Each of the rows has separate NEXT PAGE and PREV PAGE buttons. This enables the Page used by these Playbacks to be set differently to the main Playbacks.
This provides significant flexibility to how shows are played back – for example one section of a wing can be used to control front lighting whilst another could be used to control the main show FX lighting. Changing the Page of the front lighting would not change the Page of the FX lighting.
The console contains a powerful engine for creating special effects (FX). FX can be applied to a group of heads at the touch of a button; there is no need to program lots of different Cues to create the effect. Special effects can be easily modified live, enabling, for example, the speed and size of the FX to be modified to match the mood of the show.
The console supports an extensive library of standard Position FX such as circles, squares, pan and tilt saws, lifts, zig zags, etc. In addition the console supports FX on Colour, Beam and Intensity attributes. The console supports programming and storing of new custom FX, which can then be re-used in shows as required. The FX engine enables complete shows to be programmed within a matter of minutes.
The console provides a means of storing the positions and sizes of Windows as a Window layout to enable easy recall of useful Windows. This enables, for example, a Window configuration consisting of the Group, Position, Colour and Beam Windows to be stored and recalled at a button press.
The system supports several standard Layouts, including a standard Group, Position, Colour, Beam programming layout.

On Stadium consoles there are 12 Layouts on the left side of the right hand display. Further layouts can be accessed by pressing CTRL.
On Compact consoles Window layouts are recalled by pressing CTRL and selecting one of the top soft buttons. There are also three physical Layout buttons, which together with SHIFT can select Layouts 1 to Layout 6.
The MagicQ lighting console uses SHIFT and CTRL buttons to enable access to advanced features. There is a SHIFT button and a CTRL button adjacent to the top corners of the touch screen in addition to the keys on the keyboard.
The SHIFT button is used with the cursor keys to enable selection of multiple items in Windows.
The ALT button is used to access functions which are supported by physical buttons on some consoles but not on others. For example, ALT is used to access PAGE UP and PAGE DOWN on Compact and Stadium consoles.
All recording of show data is carried out using the Programmer. The Programmer takes priority over all playbacks, and channels. It can also be used during live running to override the outputs – for example, for changing the colour or gobo of intelligent heads.
The Programmer can be considered to be a table of channel level and active flags for each of the channels patched onto the console. Initially all channels are set to their default values. When a channel is changed, the channel level for that entry in the table is set to the new level and the channel is flagged as active.
The console outputs any channels that are marked as active in the Programmer at highest priority – i.e. they over-ride all other playbacks.
To clear the Programmer press CLEAR. All channels will be deactivated and all HTP channels will be set to zero. Depending on the "unused Channels return to defaults" setting, LTP channels will either stay at their current values or return to their defaults. It is possible to force all LTP channels to zero by using CTRL CLEAR.
The programmer can be set into a Blind mode using the BLIND button so that the contents of the programmer do not affect the output of the console. This allows programming adjustments to be made during a live show and special effects to be "busked" in.
The Help Window enables the operating manual to be viewed on-line. Press the HELP button at any time to open the Help Window. To close the window, press the CLOSE button.
Use the scroll encoder, the cursor keys, and the hyperlinks to navigate through the manual. You can go directly to a particular section using the top soft buttons, e.g. CONTENTS, QUICK START or SHORT CUTS.
You can search through the manual by typing some text and pressing SEARCH. To search for the same words again, press SEARCH AGAIN.
The Help window also contains a VIEW COMMANDS view which logs all of the commands and console responses. It also has a VIEW LOGS which logs all the buttons, fader moves and events including MIDI, LTC and network events.
| | ||