| |
| |
MagicQ stores sequence of Cues as Cue Stacks. Cue Stacks keep track of the order of the cues and the options for how they are played back. A Cue Stack may have only one Cue associated with it or may have a whole list of Cues.
When you record a Cue onto a Playback, MagicQ automatically generates a Cue Stack. MagicQ adds the Cue Stack to the Stack Store. The Stack Store is a list of all Cue Stacks stored in the show. The Cue Stack will be given a unique Cue Stack Number (e.g. CS1). This enables the Cue Stack to be re-used in future programming.
If a Playback already has a Cue Stack stored on it, then by default the new Cue will be added to the end of the Cue Stack. However if you key in a Cue Id before pressing RECORD then the Cue will be inserted into the Cue Stack in the appropriate place.
To view a Cue Stack, press the SELECT button of the Playback and then CUE STACK to open the Cue Stack Window. Alternatively double click the SELECT button of the Playback.
The Cue Stack Window shows details of all the Cues in the Cue Stack including their names, numbers and timing information. The fields can be edited in a similar way to the Prog Window and Patch Windows.

The status field indicates the current status of the Cue in the Cue Stack. If the Cue is active (i.e. it is in the process of execution) then the field indicates a % complete and the entire cue is coloured red.
Each Cue within a Cue Stack has a Cue Id (e.g. 1.0). This value is specific to the Cue Stack and is used for tying up Cues with a script in theatre style playback. It is distinct from the Cue Number (e.g. Q1) used to identify the Cue in the Cue Store.
Each Cue also has some text associated with it. This text enables easy recognition of the contents of the Cue when the Cue Stack is played back. This text is displayed above the main Playbacks. It can also be displayed on the displays above the Wing Playbacks.
Soft button A can be used to select different views. The different view modes show the columns in different orders. View modes include Default, Info, Macro and Tracking and Media.
It is possible to open two cue stack windows on MagicQ systems. To open a second cue stack window using CTRL + Cue Stack window button. The Choose Cue stack soft button inside the window can be used to lock a cue stack window to a particular stack.
When you record more than one Cue onto a Cue Stack, the Cue Stack behaviour kicks in to control the transition from one Cue to another. By default the Cue Stack operates like a chase - i.e. each Cue is executed in turn, with timing being handled by a Chase Speed for the whole Cue Stack.
The timing mode can be changed, so that the Cues play back in a theatre style using the GO / STOP buttons, by pressing the CUE TIMING and CHASE TIMING soft buttons in the Cue Stack View Options Window to modify the timing mode.
In Chase Timing mode it is possible to manually change the Fade and Delay times by pressing Cue Stack, View Options, Chase Times. The delay/crossfade is determined by whichever was set last - the specific delay times or the crossfade.
When using Cue Timing, the timing of each cue is determined by individual Wait, Delay and Fade times for each Cue in the Cue Stack. The MagicQ can execute multiple Cues at one time - for example a Cue Stack could have one Cue that fades in MAC500s in green whilst another Cue fades in HPEs in red.
The Wait time affects when execution of the Cue is started. The Delay and Fade times affect how each individual Cue is executed. The Wait time can be set to "Follow" - in this case the Cue is executed when the last Cue finishes - i.e. Cues are executed sequentially.
Each Cue has a Next Cue - by default this is set up to be the following Cue in the Cue Stack. You can change the Next Cue to be any of the Cues in the Cue Stack. This enables loops and sequences to be set up.
The Next Cue for the last Cue in the Cue Stack defaults to being the first Cue in the Cue Stack.
To illustrate the above Cue Timing consider a Cue Stack with three Cues. When the Cue Stack starts executing it executes the first Cue using its Delay and Fade times.
As soon as the first Cue has been started (regardless of whether the first Cue is in a Delay, Fade or Complete stage) the next Cue in the Cue Stack will be examined to determined its Wait time.
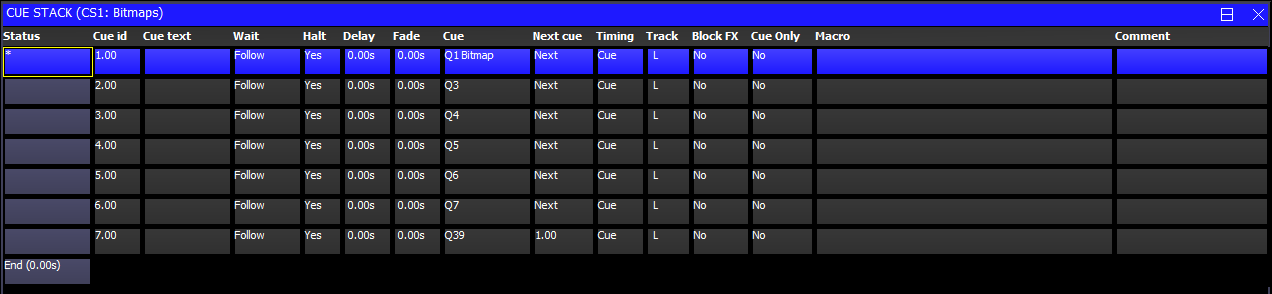
If the Halt field on the next Cue is set, then the Cue Stack waits for Go to be pressed before starting the next Cue – otherwise it executes the next Cue using its Fade and Delay time. The picture below shows 3 Cues each set to follow the previous Cue but with "Halt" set to "Yes".
If the Wait time on the next Cue is set to "Follow" then the Cue Stack will wait until the first Cue has completely finished fading (i.e. all channels have reached their final values) before starting the next Cue.
If the Wait time on the next Cue is set to a time then the Cue Stack waits that time before executing the next Cue. This time is completely independent of the first cue – the first cue may still be in Delay or Fade and will continue until the Fade completes.
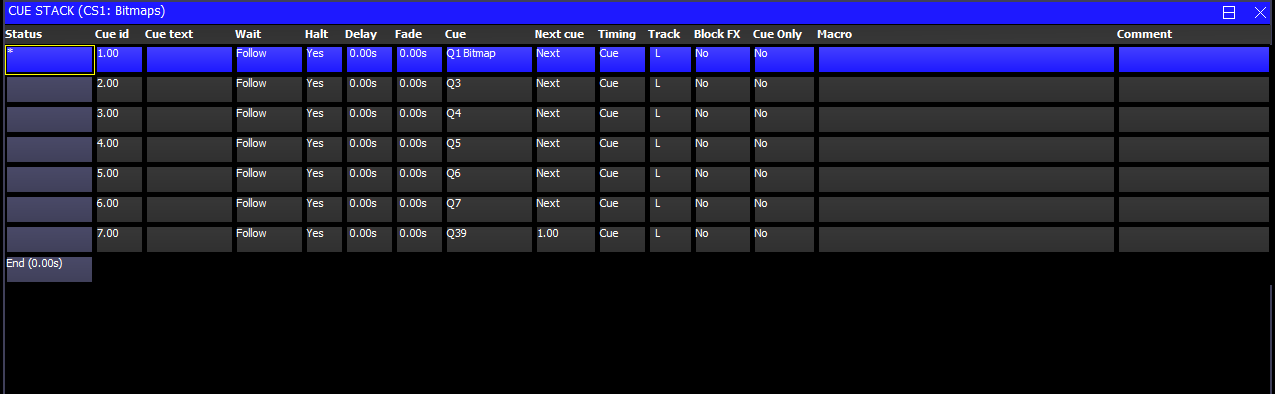
If you enter a wait time in the Wait field MagicQ automatically changes the Halt field to No so that the Cue executes after the specified Wait time. The picture below shows Cues 2.00 and 3.00 automatically running 1 second and 2 seconds after Cue 1.00.
This field determines whether MagicQ waits for the user to press GO before executing the next Cue. It can also be use to setup Cue triggers from the remote interface, Scheduled events or timecode.
Pressing ENTER only toggles between Yes and No. To get the advanced options, such as Timecode, Scheduled or Remote either double click the field or press SHIFT + ENTER.
The options "Yes (Ignore TC)" and "No (Ignore TC)" are the same as "Yes" and "No" except that when these Cues execute the incoming timecode will be ignored.
The Delay and Fade times shown in the Cue Stack Window are properties of the Cue whilst the Wait time is a property of the Cue Stack. Modifying the Delay and Fade times of the Cue may affect other Cue Stacks that use the Cue.
The Delay and Fade time fields show the maximum delay and fade times used by any channel within the Cue – so giving a summary of the maximum delay and fade of the Cue. To view the actual times of the Cue move the cursor to the Delay or Fade field and press the View Cue soft button. This opens the Cue Window for the selected Cue, automatically showing the Cue Times.
Delay and fade times can be entered directly in the Cue Stack Window – note however that this will set the times for all attributes. If you wish to change just the times for Position, Beam or Colour then these should be set up in the Cue Window, Simple View for general times or Cue Window, Advanced View for channel specific times.
Split intensity in/out times can be entered into the Cue Stack Window in the Delay and Fade fields using /. For example, 2/3 entered in the Fade field will fade the current cue in over 2 seconds, and will fade the previous cue out over 3 seconds. Only intensities times are affected – Beam, Colour and Position times remain at their current values.
When executing Cues, MagicQ will primarily use the specific delay and fade times entered in the Advanced View, of the Cue Window. If no times are specified, then the general times used in the Simple View will be used.
Times can be added in the Advanced View using the keypad and can be removed using the REMOVE button. In the Advanced View, the times shown are fade times, except where delay times have been set up, then times are shown as delay/fade.
Times can also be set up for the selected heads in the Simple View.
In the Cue Stack and Cue Windows delay and fade times with a ‘>’ symbol at the end indicate when there are advanced times set for the Cue.
By default, MagicQ works in a similar way to traditional lighting consoles, in that what is in the programmer is recorded into the Cue. This is a "no nonsense" mode where you get what you expect recorded into your Cues.
If you program just a FX chase on pan and tilt into a Cue, then that is what you get. If you program a complete look for a head including all the attributes, then that is what you get. Looking at a Cue in the Cue Window gives you the full picture.
In a Cue Stack, you can choose for each Cue whether the Playback continues to control HTP and LTP channels used earlier in the Cue Stack but not stored in the current Cue. In "Live (Chase)" the LTP channels are tracked, but HTP channels (Intensities) are not.
Traditionally lighting consoles used tracking mode to reduce show storage by only recording changes into each Cue. This can be confusing as when you jump around in Cue Stacks they may not play back as they were programmed. Busking live shows can be particularly difficult, as it can be more difficult to predict what is going to happen.
MagicQ show files do not require a significant amount of space compared to the storage space available so show size is not a major concern. MagicQ has powerful editing modes that enable changes to be made to multiple Cues simultaneously – overcoming any benefits tracking mode might have for storing Cues in separate parts.
MagicQ supports a tracking mode, which can be turned on through View Settings in the Setup Window. We recommend that users unfamiliar with tracking use MagicQ in its default, "non tracking" mode.
The easiest way to change between tracking and non tracking is to change the "Programming Mode" by pressing soft button B in the Setup Window and choosing one of the modes. For non tracking select Live (Chase) or Theatre Non Tracking. All other modes are tracking.
Changing the "Programming Mode" affects the "Programmer Tracking" option in the Setup Window and also the defaults for tracking ("Track","Zero old HTP" , "Zero old FX", "Rel old chans") on the Cues Stack options. The "Programmer Tracking" option by itself determines how Cues are recorded - it does not affect how they are played back.
When programmer tracking mode is off, then the entire contents of the programmer is recorded into Cues regardless of whether attributes have been change since the last Cue was recorded.
When programmer tracking mode is on, then only attributes that have been modified since the Cue was recorded are stored into the new Cue. Attributes are determined as modified if their value had been changed using an encoder, using keypad entry, using a range button, using a palette or by a locate head. Note that modifying an attribute to a new value and then returning it to its old value counts as modified.
Whilst in programmer tracking mode it is possible to force a record of the whole of the programmer by selecting the ENTIRE STATE record option. Record options are configured by pressing SHIFT and RECORD; whereupon the Record Options window is opened. Pressing any Window select button hides the display option and returns to the appropriate Window.
As a Cue Stack is executed, it keeps track of channels that have been used in previous Cues but are not used in the current Cue. How these channels are handled depends on the following settings on each Cue in the Cue Stack – there are three options which are shown in the Track field.
H Track HTP (Defaults Yes in tracking mode)
L Track LTP (Defaults Yes in all modes)
F Track FX (Defaults Yes in tracking mode)
So, to get a Cue Stack recorded in tracking mode to track all channel state during playback, ensure that all the Cue Stack steps have HLF set in the Track field.
If Track LTP is not set then LTP channels that were used in previous steps in the Cue Stack but not in the current step are released with the release time of the Cue Stack. If Track HTP is not set then HTP channels that were used in previous steps in the Cue Stack but not in the current step are faded out using the Intensity fade out time of that Cue step.
In addition there is an option on the Cue Stack that affects how tracking works for jumps and going backwards up the Cue Stack. If "recalculate state on jumps" is set, then MagicQ recalculates the entire state of the Cue Stack when you jump to a new Cue using "Goto Cue" or if you press the Pause button to go backwards up the Cue Stack.
When tracking Duplicated Elements, if a Cue has Duplicated element 1 but not other elements, then any other elements that were tracking are removed. This ensures it is possible to go from reduced elements back to control of all Duplicted elements.
The Cue Window shows the Cue data for the current Cue on the selected Playback. The Cue Window, has three views, View Levels, View Times and View FX just like the Programmer Window.
When looking at a Cue Stack in the Cue Stack Window it is possible to go directly to the Cue Window by placing the cursor on the required Cue and pressing the View Cue soft button. If the field the cursor is on is a timing field then the Cue Window will open to show View Times, otherwise it will open to show View Levels.
It is possible to view Cue data for different Cues in a Cue Stack by pressing the PREV CUE and NEXT CUE soft buttons. When a Cue is examined that is not the current Cue on the selected Playback, the Cue Window becomes locked to that Cue. Press the UNLOCK WINDOW soft button to return to viewing the current Cue.
The Cue Window can also be used to preview Cues when in tracking modes – there is a View Tracking soft button. When this option is on the Window shows all of the values that are tracking from previous Cues as well as the data in the selected Cue. The tracked data is shown in dark colour whereas the data from the selected Cue is shown in active colours.
When running a Cue Stack it is possible to determine which values have been tracked through the Cue Stack by selecting "View Cue Ids" in the Outputs Window. This shows which playback and which Cue on that playback is controlling the outputs. Thus, when values are tracking through a Cue Stack the Outputs Window will show the Cue that originated that value.
All FX can be tracked out using the Cue Track field in the Cue Stack - remove the "F" from the Cue Track field.
FX in Cues can be tracked out by setting them as "Track Out" - page right to the "Track Out" field in the Cue, View FX and Programmer, View FX views.
When a Cue executes a FX with "Track Out" set it removes the FX for all the channels in this FX from the playback. The parameters of a "Track Out" FX are ignored - except for fade out times - the FX will continue to run using the parameters it was using before until the fade out completes. The FX will fade out using the FX Out time in the View Times view unless the "Fade Out" field in the FX is changed from "Default" to a specific time.
The "Track Out" FX do not need to exactly match the original FX - but it would be normal to copy the original FX and set it to "Track Out" to ensure that all the channels from the original FX are tracked out.
It is possible to have both "Track Out" FX for an old FX and at the same time new FX for the same channel in a Cue provided there some of the heads from the old FX are not used in the new FX. Channels from the new FX will ignore the "Track Out" for the old FX and will crossfade from the old FX as per previous software.
Track Out will work for both normal FX and Group FX.
When in tracking mode, performing an unlinked copy of a Cue in a Cue Stack now copies the entire state of the Cue, not just the specific cue values. When copying multiple Cues from one Cue Stack to another Cue Stack, the first Cue will be copied entire state with the following cues being just the changes.
If Cues are copied linked in tracking mode then they will always be just the change values not the entire state.
When using Theatre Tracking mode and Hog II Warp mode, MagicQ defaults the Cue Storage option "Copy mode (unlinked/linked) to "unlinked".
It is possible to block and unblock Cues from the Cue Stack Window and from the Cue Window through soft buttons.
Blocking a Cue has the effect of adding to that Cue all the state information that would track through into that Cue if the Cue Stack was executed up to and including that Cue. When a Cue is blocked it becomes a hard Cue – i.e. if edits are made to previous Cues then the edits will not affect the blocked Cue.
Unblocking a Cue has the effect of removing from the Cue all the state information that would track through into that Cue if the Cue Stack was executed up to and including that Cue. When a Cue is unblocked it removes hard values in the Cue from the Cue that duplicate tracked values – therefore it enables values to track through from where they were first used.
Unblocking and blocking Cues in a Cue Stack does not affect the appearance of the Cues and Cues Stacks when the Cue Stack is played back – it simply affects where the data is stored and what effect an edit will have on a Cue.
Multiple Cues can be blocked / unblocked in the Cue Stack Window by selecting a range using SHIFT and the cursor keys.
The "Cue Only" function in the Cue Stack Window can be used to mark a Cue as a temporary change to the lighting state before continuing the tracked state from the following Cue. The Cue Only field is on the right hand side of the Cue Stack Window (page right) and is only relevant when using tracking mode.
MagicQ enables one or more Cues to be marked as Cue Only – when MagicQ moves on to the next Cue which is not set to "Cue Only" then it reverts to tracking the Cue Stack from before the "Cue Only" cues.
Note that sequential Cues marked "Cue Only" will each be based on the state previous to the first "Cue Only" Cue with the additions of the specific Cue. To track changes through a sequence of "Cue Only" Cues, record each Cue using "Entire State" to capture the entire programmer contents in to each "Cue Only" Cue.
Mark Cues are special cues that are used to pre-load LTP values before the following Cue is executed thus ensuring that, for instance, moving heads are in the correct position before the Cue executes. Note that Mark Cues only take effect if the corresponding head has intensity set to 0 – otherwise the change would be noticeable.
The Mark Cue only affects LTP values for heads controlled by the Cue Stack which are currently at zero intensity. If these heads are used in the next Cue then their value will be faded to the value of the next Cue. By default the fade is set to 3 seconds but this can be modified as required. Note that attributes that are specified as Instant in the personality file will snap to the new value.
The Mark Cue executes as soon as the previous Cue has completed execution.
In the Cue Stack Window press the Mark Cue soft button insert a Mark Cue before the Cue which the cursor is currently on. Alternatively enter a Cue Id and press Mark Cue to insert a mark before the specified Cue Id.
An entire Cue Stack can be configured to automatically perform the function of marking all Cues - set the Move When Dark option in View Options in the Cue Stack Options.
The time taken for the Move When Dark is specified in Setup, View Settings, Cue Storage, Default mark/move when dark time.
When using Marking and Move When Dark attributes of moving lights will be marked even if they have not been previously used in the Cue Stack. This result is that when a Mark Cue is executed in a Cue Stack, MagicQ will take control of the parameters used in the Marked Cue from other Cue Stacks even though the Cue is not yet executed.
MagicQ stores Cues and Cue Stacks in the Cue Store and Cue Stack Store respectively. Since you can program Cues and Cue Stacks directly onto playbacks, it is possible to program complete shows without referring to the Cue Store or the Cue Stack Store.
However, sometimes you may wish to build up a library of Cues or Cue Stacks that are not assigned to playbacks. You might then assign them to playbacks later, e.g. during a technical rehearsal.
To record a Cue into the Cue Store simply set up the required look in the programmer, open the Cue Store Window, press RECORD and press an empty Cue in the Cue Store Window.
You can test programmed Cues in the Cue Store by pressing the appropriate Cue. MagicQ searches for an unused playback (from the last playback down) to test the Cue on. Pressing the Cue again removes the Cue from the playback.
You can restart a Cue that is being tested by pressing the "Retest" soft button. Holding CTRL and selecting a Cue also restarts the Cue.
You can view the contents of a programmed Cue by moving the cursor to the required Cue in the Cue Store Window and pressing the View Cue soft button. This opens the Cue Window locked to the specified Cue. Pressing the Unlock Cue button returns the Cue Window to monitoring the current Cue on the currently selected playback.
Use the REMOVE UNUSED soft button to remove Cues from the show that are not being used. Cues that are assigned to Cue Stacks or used in the Execute window will not be removed. From 1.9.2.2 MagicQ also checks for usage in Automations.
To record a Cue into a Cue Stack in the Cue Stack Store Window set up the look as above, open the Cue Store Window, press RECORD and press the Cue Stack you wish to record the Cue into. If the Cue stack is empty then a new Cue Stack will be generated. Otherwise the Cue will be added to the existing Cue Stack, either at the specified Cue Id, or at the end of the Cue Stack.
You can test programmed Cue Stacks in the Cue Stack Store by pressing the appropriate Cue Stack. MagicQ searches for an unused playback (from the last playback down) to test the Cue on. Pressing the Cue Stack again removes the Cue or Cue Stack from the playback.
You can restart a Cue Stack that is being tested by pressing the "Retest" soft button. Holding CTRL and selecting a Cue Stack also restarts the Cue Stack.
You can view the contents of a programmed Cue Stack by moving the cursor to the required Cue Stack in the Cue Stack Store Window and pressing the View Stack soft button. This opens the Cue Stack Window locked to the specified Cue Stack. Pressing the Unlock Stack button returns the Cue Stack Window to monitoring the Cue Stack on the currently selected playback.
Note that the Cue Id used as a sequence number in the Cue Stack (e.g. 1.00) is different to the QId used in the Cue Store (e.g. Q5). The Cue Id is the sequence number within the Cue Stack wheras the QId is the reference number in the Cue Store.
Some users prefer to hide the QId and only use and view Cue Ids – use the Setup, Cue Storage Settings – "Hide Cue Store Ids (Qxxx). When this option is set the Cue Stack window and Cue Window only either show the Cue Ids from within the Cue Stack – they do not show the Q ids from the Cue Store.
Normally each step in a Cue Stack has a Cue assigned to it.
When importing or exporting shows sometimes Cue Stacks will have steps that do not have a Cue assigned to them. The CREATE CUES soft button forces MagicQ to create Cues (with no channels) for any steps in Cue Stacks that have no Cue assigned to them.
Use the REMOVE UNUSED soft button to remove Cues Stacks from the show that are not being used. Cue Stacks that are assigned to Playbacks or used in the Execute window or on Master faders will not be removed. From 1.9.2.2 MagicQ also checks for usage in Automations, Cue Stack macros and TC Tracks.
Cues and Cue Stacks can be assigned to Playbacks at any time.
To assign a Cue, open the Cue Store Window, press the MOVE button, select a Cue, and then select a playback to assign the Cue to. You can assign to real playbacks or to playbacks in the Playbacks Window. You can assign to a specific Cue Id in a Cue Stack on a playback, by keying in a Cue Id before you select the playback.
To assign a Cue Stack, open the Cue Stack Store Window, press the MOVE button, select a Cue Stack, and then select an empty playback to assign the Cue to. You can assign to real playbacks or to playbacks in the Playbacks Window.
Multiple Cues and Cue Stacks can be assigned at a time, by using SHIFT or CTRL and the cursor keys to select multiple Cues and Cue Stacks in the appropriate window.
Cues can be copied and moved within a Cue Stack using the standard move and copy procedures. For example, to move a cue, press COPY, select the source, then select the destination. To copy multiple cues, press and hold COPY, select multiple entries, release COPY and select the destination.
When copying or moving within a Cue Stack, Cues the Cues are moved or copied before the destination Cue that you select. To copy or move onto the end of the Stack select "End" as the destination.
Cues can be copied onto other Cue Stacks that are assigned to playbacks. Select the Cues in the Cue Stack window and then select a playback fader as the destination.
Cues can also be copied using the keypad syntax COPY CUE. For example, to copy Cues 1 and 2 to Cue 5.
COPY CUE 1 THRU 2 @ 5 ENTER
Or to copy Cues 3 to 5 at the end of the Cue Stack:
COPY CUE 3 THRU 5 @ ENTER
By default when copying Cues MagicQ does not create new Cues - it simply makes another link to the existing Cue. The default can be changed in Setup, View Settings, Cue Storage, Copy mode to Linked, Unlinked, or Unlinked Entire State.
To force MagicQ to create a new Cue press SHIFT and COPY and select Unlinked. To force record of entire state, press SHIFT COPY and select ENTIRE STATE.
A copy options toolbar can be enabled from Setup, View Settings, Windows, Always Show Record Options = Yes.
Cues that are used more than once in a Cue Stack or that are used in more than one Cue Stack are called Linked Cues. If you edit a linked cue it will affect all places where the Cue is used. The Cue Store Window shows where each cue is used.
In Cue Stacks linked Cues are shown with a "L" in the Cue field. It is possible to unlink a Cue by moving to the Cue in the Cue Stack and pressing SHIFT and UNLINK CUE.
If you wish to avoid creating linked Cues, then when copying Cues and Cue Stacks use SHIFT + COPY (copy unlinked) rather than COPY and select COPY UNLINKED.
It is possible to link Cues in a Cue Stack to other Cues in the Cue Stack or to a Cue in the Cue Store. When the Cue at the cursor is not linked to any other Cues then SHIFT + LINK can be used to link the Cue.
To link a Cue you put the cursor on the Cue(s) that you want replaced then press SHIFT LINK. Then press ENTER on the Cue that you want those Cues linked to.
Alternatively type the ID of the Cue in the Cue Store on the command line of the Cue you want to link to then press SHIFT LINK. For example to link to Q2550 type 2550 and press SHIFT LINK. That step will then be linked to Q2250. It is possible to cursor select multiple Cues in the Cue Stack and then link them all to the same Cue.
When Copying Cue Stacks MagicQ will create a new Cue Stack, but will only create new Cues when COPY UNLINKED is used.
When copying Cue Stacks unlinked MagicQ takes into account linked Cues in the source Cue Stack.
Any Linked Cues that are linked to other Cues outside of the source Cue Stack remain as Linked Cues. Any linked Cues that were only linked within the Source Cue Stack are copied to a new Cue, but all of these Cues in the new Cue Stack are Linked together.
MagicQ supports the SELECTED ONLY option when copying Cues and Cue Stacks. Only the selected heads from the source Cues and Cue Stacks will be copied. If none of the selected heads are in a source Cue then an empty Cue will be generated.
The Cues in Cue Stacks created using copying SELECTED ONLY will always be unlinked.
MagicQ can create a Cue Stack based on an old Cue Stack but using different heads.
Press SHIFT + COPY and select the COPY TO SEL option. This creates a new Cue Stack with identical Cues to the original Cue Stack except that it uses the selected heads instead of the heads in the original Cue Stack. The new Cue Stack will not contain the heads from the old Cue Stack, unless they are part of the new selection.
MagicQ will rotate around the heads from the existing Cue to provide data for the new heads - for example if the old Cue Stack had 4 heads and 8 heads are selected then heads 1 and 5 from the selection will both use data from the first head in the old Cue Stack.
This option will work on Cue Stacks containing multiple head types, but the best conversion will occur when copying from one set of heads to another set of heads. In some situations it may be preferable to do a selective copy of the original Cue Stack to heads of only one type and then to use the COPY TO SEL option on that new Cue Stack.
The Cues in Cue Stacks created using COPY TO SEL will always be unlinked.
Cues can be removed from a Cue Stack by opening the Cue Stack window, then pressing REMOVE and selecting the Cue you wish to remove by pressing in the "Status or Cue Id" field.
It is also possible to remove a specific Cue from a Cue Stack using the keypad. Type a Cue Id on the keypad then press REMOVE and select the S button of the Playback you wish to remove the Cue from.
To remove an entire Cue Stack from a Playback press REMOVE and hit the S button of the Playback. Press S button again to confirm.
Note that the Cue Storage Setting in the Setup options determine whether the Cue and Cue Stack are removed from the Cue Store and Cue Stack Store as well.
The default operation of Cue Stacks can be modified in the Defaults view of the Cue Stack Window.
Defaults can be configured for all of the Cue Stack options including operation of the faders and buttons, chase defaults and the defaults for each Cue Stack step.
Changing the Defaults does not change Cue Stacks and Cues which have already been recorded – it only changes the options for when new Cue Stacks and Cues are recorded.
When inserting and adding Cues to a Cue Stack MagicQ by default derives the settings from the previous Cue in the Cue Stack. If the setting Setup, Cue Storage Settings, "Derive settings from previous Cue" is set to "No" then all new recorded Cues will use the default step settings.
MagicQ supports Col Tags on each of the Cue Stacks. Set Col Tags in the Cue Stack, Options, Function. When a Col Tag is set for a Cue Stack then that Col Tag is shown in the Playback legend above the Playback faders and buttons.
The RGB LEDs on the MQ500 and Stadium Wing playbacks can be set to show the colour of the Col Tags - in Setup, View Settings, View Windows set Playback Col Tags Playback to Cue Stack.
Cue Stack Favourites provide a way to quickly apply favourite settings to different types of Cue Stacks.
Cue Stack Favourites include:
In the Cue Stack window there is a new view with 100 favourites. Press VIEW OPTIONS (or click 3 times on the S button) and then press VIEW FAVOURITES.
The settings of the current Cue Stack can be recorded onto a selected Favourite. The Favourite can then be applied to any Cue Stack.
Favourites can be named, moved, copied and removed in a similar way to all other MagicQ items.
Note that when applying to a Cue Stack with multiple steps fade times are not applied. Release times are applied in all cases.
Icons are only applied if the Favourite has an Icon in it - otherwise the icon on the current Cue Stack is retained.
Cue Stack Favourites are stored in the show file. They are also stored in the settings file when using SAVE SETTINGS and IMPORT SETTINGS.
MagicQ supports two methods of playing back audio files from a Cue Stack. The first is allocating a single audio file to a Cue Stack, which is started when the Cue Stack is activated and stops when the Cue Stack is released. This is good for if you have a particular song for a timecode Cue Stack and need to synchronise Cue playback to the audio file. The second method is to specify an audio file as part of a given Cue in a Cue Stack. This will play the audio file when the Cue is activated.
Audio output is available direct from the jack port on the front of the MQ500 consoles, from rear of the MagicQ Pro 2014, and from the audio port when using MagicQ PC on Windows, Mac and Linux. MagicQ older Compact consoles and Pro2010 consoles do not have audio output ports.
MagicQ will search for audio files in the show\audio folder.
The Timeline Editor gives a visual timeline of the audio file and Cue Stack information to allow Cue Stacks to be programmed along a visual timeline.
To specify an audio file to play when a Cue Stack is activated, goto the Cue Stack options, select the Audio tab, and then select your track in the "Audio file" setting.
The "Audio Play Mode" setting can be used to associate an audio file with a Cue Stack for use in the Timeline Editor, but to not actively play back from MagicQ. This is useful in the situation where an external system is playing back audio and providing a timecode input to MagicQ, but where the waveform is still visualised in the Timeline Editor window.
If a Cue Stack has an audio file as well as timecode Cues, then MagicQ will make sure that the audio follows the timecode value for the Playback. Scrubbing the timecode value from an external source will make the audio file jump to the given time. Using the "Set Timecode" feature in MagicQ will similarly jump to the corresponding point in the audio file.
MagicQ supports playback of audio files triggered from Cues within Cue Stacks.
Use the "Audio" column in the Cue Stack window to specify the audio file to play when the corresponding Cue is triggered.
Each playback supports play of one Cue audio file at a time. If a Cue is triggered with an audio file configured, then any audio playing from a previous Cue in the same Cue Stack will be stopped. Audio files playing from the Cue Stack setting will continue. Multiple playbacks can be used to play multiple sounds simultaneously.
The Macro & Audio fields support some special commands to stop, close, jump and set the gain level. ChamSys recommend using the Macro field for these commands.
In the Macro field:
D <Audio command> | Audio Command, supported commands are stop, close, jump, dev, Param1,g (gain) |
Dstop | Stops playing the file |
Dclose | Stops playing the file and closes the audio port |
Djump | Jumps within the current audio file to the calculated position (timecode only) |
Ddev | Changes to use output device d |
Dgain <gain> | Changes audio gain on current playback |
Dgain <playback> , <gain> | Changes audio gain on specified playback 1 to 202 |
Dparam 1,<g> | Changes gain level (volume) where g is value 0 to 100 |
In the Audio field:
filename.wav | Plays filename.wav (also supports other file types) |
stop | Stops playing the file |
close | Stops playing the file and closes the audio port |
jump | Jumps within the current audio file to the calculated position (timecode only) |
dev | Changes to use output device d |
gain <gain> | Changes audio gain on current playback |
param 1,g | Changes gain level (volume) where g is value 0 to 100 |
MagicQ will decode a variety of both lossy and lossless audio file formats. This includes .wav, .ogg, .flac, .alac, .mp3 and .aac. When using .wav files, only 8 and 16 bit formats are supported. It will accept both mono and stereo formats and sample rates up to 96kHz and will internally resample the audio files configured in the show to 44.1kHz stereo when playing back.
Audio files will initially play back at 100% volume from their files unless overridden by the audio field above. The master output volume from MagicQ can be configured in Setup, View Settings, Ports, Audio output volume.
Cue Stack audio and Cue Audio will fade out when a Playback is released with a Release time configured.
If a Playback is configured with the "Fader controls audio volume" setting, then the audio volume will also be multiplied by the fader level.
Cue Stack macros enable control over other Cue Stacks from within Cue Stacks such as activation, release, go, stop, and setting level of other Cue Stacks. Macros are typed into the Macro field in the Cue Stack window (scroll to the right). Macros can affect multiple Cue Stacks on different Playbacks enabling complete shows to be driven from one master Cue Stack.
Cue Stack macros take the following format:
A <Playback no> | Activate playback |
A <Playback no> / <Level> | Activate playback at level |
A <Playback no> / <Level> / <Fade time> | Activate playback at level with time |
B <Macro no> | Run macro (0 = stop all macros) |
R <Playback no> | Release playback (0 = release this playback) |
R <Playback no> / <Fade time> | Release playback with time |
R1000 | Release All Holdover Playbacks |
R999 | Release Holdover Cue Stack on this Playback |
T <Playback no> | Test playback (activate with level 100%) |
T <Playback no> / <Fade time> | Test playback with time (activate with level 100%) |
U <Playback no> | Un-test playback (release with level 0%) |
G <Playback no> | Go on playback. |
G <Playback no> / <Cue id> / <Preload flag> / <Fade time> | Go to Cue id on playback with time (when <preload flag> is set to 1, cue is preloaded). |
G 0 / 1 / <Frames> / <Layer> | Go on current playback when the MagicHD layer is the given number of frames from the end |
G 0 / 2 / <Frames> / <Layer> | Go on current playback when the Pixelmapper layer is the given number of frames from the end (for server 2 and above add 16 to the layer for each server) |
H <Type> | 1 – Lamp on all heads, 2 reset all heads, 3 lamp off all heads, 4 cancel screen save |
H <Type> / <Uni zone> | Type is 5 for enable Uni zone, 6 for disable Uni zone |
H 10 / <Speed Master> / <Command> / <Parameter> | Control Speed Masters |
H 11 / <Device ID> / <Zone> / <Status> | Lyntec Zone. Status = 1 for On, 0 for Off |
H 12 / <Device ID> / <Chan> / <Status> | Lyntec Channel. Status = 1 for On, 0 for Off |
H 112 / <state> | Emergency Hot Takeover, <state> is 1 for On, 0 for Off. Also works for H 911 and H 999. |
S <Playback no> | Stop playback |
C <Playback no> | Choose playback |
K <level> / <Fade time> | Set level of last Cue Stack to be activated (e.g. with an A command) / fade time |
L <level> / <Fade time> | Set level of current playback / fade time |
M <level> / <Fade time> | Set level of the playback that is running the macro / fade time |
J <Cue Id> | Jump to Cue Id on current playback |
E <Cue Stack id> | Activates Cue Stack (in Stack Store). |
E <Cue Stack id>/<Level>/<Cue Id> | Activate Cue Stack at level. Cue Id is optional. |
E 0/<Exec Page>/<Item> | Activate Exec Grid item |
F <Cue Stack id> | Releases Cue Stack (in Stack Store) |
F 0/<Exec Page>/<Item> | Release Exec Grid item |
I <Timecode> | Set internal timecode (1000 to pause, 1001 to play, 1002 to reset to 0. All other values to set specific timecode) |
O <Timecode> | Set current received timecode |
P <Page no> | Change page (page no of 0 means next page) |
V <View no> | Open Layout (window layout) |
W <Enable> | Enable/disable timecode generation (1 for enable, 0 for disable, 2 for use internal timecode from this Playback) |
W <Autom ID> / <Enable> | Enable/disable Automation (1 for enable, 0 for disable) |
Q <Timecode> | Enable timecode gen from timecode e.g Q100 |
T0 / <Zone id> / <Button id> / <State> | Trigger 10Scene - Zone id 1 to 20, Button id 1 to 10, State is 0 for button released 1 for button pressed 2 for activate and 3 for release |
X <Data> | Transmit data on the serial port |
Y <Data> | Transmit data on the network port over ChamSys Remote Ethernet Protocol |
N <Data> | Transmit data over MIDI |
K/ <Data> | Transmit data over OSC. |
D <Audio command> | Audio Command, supported commands are stop, close, jump, dev, Param1,g (gain) |
Z<DDMMYYYY>Z | Scheduled Events Date |
Note that either / or , can be used as the separator between parameters in commands that have more than one parameter. It is not neccesary to add a / or , after a command between the next command - MagicQ will detect A to Z as a command. Midi, Serial, Audio & Ethernet cue stack macro commands cannot be mixed with other cue stack macros within the same cue.
The playback number can either be the playback number 1 to 202. Alternatively Playbacks for wing playbacks can be entered as 1-1 to 1-24, 2-1 to 2-24 etc… Playbacks can be playbacks with faders or virtual playbacks (playbacks on non fitted wings).
Multiple Playbacks and multiple Cue Stacks in the Stack Store can be selected using + and THRU (>) in the first parameter.
For example to activate playback 8
A8
To press GO on playbacks 3 to 5,
G3>5
To activate Cue Stacks 30 and 32 in the Cue Stack Store at 100% on step 2.00.
E30+32/100/2.00
Multiple commands can be put in a Cue Stack macro, e.g. to activate PB1 and then release PB2
A1R2
The G macro optionally supports two parameters. The first parameter is the playback, the second is the Cue ID to GO. For example, G5/6 will GO Cue Id 6 on Playback 5.
The A macro optionally supports two parameters. The first parameter is the playback, the second is the level in %. For example, A5/60 will activate Playback 5 at 60%. To activate at 100% we suggest using the T macro rather than A - i.e. T5 instead of A5/100.
The R macro supports the parameter 0 to release itself – i.e. R0 releases the playback that is running the macro.
Where using the E and F Macros to control Execute grid item the item starts from the top of the grid left to right.
The commands X, Y, N and K/ take a list of byte values (0 to 255) or strings in between "" separated by \ or ,
To send the bytes 10 followed by 20 followed by 30 on the serial port use the command
X10,20,30
From v1.9.0.4 the Cue Stack macro commands X,Y,N, K/ and D (Serial, Ethernet, MIDI, OSC and Audio commands) can be placed after other macro commands in the Macro field. They must be the last command in the Macro field. Previously they had to be the one and only macro command. As before, only one macro command X,Y,N,K,D can be in a Macro field. For example it is now possible to do:
A1 R2 Y"G2"
G2 K/pb/1/go
Executing the Q Macro turns off timecode receive on the ChamSys MIDI/Timecode USB interface and on some consoles.
Timecode for the I and O commands can be specified using any of the separators / ; , . If no separator is specified then the time is in seconds.
Cue Stack macros can be tested from the command line on MagicQ consoles and unlocked MagicQ systems using the command testmac followed by the macro. Note that the D, I, M macros normally run on the playback that is executing the macro so will always apply to the current selected playback when executed from the command line.
Use the H10 Cue Stack macro to control the Speed Master.
H10,<Speed Master ID>,<Command>,<Parameter>
Command | Parameter | Description |
1 | BPM | Set the BPM |
2 | Activate | |
3 | Deactivate | |
4 | Run | |
5 | Halt | |
6 | Divisor | Set Divisor (2 to 32. 0 for no divisor) |
7 | Multiplier | Set Multiplier (2 to 32. 0 for no multiplier) |
8 | Step | |
9 | Source is DJ Beat | |
10 | Source is Audio Beat | |
11 | Source is DJ BPM | |
12 | Source is Audio BPM | |
13 | Source is Tap | |
14 | Resync | |
15 | Resync beat | |
16 | BPM increment | Increase the BPM |
17 | BPM decrement | Decrease the BPM |
MagicQ supports execution of the Cues in a Cue Stack according to timecode - either generated internally, or received externally from other devices.
To use timecode in a Cue Stack set the Halt field of one or more steps to timecode. Note you will need to double click the Halt field or put the cursor on the Halt field and press in the Input Window to open the Halt options. Pressing SHIFT and ENTER will toggle through the options.
When setting Cues to timecode for the first time, the initial timecode value is set to previous timecode value in the Cue Stack + 1 second.
Timecode values in a Cue Stack must be in increasing order otherwise the Cue Stack may not play back at all. Timecode values that are out of sequence are shown with a !.
MagicQ supports both external and internal timecode - choose using soft button C. External timecode is received from LTC, MIDI, Art-Net, Winamp or from the MagicQ timecode simulator.
Internal timecode is run on a per Cue Stack basis, starting from 00/00/00.00 when the Cue Stack is activated.
When the Cue Stack is active and a timecode value reaches a value in one of the steps then that step is executed.
When a timecode Cue Stack is on a playback, the GO and PAUSE buttons will now allow control of the timecode playback status when using internal timecode or the external timecode simulator. If the timecode is paused, then the GO button will start the timecode from where it was paused. Similarly if the timecode is running, then the PAUSE button will stop the timecode where it is.
Pressing GO when the timecode is already running will progress the Cue Stack to the next cue in the same way as a non timecode enabled Cue Stack works and the timecode will continue to run as before. This is useful in the case where there are some Cues which don’t have a timecode and need to be manually triggered during the stack.
The Fast Forward and Fast Back buttons as part of the crossfade section will jump back and forward between the Cues, and will also update the current timecode. This allows for fast navigation around timecode enabled Cue Stacks.
If the Cue Stack has an audio file associated with it, then the audio playback will follow the timecode value for the Cue Stack.
See Timecode Support for how to set up external timecode on the console.
Timecode values can be edited individually and can be set in the format 0/0/0.00. The + and – operators can be used to add or subtract times to the timecode times for one or more cues. This is useful for changing the absolute times of a Cue Stack whilst maintaining the relative times between Cues. Use SHIFT or CTRL and the cursor keys to select multiple times and offset their values using + or -.
To set a Cue Step to use the current timecode being received enter / in the Wait field. If multiple Cues are cursor selected then the first Cue will take the current timecode and the following Cues will all be modified, but keeping the same offsets between Cues as they previously had. This enables a whole section of Cues to be moved to a new timecode.
To adjust all timecode values in a Cue Stack including the TC Tracks use the Adjust TC soft button and enter a +/- value to adjust by. Alternatively, press SHIFT + Encoder Y to nudge all timecode values up or down.
It is possible for the console to learn the timing live. Set the steps in the Cue Stack to timecode. Then release the Cue Stack, and in the Cue Stack window, press SHIFT and RECORD TC.
Now press the GO button for the Cue Stack. MagicQ starts the timecode running at 00/00/00.00 and each time you press GO it moves to the next Cue whilst recording the current timecode into the Wait fields. At the end of the Cue Stack, press RELEASE to end the timecode record mode.
When a Cue Stack has some steps set to timecode the Cue Stack Window shows the timecode simulator / internal timecode on soft buttons X and Y.
When a Cue Stack is set to External Timecode then the timecode simulator is available - this is the same simulator that is available in the Setup window, but is easier to access when working on a timecode Cue Stack. Use soft button Y to turn the timecode simulator on and off. The display for soft button X shows the current timecode value (either received from external timecode or set by the simulator). Use soft button X to start and stop the timecode, or enter a value on the keyboard/keypad and press the soft button to jump to a new timecode value.
When a Cue Stack is set to Internal Timecode then soft button X shows the current internal timecode value of the playback. Use soft button X to start and stop the timecode, or enter a value on the keyboard/keypad and press the soft button to jump to new timecode value. Soft button Y can be used to restart the internal timecode at 0.
When using the TC simulator or internal timecode, manually jumping to a Cue that is set to timecode timing will cause the timecode to be set to that timecode value. Jumping to a Cue can be done by pressing GOTO CUE or putting the cursor on the Cue Status field of a Cue and pressing ENTER.
A Cue Stack on a Playback will only run external timecode steps when it is active - it will not activate by itself. Either manually activate the playback before the external timecode is started or use an Autom event to set a Playback to activate when a particular external timecode range is detected.
In some cases it may be useful to have a master Cue Stack controlled by timecode that is always active which then activates other Cue Stacks for each song.
When timecode values jump (for example when changing tracks), MagicQ checks for each active Cue Stack, whether the external timecode received is within the range of the first timecode value in the Cue Stack and the last timecode value in the Cue Stack. MagicQ will only execute a change of Cue if the new value is within the range controlled by that Cue Stack. This helps to avoid the erroneous execution of an entire Cue Stack.
When timecode values jump forward, MagicQ will jump to the Cue that corresponds to the new timecode. If the Cue Stack, Options, Advanced, Recalculate State on Jumps is set to "Yes" then MagicQ will execute all of the Cues from the current Cue to the new Cue including any macros, media and audio clips. If Recalculate on Jumps is set to "No" then only the new Cue will be executed.
MagicQ supports a timecode offset field for each Cue Stack. This can be used to add a positive or negative timecode offset to all timecode values within a Cue Stack including all TC Tracks associated with that Cue Stack. For example if the Cues in the Cue Stack have been set to respond to timecode starting at 0/0/0 and the timecode received actually starts at 2/0/0 then setting the timecode offset to 2/0/0 will make the Cue Stack correctly respond to the received times. Similarly if the Cue Stack has been set to respond to timecode starting at 5/0/0 then and timecode is actually received startign at 0/0/0 then setting a timecode offset of -5/0/0 will have the desired effect.
The timecode offset can be adjusted in the Cue Stack Window by holding SHIFT and turning encoder D.
The timecode offset is set in Cue Stack options, Advanced. Note that all the Cues will still show their programmed timecode values but an offset will be applied when playing back or recording timecode. The titlebar in the Cue Stack window shows the offset.
MagicQ supports an option to automatically activate and release Playbacks according to the current received timecode. To use this feature set Setup, View Settings, MIDI & Timecode, Timcode activate/release to either Act/Rel TC Playbacks or Act/Rel TC playbacks at full. MagicQ will activate and release all playbacks on the current playback page that contain timecode depending on the received timecode.
Note that when this option is enabled, Playbacks that are in the range of the incoming timecode can not be released.
Cue Stacks set to Internal timecode start the internal timecode from 0 when the Cue Stack is activated.
There is support for setting the internal timecode from within a Cue Stack using the macro command ‘I’. To reset the internal timecode for a Cue Stack to 00/00/00.00 use the macro I0. To set a specific time, e.g. 10 seconds use the macro I10.
Note when using internal timecode MagicQ uses hundredths of seconds as the unit of measure rather than timecode frames.
MagicQ supports up to 10 timecode tracks (TC Tracks) linked to each Cue Stack. A timecode track allows a sequence of button presses/fader movement events to be associated with the playback of a Cue Stack. This is useful where a main Cue Stack is used to program the overall look, but additional effects and bumps need to be added in time to the music. The timecode tracks are independent of the Cues in the Cue Stack, so it is therefore not necessary to generate a Cue for each of these effects/bumps.
All recorded timecode tracks are started when the Cue Stack is activated and are released when the Cue Stack is released.
Timecode tracks are visible in the Cue Stack, View TC view.
Tracks 1 to 10 are selected by soft button A. Tracks can be recorded, removed and unassigned using the RECORD TRACK, REMOVE TRACK and UNASSIGN TRACK soft buttons.
The RECORD TRACK function is used to record the tracks - in this mode MagicQ records all button presses and fader movements as they occur with the appropriate times. The events and times can be modified afterwards. Each event can be edited individually, or whole sections can be cursor selected and moved in time.
When recording a Track it is not recommended to record button or fader movements from the Cue Stacks itself as this may cause unexpected results when played back.
Timecode tracks can be edited and steps can be manually added to them and removed from them.
Steps in a timecode track must have increasing Time field otherwise they will not play correctly. To reorder the steps so that they are correctly in time order use the REORDER TRACK soft button.
Each timecode track can be turned on and off individually using soft button D.
Each timecode track is stored in MagicQ as a keyboard macro and if required can also be viewed and played back in the Macro Window. When a Track is created MagicQ generates a keyboard macro with the name CSx TrY where X is the Cue Stack ID and Y is the track number.
When the track is unassigned using the UNASSIGN TRACK soft button the keyboard macro is removed from the Cue Stack. The macro can still be viewed in the Macro Window and assigned to other Cue Stacks.
When the track is removed using the RMEOVE TRACK soft button the keyboard macro is also removed from the Macro window.
Timecode tracks can be managed completely from the Cue Stack window, so it is not necessary to use the Macro window. If required the ASSIGN TC MACRO soft button in the Cue Stack window can be used to manually assign a keyboard macro to a Track.
MagicQ supports importing timecode values from .CSV files which can be exported from software such as InqScribe, Reaper and Audacity. In Cue Stack, View TC View select the IMPORT TC TIMINGS soft button.
MagicQ normally looks for a .csv in the format:
<timecode>,<short name>,<long name>,<options>
Where the <short name> is used as the cue name and <long name> the comment field within MagicQ.
For example:
Header line 10:02:36.09,all on,Guests enter the room
10:02:36.13,OPP 2 ON CHASE,Start the event
10:02:36.23,ALL ON,Interval
When importing from InqScribe, first export as .XML, open using a spreadsheet editor (for example Excel), reorder the columns to be as above and then save out as a .csv file.
MagicQ autodetects input from Reaper (first line starts with a #) - the format for Reaper is
<short name>,<long name>,<start tc>,<end tc>,<length tc>,<colour>
For example:
#,Name,Start,End,Length,Color R1,Intro,0:00:00:00,0:00:02:00,0:00:02:00, M1,Accent,0:00:00:11,,,FFF80A
MagicQ autodetects input from Audacity. Audacity uses a tab delimited file without a header.
If the filename contains "Label Track" then MagicQ treats it as an Audacity file. MagicQ will also detect Audacity if the file has tabs instead of commas.
<start timecode> tab <end timecode> tab <name>
For example:
0.000000 0.000000 Intro Cue 25.497099 25.497099 Dance
Once the times have been imported MagicQ gives the option to Make Cues, Make TC Stack or Load Markers.
When Make Cues is selected, Cues will be generated for each timecode value and appended to the Cue Stack on the current playback for each of the timecode values in the file.
If there is no Cue Stack on the current playback than a Cue Stack will be generated on the currently selected playback with a Cue for each timecode timing point. Each Cue can be programmed by merging into it. Remove any unwanted Cues. If the playback is empty then a new Cue Stack will be created.
When Make TC Track is selected, TC Track items will be added to the current selected Track of the Cue Stack on the current playback for each of the timecode values in the file.
If there is no Cue Stack on the current playback than a Cue Stack will be generated on the currently selected playback with a TC Track 1 with a TC Track item for each of the timecode values in the file.
When Load Markers is selected, Markers will be loaded into the Cue Stack in the current playback. If there is no Cue Stack on the current playback than a Cue Stack will be generated on the currently selected playback with the Markers loaded into it.
The Timeline Window provides alternative views into the Cue Stack and enables editing of Cues and TC Tracks events in a track sheet or visual timeline form. There are three views in Time line window; VIEW SHEET, VIEW CUELINE and VIEW EDITOR.
To use the VIEW TC mode in the Cue Stack view, you can easily toggle between the timeline and the Cue Stack view using the VIEW TIMELINE and VIEW CUE STACK options.
To record to a track first select the track layer normally named "CSYY TRKZ" where YY will be the number of the Cue Stack and Z will be the track number. To select the track click/press the on box containing the track layer’s name once you have selected you should see the INSERT IN TRACK option become available. It will immediately start recording and you will see the changes you make appear live in the relevant tracks below.
To add more Timecode tracks you can do so using the new button "Add TC Track". It will immediately start recording and you will see the changes you make appear live in the relevant tracks below.
To select multiple cues and/or steps in a track, if you hold shift and press/click and drag you are able to draw a box and select multiple items.
Once selected you can either drag, copy or delete them all at once. If you drag them you must press/click on an item in the selection then drag. To copy the items press copy then left click/press on the timeline to place them all at that position. The timecode distances between all items are preserved. If you press return instead of clicking after pressing copy; it will paste all the items 1 second after the original.
Selected items can now be deleted as a group using the REMOVE button.
You are able to enter timecode value and update the playhead’s position while a track is running. Enter a +/- and/or your value then press on the PB Timecode/encoder X soft button to have it apply the value against the current time. A value with no +/- operator will set the position.
To keep the playhead centred you can turn on the "Center Playhead" option found on the horizontal scroll encoder Y soft button.
Press View Track Sheet to view the track sheet. The Track Sheet shows the data for the Cues for the Cue Stack on the currently selected Playback.
Colours in the track sheet are as follows.
Red | In programmer |
Cyan | Increasing value |
Green | Decreasing value |
White | Static value controlled by Playback/Cue |
Magenta | Tracked value |
Values can be directly edited in the Track Sheet.
Use SHIFT and BLOCK CUE and SHIFT and UNBLOCK CUE to block and unblock Cues in the Track Sheet.
The Cueline is the original MagicQ timeline which enables viewing of a Cue Stack horizontally as a timeline. This view only shows Cues within the Cue Stack, not TC Track Events and there is only very limited editing supported.
Use encoders A to specify the level of detail shown for each head and encoder B to choose specific attribute masks.
By default all of the heads in the Cue Stack on the selected Playback are shown – use the SEL HDS ONLY soft button to make it only show the currently selected heads from that Playback.
Encoder D is used to modify the horizontal scale to choose how many Cue Steps are shown in the window.
Use encoders X and Y to scroll around the timeline.
View Vals and View Raw can be used to view the data values rather than the timeline.
Press VIEW TRACKING to show the tracking information for information that tracks from one Cue to another. When this is not selected only the hard values in each Cue are shown.
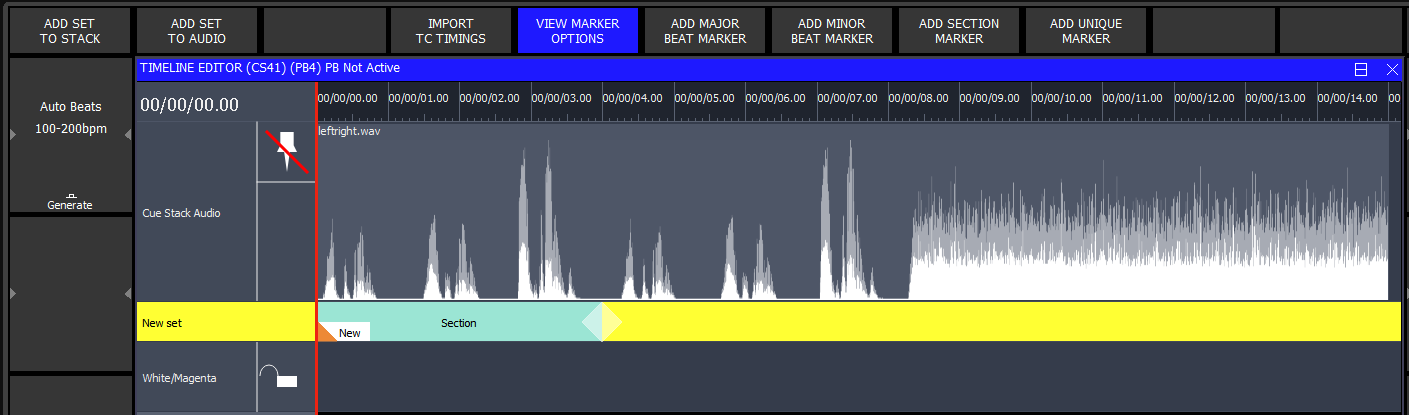
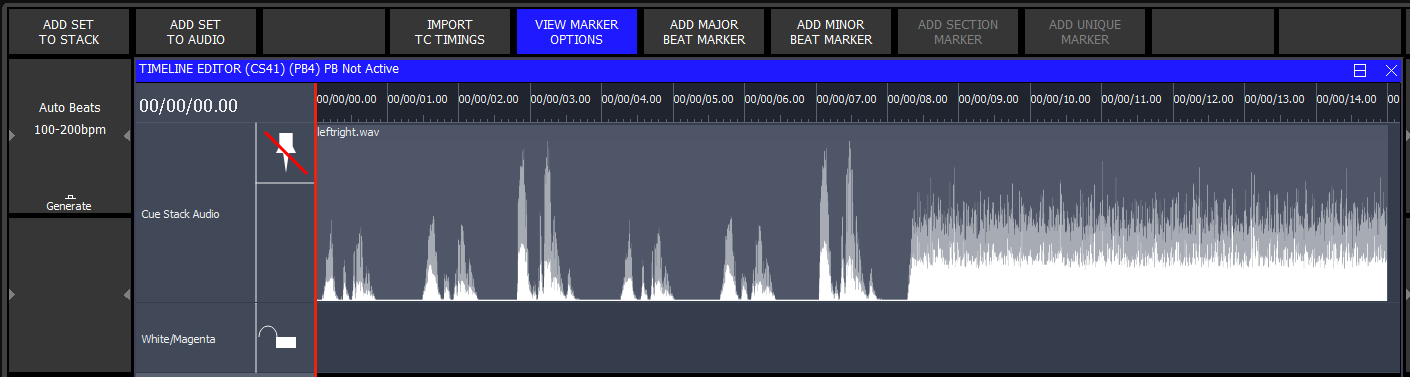
The Timeline Editor is designed to allow you to lay out Cues in a Timecoded Cue Stack on a traditional timeline based view. It visualises audio tracks, timecode values, and both Cue and Timecode Track events in rows to allow you to visually see and modify the Cue Stack.
To access the Timeline Editor, select your Cue Stack, and then press the TIMELINE EDITOR soft button from within the Timeline window. The Timeline Editor will update the timeline to follow the currently selected playback. To lock the window to a particular Cue Stack, select the Cue Stack as normal, and then press the CHOOSE CUE STACK soft button. To unlock the window, press the same button again. Note that the cue stack needs to be set to cue timing and the cues within it set to timeline (TC) timing. Cues can be set to TC timing using the Halt field within the cue stack.

The timeline is split into multiple rows:
The timeline view can be panned by dragging in any of the background space of the timeline window, or by using the "Horiz Scroll" encoder. The horizontal zoom level can be changed with the "Zoom" encoder, or by pressing on the encoder soft button to zoom in and out.
In its default mode, the cue and timecode track rows are unlocked and will allow movement by clicking and dragging individual items. To prevent accidental changes to a cuestack, a row can be locked and unlocked by clicking the padlock icon next to the row name.
Items can be selected and moved by clicking and dragging on the item. When selected, items can also be moved using the "Timecode" encoder. Cue fade and delay times can be modified using their respective encoders.
If Cue’s are moved they also check whether they have had their order changed, if they change from orange to grey this is to show they are now no longer in the correct order. To fix this press the "REORDER TC" softbutton. Once ordered they will return to their orange colour and will then respect the updated time.
After a TC reorder it will likely rename a cue with a new Cue ID, so aware if you have linked any of the cues. If you wish to renumber the cue’s so they follow a simpler order press the "REORDER CUE IDs" button.
When a timecode offset is enabled in the Cue Stack, then two rulers are shown at the top of the window, with the upper showing timecode from the start of the Cue Stack, and the lower showing the equivalent external timecode with an offset applied.
The Timeline Editor is supported on the MQ500M, MQ500, MQ250M, MQ80, MQ70, MQ50 and MagicQ PC Systems. Legacy products such as the MQ40,MQ40N, MQ60 and MQ100 Series consoles do not support the timeline editor.
Pressing "VIEW CUE STACK" will switch you over to the "CUE STACK" window, if you then press "VIEW TC" you see the "VIEW TIMELINE" button. You can switch back and forth between these views using these options with ease.
All the markers can be moved, copied and removed using COPY, MOVE and REMOVE buttons.
Naming a marker set or marker (if applicable) can be done using SET.
The generate a bpm grid option has been moved if you would like to generate a grid based off a bpm you need select the “VIEW MARKER OPTIONS”.
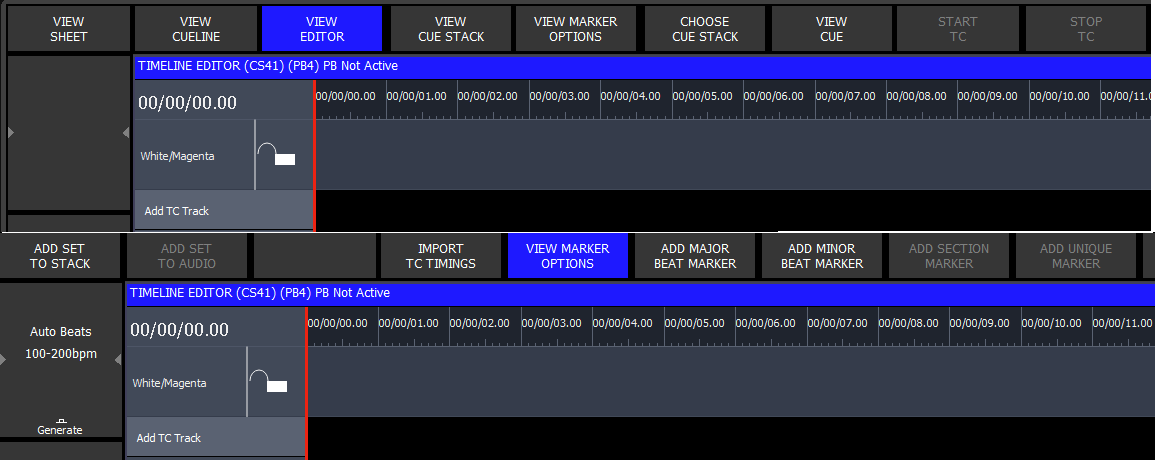
To generate a bpm grid simply use the encoder to set the BPM range you would like then press "Generate", if you need to add any extra beat markers add use the “ADD MAJOR BEAT MARKER” to mark the beginning of a new grid and “ADD MINOR BEAT MARKER” to mark the other beat positions.
Marker set layers are used to label sections of a cue stack or song (if used), each layer can contain sections and unique markers. In order to add to an existing “marker layer” it first must be highlight/selected.
Using the cursor will add the new marker to that position, otherwise it will be position at 0.

To add a new marker set layer you need press either the “ADD SET TO STACK” or “ADD SET TO AUDIO” option. The latter of the two options will only appear if there is and audio file assigned to the cue stack.
Using this option with lock/unlock the timeline window to a particular "Cue Stack".
Audio files are shown in the timeline view as a waveform. If the input audio file is in stereo, then this is mixed down to mono before being displayed.
There are two render modes currently available for audio files. The first will show the peak and RMS values of the overall waveform. The second mode shows the peak values of the hi, mid and lo frequency bands of the audio file as an overlaid red, green, and blue waveform. This can aid in aligning cues to particular beats which may not be easily visible on the standard waveform, but easy to see when just looking at a particular channel. The modes can be toggled by pressing the "VIEW FREQ BANDS" and "VIEW PEAK/RMS" soft button in the timeline editor window.
An example of how these two modes compare can be seen below. These show an audio file containing a single sine wave of increasing frequency. The RMS value and peak values stay consistent across the file as the amplitude of the sine wave doesn’t change, but the rising frequency can be seen going from lo, through mid, to high.


The Cue Stack audio file will always start at the 00/00/00.00 timecode value as this is started when the Cue Stack is activated. Cue Audio files will move in conjunction with their corresponding Cue in the above row.
The first time an audio file is loaded into the timeline window, the waveform image is generated in the background. Once this has been created the timeline window will show the respective waveform. The underlying image files are stored in a folder named _cache in the audio folder based on the file name. If an audio file with the same name is replaced in the audio folder, you may need to clear this cache folder to regenerate the audio waveforms.
The current timecode value is shown in the timeline using the red playhead bar. This will follow the timecode value for the selected Cue Stack. If the Cue Stack is configured to use an external timecode input, and a timecode offset has been configured, then the playhead will show the relative position in the Cue Stack of the external timecode. If the Cue Stack is either using the TC Sim or internal timecode, then the Encoder X buttons will start and stop the timecode playback. The RESTART TC softbutton will set the current timecode value to 00/00/00.00.
The playhead can be moved by dragging in the timecode ruler at the top of the display. If the Cue Stack has a Stack Audio file associated and the Playback is currently active, then the Audio playback will also be scrubbed along with this.
When the timecode source is playing, the timeline window will follow the playhead to keep it in view. If you have scrolled away from the current playhead, the Centre Playhead soft button on encoder Y can also be used to move back to view the current playhead.
Timecode track items are shown on the timeline where each macro target is shown on it’s own row. This means that Playback actions for multiple Playbacks will appear on their own rows. An entire timecode track can be hidden using the arrow in the row name. The timecode track can also be enabled or disabled using the 🚫 icon.
For TC track entries which change the level of a Playback, the level shown in the timeline window is the target level which the Playback will fade to. The level can be modified using the "Parameter" encoder.
To enable the timecode loop function on a cue stack, you can use the ENABLE TC LOOP softbutton from within the Timeline Editor window. This will toggle the function on and off. The timecode loop functionality is only supported with a Cue Stacks' internal timecode and not on Cue Stacks configured to external timecode.
To modify the timecode loop in and out points, use SHIFT + CONFIG TC LOOP to enter the loop configuration mode. The timecode in and out points can be modified using encoder A and B respectively. The In and Out points can also be set to the current timecode value on the playback by using the SET LOOP IN POINT and SET LOOP OUT POINT softbuttons.
The loop configuration mode can be exited by pressing the BACK softbutton.
| | ||