| |
| |
The Execute Window is a special window designed to allow customisation of the look and feel of the MagicQ. This layout of the window is configurable by the user and can contain Groups, Palettes, Macros, Cues and Cue Stacks and other special items.
The Execute Window is also automatically accessible on the MagicQ remote iOS and Android applications and items in the Execute Window can be trigger from Cue Stack Macros and from external systems using the ChamSys Remote Protocol Commands.
Press the Exec button to open the Execute Window. Press 2 and Exec or 3 and Exec to open additional Execute Windows. Each Execute Window operates independently and can select different Execute Grid pages. Items can be copied between different Execute Windows.
There are three views, View Design, View Execute and View Max. Use View Design to design the grid size and to place items in the grid. Use View Execute for playback, or View Max for full screen playback.
Use the Set Grid Size soft button to specify a grid size and then copy the relevant items from other windows. For example, to place a Group in the Execute Window; go to the Group Window, press Copy, select the Group, and then go to the Execute Window and select the box to place the Group.
Cues and Cue Stacks can be recorded directly into the Execute Window using Record and selecting a free item.
Multiple items can be selected for copying into the Execute Window.
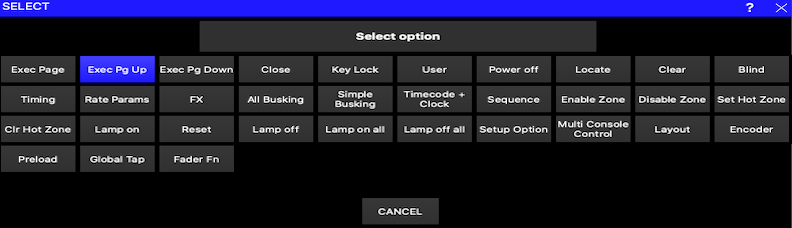
You can also assign Special Functions to items in the Execute grid. These include Execute Page Up, Execute Page Down, Change to Exec Page, Close, Blind, Clear, Lamp On, Lamp Off, Reset, Key Lock. Press the ASSIGN SPECIAL soft button.
There are special functions for controlling universe zones – enabling, disabling and setting the hot takeover state. These enable complete control of complex DMX routing from a simple interface.
To view the details of an item in the Execute Window use the VIEW ITEM soft button. This makes it easy to change FX and Chase speed quickly.
Holding the SELECT button on the console front panel and pressing an item in an Execute Window also performs a VIEW ITEM on that item.
The Execute Window can be run in full-screen mode (View Max), allowing the whole of the screen to be customised. The size of the full screen Execute Window can be set via GRID OPTIONS soft button and selecting Win Size – this defaults to 1024 by 768 for MagicQ PC/Mac and 800 by 600 for the console.
Selecting the "Run in Execute Window" option in the Setup Window ensures that the MagicQ will start up directly in the Execute Window. Note that on MagicQ PC/Mac, the buttons on the full screen Execute Window will only work when a MagicQ PC Wing is connected.
Use the close icon in the title bar to close the Execute Window. Use Assign Special to add a specific Close button into the Execute Grid. On MagicQ consoles you can press the CLOSE button to return to normal MagicQ windows.
It is possible to have the legends for the 10 main playbacks displayed even when in full screen view - use soft button C, Playbacks = On. The Playback legends take up the bottom part of the window, thus reducing the total size available for items.
Note that View Max is only supported on the first Execute Window.
It is possible to protect the Execute Window so that operators only see the Execute Window and can not use the main MagicQ application windows. From the Execute Window set up a password using the Set Password soft button. If an operator tries to close the window then they have the choice of shutting down or entering the password to re-enter the main MagicQ application windows.
Password protection in the Execute Window is only supported when the run in execute option is enabled in Setup, view settings, playback and MagicQ has started in full screen execute. Pressing view max in the execute window will not prompt for the password.
For security reasons there is not a master password. To reset the password that is locked, please contact your local dealer.
Protection can be added so that users cannot operate any Execute buttons until they enter a password. A "Key Lock" Special Function button can be placed in the Execute Window. When pressed the Execute Window is locked and can only be unlocked by entering the password. If no password has been set, then entering a blank password will unlock the window.
MagicQ includes several options for automated start of Playbacks and Executes. These options are available on MagicQ consoles and on MagicQ PC systems when connected to a MagicQ USB Wing or Interface. See Setup, View Settings, Playback, Activate Playbacks On Start.
Items in the Execute window so that different items can have different sizes. This is particularly useful for laying out buttons around faders.
In View Design mode, use encoders and soft buttons X and Y to set the item width and height from 1 to 16 boxes wide . The default is 1 box wide and 1 box high.
Items that overlay other items will block the other items so overlapping items should be avoided.
The overall grid size can be set to up to 40 by 40 items - which enables detailed grid layouts to be constructed.
The Execute Window supports faders as well as buttons. Cue Stacks and Cues can be represented as faders. To set a Cue Stack or Cue as a fader, move the cursor to the item and press SOFT button E to toggle the Type between button and fader. A ‘F’ appears in the corner of the item when it is set to be a fader. Faders are only shown in Execute View and Max View, not in Design View.
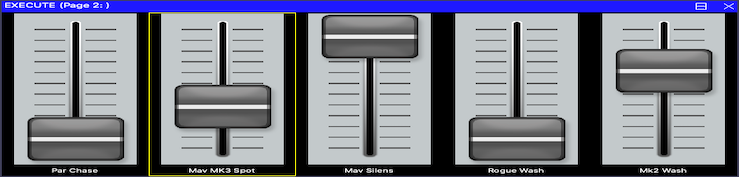
From version 1.8.8.0 MagicQ supports full sizing of all Execute items using the Item Width and Item Height soft buttons and encoders. In previous versions, and in 1.8.8.0 if faders are set to width and height of 1 then the size faders then if there is an unused box below the fader item then MagicQ automatically adjusts in the Execute View to fill the two boxes.
Use SHIFT or CTRL and the cursor keys to cursor select multiple items to set the type for multiple items in one go.
By default buttons in the Execute Window are set to toggle their function on and off each time the button is pressed. It is possible to set a button in the Execute Window that is controlling a Cue or a Cue Stack to momentary rather than toggling. Move the cursor to the required item and use Soft button E to set the item type "Button Fl".
Buttons can also be set as solo buttons (also known as radio buttons) so that a group of buttons programmed as Cues or Cue Stacks can be set so that only one of the group is active at a time. Use soft button E to select "Solo".
The group consists of all adjacent buttons in a horizontal row that have their "Item Type" set to "Solo". "Solo" buttons must be immediately adjacent. Empty items or items that are not set to "Solo" will end the group.
Use SHIFT or CTRL and the cursor keys to cursor select multiple items to set the type for multiple items in one go.
Added Regions to the Execute Window to enable easier control of multiple items for attribute selection and soloing. Items in the Execute Window can be made part of the Region by selecting them with the cursor keys and pressing the SET REGION soft button.
If the Region includes a Group item then Palettes within that Region will only affect the heads within that Group. The Group does not need to be selected first - those palettes will affect the heads regardless of head selection. This enables colours and other attributes to be selected on different head types without changing the current selection. All Palettes are applied in the programmer as normal.
A Region should only have one Group in it.
If a Region includes Cue Stacks that are set as Solo, then all those Cue Stacks will solo together - i.e. only one will be active at a time. This enables the solo areas to be set out as a block whereas previous solo selections had to be in a horizontal line.
Use SHIFT and CLEAR REGION to clear a region. In Design View the region ID is shown in the top right corner of the item in Design View. Note that Win Size, Background, and Password have now been moved from the top menu to under the SET OPTIONS soft button.
If the CLEAR, LOCATE, LAMP ON, LAMP OFF, LAMP ON ALL, LAMP OFF ALL buttons are included in a Region then they only affect the heads from the Group controlling that region.
If RELEASE is included in a region it only affects the Cues and Cues Stacks in that region.
It is possible to add Timing items to the Execute Window via the Assign Special, Timing button. The timings affect how Palettes are played back in the Execute Window. The options include setting a time in seconds for Palette fades, setting a split fade, and directions - normal, reverse, in to out, out to in and random.
The timing options include standard fades of 0, 1, 2, and 3 seconds and also allow custom times. A fade of 0 seconds ensures that Palettes snap in regardless of other MagicQ console settings such as Busking Rate masters.
If the Timing items are within a Region then those times only affect the heads from the Group controlling that region. Using multiple regions this enables different times to be used on different heads simultaneously.
Timing items also affect releasing of Cues and Cue Stacks within a region using the RELEASE special item.
A Region can be set up with palettes and timing items but without a Group. In this case the timing will be used with those Palettes when applied to the currently selected heads. This is useful for example to have timings on Colour and Position Palettes, but not on Beam Palettes.
It is possible to add Rate items to the Excecute Window via the Assign Special, Rate Params button. The rate items affect how Cues, Cue Stacks and Programmer FX in the Execute Window are controlled. The Rate items include a Rate Tap to set the speed, controls to select Fade or Snap and controls to set the Parts to 2, 3 or 4.
If the Rate items are within a Region then they only affect the Cues, Cue Stacks and Programmer FX that are within the Region.
If the Rate items are not within a Region then they affect all Cues and Cue Stacks and Programmer FX in the Execute Window that do not have a Region set.
Rate items affect both FX and Chases. When a Cue Stack is set as Chase Timing then the Rate will affect the Cue Stack rate not the FX rate within the chase steps. Chases are not affected by Width controls.
The rate items affect the Cues and Chases regardless of whether they are active - so it is possible to set the speed, snap and width of a FX before activating a Cue or Cue Stack. Changes are stored with the Cue or Cue Stack so that when they are reactivated they will use the same parameters.
When the "Use SPx" Rate Param is active the inbuilt FX in the Execute Window will use the respective Speed Master for timing if it is active. If the Speed Master is not active, then timing will remain as per the above Rate Params in the Execute Grid.
It is possible to add simple FX items directly to the Execute Window via the Assign Special, FX button. The FX items generate FX for Intensity chase, Zoom chase, Colour flick, 2 Colour chase, 3 Colour chase and White Flick. In addition it is possible to add Colour 1, Colour 2 and Colour 3 buttons to select the Colours Palettes used within the FX.
If the FX items are within a Region then they use only the channels from the Group of that Region. If the FX items are not within a Region then they will use currently selected heads.
All the Colour FX items are affected by a change in Colour Palette. Note that Colour Flick only uses Colour 1, 2 Colour only uses Colour 1 and Colour 2. Intensity Chase, White Flick and Zoom Chase do not use any Colour Palettes. Colour Palettes can be selected before the FX items are active.
When the item is activated the FX is added to the Programmer. When it is deactivated the FX is removed from the Programmer. As the FX are in the Programmer they run at normal programmer priority overiding any FX from Playbacks. The BLIND button affects these FX just like any other values/FX in the programmer.
The Execute Window supports Soft Palettes. These are Palettes that can easily be updated from other Palettes so that Cues and Chases can be immediately changed to have new values. This is useful for instance when running Cue Stacks with colour chases and wanting to update the colours.
Set "Item Type" to "Link" (Encoder E) in the Execute Window to set the Palette to be a Soft Palette. Soft Palettes are marked with a "S" in the top right corner.
To change the contents of the Palette press the item and then select another Palette (not a Soft Palette) from the Execute Window. The Soft Palette will be updated with the values from the other Palette for all the currently selected heads.
If the Soft Palette is set as part of a Region which has a Group and Palettes in it then it is not needed to press the Soft Palette - the individual Palettes can be selected directly to alter the Soft Palette. Note that in this case the Palettes in that Region only perform this function - they can not be used in the normal way.
It is possible to set items within the Execute Window to automatically sequence through the items according to defined time. Sequencing is possible for Positions, Colours, Beams, FX, Cue Stacks, Cues, Macros, and Groups. The sequence can be in sequential order or random. One item of each type will be activated at a time with all other items of that type released.
In the Execute Window select ASSIGN SPECIAL and select Sequence. Then choose between Sequence and Random, followed by Sequence. Then enter a sequence time - this is the time between execute items automatically being activated/deactivated.
If the Sequence item is within a Region then it will only affect items within that region. If it is not in a region then it will affect all items within the Execute grid. All item types are affected and are sequenced independently - for example if you have both Colour items and Cue Stacks items in the grid then MagicQ will sequence the colours at the same time as the Cue Stacks. Using the random sequence would cause a different colour and different Cue Stack to be activated after each sequence time has expired.
MagicQ will apply any fade times from timing items within the Region/Grid that the sequence item is in.
To make the Sequence Random, add a Random button - ASSIGN SPECIAL, Sequence, Random. When the RANDOM button is active the sequnce will run random instead of following one after another.
Only one sequence item can be active at any one time within a Region. Only one sequence items outside a Region can be active at a time.
Each Execute Grid can have a Group assigned to it. This operates in a similar way to regions, except that the Group applies to the whole window without the need to set regions.
Choose Grid Options, and select SET GROUP. To clear the Group select SET GROUP and choose NO GROUP.
The Group Mode Filter determines whether MagicQ filters or expands to the group. Set the Group Mode Filter in Grid Options. For filtering the data in the Exec Grid must have the required channels in it. For expanding, the data in the Exec Grid can have any channels (but must have required attributes).
By default no Group is assigned. When a Group is assigned then by default it expands to the Group.
The appearance of the boxes can be set using Soft button B "Appearance". The options are "Boxes" or "Coloured" for the appearance of the buttons, faders and encoders. "Coloured" colours the buttons according to function. When that function is active the button appears brighter.
The Execute Window supports custom images for the buttons, faders and encoders. When set, these are displayed in "Coloured" mode instead of the coloured control. The images should be stored in the bitmaps folder and named according to:
Button up image | xxxxup.bmp |
Button down image | xxxxdn.bmp |
Fader track image | xxxxtrck.bmp |
Fader knob image | xxxxknob.bmp |
Encoder back image | xxxxbase.bmp |
Encoder dial image | xxxxdial.bmp |
Where xxxx is any name. The images can be .bmp, .jpg or .png. The bitmaps can be selected for each item in the Execute Window, View Design by pressing the BUTTON BITMAP soft button and selecting the required image file.
When selecting the file, choose the "up", "trck" or "base" file. MagicQ will automatically substitute the "dn" file when the button is active.
Use SHIFT + CLEAR BITMAP to remove the bitmap.
The bitmap will be applied to all new buttons created on that Grid until the SHIFT + CLEAR BITMAP is pressed on an item.
Use SHIFT or CTRL and the cursor keys to cursor select multiple items to set the image for multiple items in one go.
Button images used withing MagicQ shows are stored in the .xhw show file.
The Execute Window supports encoders for speed control of Cue Stacks. Use Insert Special, and select Encoder to insert an encoder below a recorded Cue Stack. The Encoder will only be active when the Cue Stack directly above is active.
The attribute encoder acts like the encoders in the Intensity, Position, Colour, Beam windows, affecting the currently selected heads.
The Preload function allows execute window items to be selected before the change is applied. Press the PRELOAD soft button to start selecting/deselecting items. MagicQ will show the items selected/deselected but will not apply them until the PRELOAD GO soft button is pressed. The Busking Rate Master can be used in conjunction with this feature to allow all the items to fade at the same time.
It is possible to set a background using the GRID OPTIONS soft button and selecting Set Background
The background should be a bmp or jpeg of the size set by the WIN SIZE button.
Use GRID OPTIONS soft button and and Clear Background to remove the background.
Background images used withing MagicQ shows are stored in the .xhw show file.
Execute Pages can be assigned to a specific user - enabling some pages to be hidden from some users.
Press the GRID OPTIONS soft button and select Set User. The User for the page is shown in the title bar of the Execute Window.
Once an Execute Page is assigned to a user then only that user can access the Execute Page - other users will just see a blank page. MagicQ hides the Execute Page change select items for Execute pages that the user does not have access to.
Super Users can always access all Execute pages.
To remove the assignment press GRID OPTIONS, select Set User and select Default.
There are a number of special options that can be assigned as buttons using the ASSIGN SPECIAL soft button. These include:
Exec Page, Exec Page Up, Exec Page Dn | Buttons to change Execute Grid |
Blind, Close, Clear, Locate, Release | Useful buttons in Execute Grids |
Timing | Set timing including split direction for Palettes |
Rate Params | Set rate of Chase / FX |
FX | Add FX to selected heads |
All Busking | Adds all Timing, FX and Rate items |
Simple Busking | Adds basic Timing, FX and Rate items |
TC + Clock + PB | Timecode, clock items and Playback items |
Enable Uni Zone, Disable Uni Zone, Set Hot Uni Zone, Clear Hot Uni Zone | Management of multiple universe zones |
Global Tap | Global Tap to Time button |
Fader FN | Record current fader mode |
Powerdown | Immediate shut down of the PC |
Lamp On, Lamp Off, Reset | Affects selected heads |
Lamp On All, Lamp Of All | Lamp On/Off whole lighting rig |
Preload | Enter/leave preload mode |
Setup Option | Change a Setup option |
Net Session | Control and status of Net Sessions |
Multi Console Control | Shortcuts for multi console control |
Encoder | Add a rate or attribute encoder |
Keylock | Lock the Execute Window so users cannot change / shut down |
User | Change the user |
Speed Master | Controls the Speed including enabling/disabling, rate and divisor |
It is possible to build up multiple execute grids and to change between them using the Exec Page, Exec Page Up and Exec Page Down special options.
For example you could use Grid 1 as an "Home" grid with only buttons to change to other pages. Then each of the other pages could have a Exec Page button to change back to the "Home" grid.
Exec Page items for specific Execute Pages are hidden for users that do not have access those Execute Pages.
Setup options can be changed from the Execute Window without having to write keyboard macros. In the Execute Window – press ASSIGN SPECIAL and select Setup Option in order to assign the changing of a Setup Option to a single button.
MagicQ will prompt for what the value for each option (e.g. Yes/No, Enabled/Disabled or other value) and this will be stored in the shortcut. It is therefore possible to make two different shortcuts - one to enable an option and one to disable it.
In Net Session mode these items help with control and monitoring of Net Sessions.
In Net Session (Multi Console) mode these shortcuts enable quick selection of which console controls the output to which heads/channels on the lighting rig. These options are normally found in Setup, View DMX I/O, MULTIPROG SEL CHANS.
All of the normal options are available.
For the Group option, the Group selected when creating the Execute item is stored and is used for the shortcut. Therefore multiple shortcuts can be created for different Groups.
For Uni Zones, One Universe, Universes the uni zone or universe is that chosen when the shortcut is recorded.
For the One Head, Selected, Programmer, Last Active and Active options reflect the ongoing head/channel selection / activation state, not the selection or state when the shortcut was created.
The None, All, User options do not depend on selection state.
It is possible to add the TC simulator and supporting buttons to the Execute Window. This enables, for example, a large display of the current timecode value.
There is also a 12 hour and 24 hour clock - so the Execute Window can be used to show the current time.
There are also items to show the next Scheduled Event and the time remaining to the next Scheduled Event from the Scheduled Events in the Autom Window. This could be used to list the running order of bands playing at a Festival.
The TC display and the Clock displays auto expand to take up to three times the normal item size if the surrounding items in the grid are empty.
Select ASSIGN SPECIAL and then select Timecode + Clock + PB.
This allows the User to be changed from the Execute Window. If passwords are configured for the users then MagicQ prompts for the password before changing user.
MagicQ supports special items in the Execute Window that indicate the current Cue name, Cue ID, Cue comment or Cue time remaining of a Playback or Cue Stack. This could be used, for example, to display special comments from a Cue Stack in the Execute Window.
In the Execute Window press ASSIGN SPECIAL and then select Timecode + Clock + PB. Then choose the required Playback/Cue Stack feature. MagicQ will prompt for the Playback number or Cue Stack ID.
The Playback Rem time is the remaining fade time whilst a Cue is fading. For a timecode Cue once the current Cue has completed the fade, then the remaining timecode to the next Cue is shown.
The Playback Rem TC is the timecode remaining to the next step. If the next step is not a timecode step then the field will show as blank.
The current Page and next Page can also be shown.
The Move When Dark indication shows active when a Move When Dark is active on any Playback and goes inactive when the Move When Dark is complete.
Speed Masters can be assigned to Exec Grids in the Exec Window using the ASSIGN SPECIAL soft button. This enables the specific Speed Master to be controlled and updated.
Select the Speed Master option and then choose from the function to assign:
Tap | Tap to Time button. Also shows the current BPM. Enter a number before pressing TAP to set to a specific BPM. |
Enable | Enables/Disables the Speed Master |
Halt | Halts the Speed Master/Restarts the Speed Master |
Resync | Restarts any FX controlled by the Speed Master |
Inc | Increases the rate divisor |
Dec | Decreases the rate divisor |
Div | Sets rate divisor back to 1. Also shows the current rate divisor. |
Step | Steps on to the next step in the FX |
DJ BPM | Uses the BPM from DJ system |
Audio BPM | Uses the BPM from Audio input |
DJ Beat | Steps on to the next step on beat from DJ system |
Audio Beat | Steps on to the next step on beat from Audio input |
Resync Beat | Resyncs FX contolled by the Speed Master to the beat |
All | Adds all the above functions |
Then choose the Speed Master to use (SP1 to SP100).
Normally only one set of Execute buttons per Speed Master is required, but it is permitted to have more than set of buttons per Speed Master - for example on different Exec Grids - they will just duplicate each other.
The Speed Master controls the chase rate and FX speed of all active Cue Stacks that have selected this Speed Master in the Cue Stack Options. Cue Stacks are affected regardless of whether they are executed from a Playback, from an Execute Window or from the Stack Store.
Note the Speed Master does not directly affect the inbuilt FX in the Execute Window, for control of these FX in Regions, assign a Use Speed Master item as specified below.
There is more info on Speed Masters in the Busking section.
The inbuilt FX in the Execute Window are applied into the Programmer. Since the default for the Programmer Speed Master is "Ignore", the speed for these FX will normally be directly controlled by the Rate Params items in the Exec Window - ie. the TAP button, and the PARTS, SNAP, FADE.
When using the TAP for the inbuilt FX in the Execute Window it shows the BPM, and applies Per Head timing rather than per Step timing.
It is possible to over ride this speed using a Speed Master. In the Exec Window press ASSIGN SPECIAL and select "Rate Params". Then select "Use Speed Master" and choose the Speed Master to use. This will then show in the Execute Window as "Use SPx" where x is the Speed Master SP1 to SP100.
When the "Use SPx" is active the inbuilt FX in the Execute Window will use the respective Speed Master for timing if it is active. If the Speed Master is not active, then timing will remain as per the above Rate Params in the Execute Grid.
It is possible (and often very useful) to have more than one Regions using the same Speed Master for Speed control.
It is also possible to have more than one "Use SPx" in a Region so that different rates can be quickly selected - the first active one will be used.
If the Programmer option, Programmer Speed Master is set to a Speed Master instead of "Ignore", then when active the respective Speed Master will control the above inbuilt FX. The "Use SPx" will take priority over the Programmer Speed Master.
Execute windows are automatically available on the iOS/Android remote apps.
Each iOS/Android device can access different Execute Pages on the MagicQ system. We recommend using the Execute Page Up, Execute Page Down, Change to Exec Page special functions to enable page selection on remote devices.
The iOS/Android device downloads any custom images used in the Execute Window from the MagicQ system.
The GO and Pause buttons for Playbacks 1 to 10 can be set to be Execute buttons from either Execute Grid 1, 2 or 3.
When this function is in use then Execute Grid should be set to size 10/2 giving a total of 20 items.
In Setup, View Settings, Playbacks if the options "Playback Go/Pause use Execute Grid 1,2 or 3" is set to "yes", then this makes all 20 Execute buttons follow the items the selected execute grid.
Setting this option will automatically set the Execute Grid to 10/2 if it was not previously used.
It is also possible to set individual items in Cue Stacks, Options, Buttons by setting the options Go uses Exec Grid 1 or Pause uses Exec Grid 1.
Note that if a button is set to an Execute and there is no corresponding item in Exec Grid 1 then the button operates as the normal Go/Pause for the Cue Stack.
When a button is set to Execute then the function of the button is shown in the display together with its activation state.
Exec Grid items can be set to Cue Stacks, Cues, Groups, Positions, Colours, Beams, Macros and other functions - all off these functions are available through the 20 Execute buttons. By default items in the Execute Grid toggle on/off - the LED on the Go/Pause button shows the state. Alternatively the Button function can be changed in the Exec Grid to be "Button Flash" or even "Button Solo".
Note that this function is only supported on the main 10 MagicQ playbacks; this function is not supported on Extra wings, Playback wings, Execute wings, Stadium Wings or MQ500M Wings.
| | ||