| |
| |
To apply a FX to some heads, select the heads then from the FX Window, Group Window, or Prog Window press the ADD FX soft button.
MagicQ divides FX into the categories - Intensity, Position, Colour, Beam, Any Attribute, User and Old. Choose the Category and then the FX to apply.
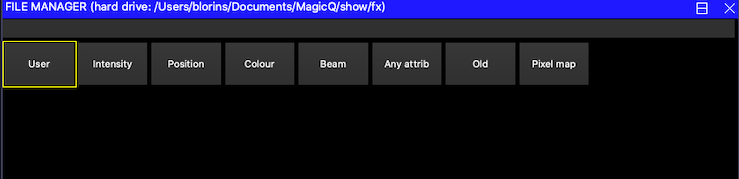
The position category includes FX using the pan and tilt attributes:

The colour category includes FX using the CMY/RGB attributes:
The Any Attribute folder contains FX that are not specific to particular attributes of the head – these are marked with a * – e.g. Ramp, Sine and Cosine. When one of these is selected you are prompted for which attribute you wish to apply the FX to. For instance you could program a circle using a Sine on the Pan attribute and a Cosine on the Tilt attribute. Alternatively you could just use the circle FX!
You can apply multiple FX to a head, provided that the FX uses different attributes - e.g. you can mix a Pan Sine with a Tilt Sine.
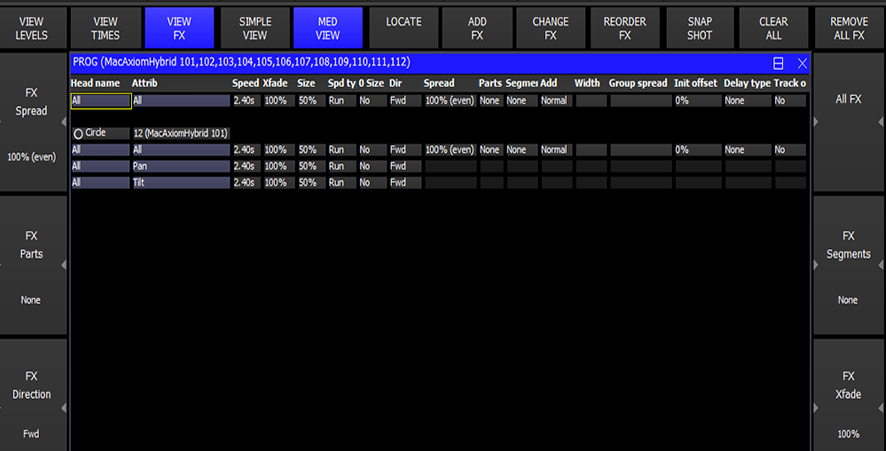
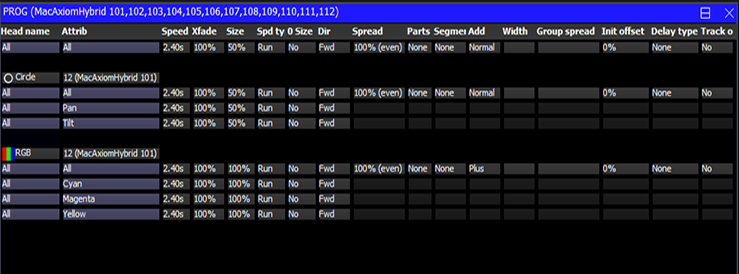
Once you have chosen a FX you are returned to the Prog Window. Use the encoders to modify the parameters of the FX such as the speed, size and spread between heads. By default FX size goes up to 255. Hold SHIFT and use the encoder to get sizes above 255.
The Prog Window provides a Simple and an Advanced View. The Simple View enables modifications of the FX as applied to all heads. The Advanced View enables the parameters of the FX to be modified for each different head – this, for example, enables different sizes to be set for different heads.
FX can be added and removed from the Programmer window.
The FX Speed can be modified on encoder X. The soft button stops/starts the FX allowing it to be temporarily stopped.
The FX Crossfade can be set on encoder Y – 0% is snap whilst 100% is complete crossfade. The soft button can be used to tap to time the speed of the FX.
The Attack of the FX Crossfade can be changed by using SHIFT and encoder Y. The attack defaults to "Even" - equal ramp up and ramp down. The FX must support Width and the Width must be less than 50% for the attack to take effect. Changing the value of Attack from 0% to 100% changes the slope of the attack. 0% is snap in, fade out. 100% is fade in, snap out.
The FX Size can be modified on the encoder wheel D from 0% to 100%. Pressing SHIFT and turning the encoder wheel allows the size to be oversized up to 800%. Pressing the soft button swaps between the chosen size and zero size. This allows an FX to be temporarily taken out.
The default for the Speed can be set in the Cue Stack window in View Options, View Defaults, FX. The default for Size comes from the FX File.
By default FX are added to the current channel values - therefore it is important to ensure that the channel values are set correctly. For example, to run a circle in the centre of a MAC500s pan and tilt range, it is necessary to set both pan and tilt to the centre position (128) before adding the FX. Changing the channel values changes the point around which the FX is centred.
Similarly in order to run a 0% to 100% dimmer chase on HTP channels the channels should be set to 50% intensity and the FX added.
Channel values and FX values do not have to be recorded onto the same playback. One playback can be used to set the centre position of the FX and another to control the FX itself. The centre position can itself be part of a multi Cue Cue-Stack or a chase thus a particular FX can itself be moved around.
If you wish to have a particular playback move heads to a particular position without a FX then record both the position and a zero size FX on the playback. Recording a zero FX ensures any other playback running an FX for those heads is over-ridden. You can add a zero size FX using SHIFT + ADD FX 0 SIZE soft button in the Group or FX windows.
It is possible to change the way that FX are added to the base values. In the FX View of the Prog Window and Cue Window there is an "add mode" field. Page right to see this option. This determines how the FX in a Cue is added to the base values. There are three choices; Normal, Plus and Minus.
When a FX is applied to a group of heads, the spread determines how the FX is played back over all the heads. By default the spread is even (100%) – i.e. the same FX is applied to each head but offset so that each of the heads is at a different point in the FX cycle. With even spread the heads are spread evenly round the cycle.
Setting the Spread to None (0) causes all of the heads to start at the same point in the cycle – i.e. they all do exactly the same thing. Choosing values between 0% and 100% enables different looks to be generated.
The FX Spread is the maximum offset between heads within the FX. FX Spread values greater than 100% are allowed.
The offsetting of the FX over heads can be further enhanced using FX Parts and FX Segments. FX parts and FX Segments have no effect if FX Spread is 0.
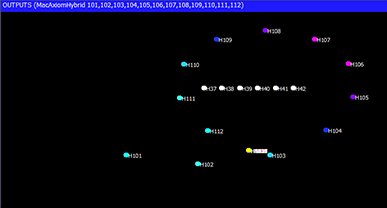
The spread can be viewed in the Outputs Window, View Chans, View DMX, View Move window. This shows a 2D representation of the pan and tilt values of each of the heads.
The default Spread comes from the FX File.
This enables the FX cycle to be repeated across a number of heads. When FX parts is 0 the FX is offset across the total umber of heads selected in the FX. Using Parts the FX can be offset so that, for example the FX can be offset (with FX parts = 3) such that the FX is offset other the first 3 heads, and then the next 3 heads, the next 3 heads, and so on…
The FX part can have the values "none", "2s", "3s" etc. For example when set to "3s" the FX will be played back spread over the first 3 heads and then this will repeat over the remaining selected heads – i.e. heads 1,4,7,10 will do the same thing, heads 2,5,8,11 will do the same thing. When a "FX part" is selected, the "spread" determines how the FX is spread across the 3 heads.
The default for FX parts can be set in the Cue Stack window in View Options, View Defaults, FX.
FX segments work together with FX Parts to enable easy control of the relative offsets of different heads within a FX. FX Segments are the number of adjacent heads that have the same offset.
So for example consider 12 heads.
Table 11.1. 100% FX spread (no FX Parts or FX Segments)
1 | 0% |
2 | 8% |
3 | 16% |
4 | 25% |
5 | 33% |
6 | 41% |
7 | 50% |
8 | 58% |
9 | 66% |
10 | 75% |
11 | 83% |
12 | 91% |
The default for FX segments can be set in the Cue Stack window in View Options, View Defaults, FX.
The FX direction can be set to the following options:
Forward and Backward affect the direction of the FX.
Odd/Even automatically makes the odd heads go forward and the even heads go backwards. Left/Right splits the heads in two, with the first half going forward and the second half going backwards. Segments alternates forward / backward for each segment.
Centre In and Centre Out split the heads, pairing the outside ones, and so on to the centre.
Rnd uses a random order for the FX. Note that for Group FX the random order will change each time the Cue is loaded into the Cue Engine - for example when reloading the show file / restarting the console.
Inverts change the polarity of the FX waveform rather than reversing the direction. For simple FX Waveforms of 1 or 2 steps the resulting FX will be identical. For FX waveforms with more than 2 steps, they will be different.
Consider a pulse 2 steps on 4 heads, spread 0%
Forward
----
####
Invert
####
----
Invert Odd Even
-#-#
#-#-
Invert Even/Odd
#-#-
-#-#
Invert Left Right
--##
##--
Invert Right/Left
^^__
__^^
Consider a pulse 4 step FX Waveform on 4 heads:
Forward
___^
__^_
_^__
^___
Backward
^___
_^__
__^_
___^
Invert
^^^_
^^_^
^_^^
_^^^
For FX waveforms that have more than one attribute, the invert is applied only to first attribute of the FX waveform. This ensures a simple mirror of movement FX such as circles etc…
The default for FX direction can be set in the Cue Stack window in View Options, View Defaults, FX.
Waveform FX with one or two steps can have a Width parameter on Encoder C. The pulse, ramp, rampup, rampdown, sineup, sinedown, dimmer chase and iris chase all have Width.
This enables the width of the FX to be altered without having to select different FX (e.g. pulse 2 step, pulse 3 step etc…) When set to 50% it is equivalent to a pulse 2 step. When set to close to 0% the pulse or ramp is very narrow, whilst at close to 100% the pulse or ramp is very wide.
For example, consider a head with a ramp on Intensity with crossfade 100% and width set to 50%. The head will ramp up and down between 0% and 100%. Changing to 25% will cause the head to stay at 0% for half the period and then ramp up to 100% and back down to 0% for the other half of the period. Changing to 75% will cause the head to stay at 100% for half the period and then ramp down to 0% and back up to 100% for the other half period.
The default Width comes from the FX File.
Speed Type can be set to Run, Stop and Double there are now the options Div 2, Div 3, Div 4, Div 5, Div 6, Div 7, Div 8. The default is Run.
The Div options enable FX to built up with different attributes at multiples of one rate but still synced.
The divisors / doubler is applied after all other rate controls regardless of whether the FX is using its own timing or is being controlled by a Speed Master.
FX can be set to use Random from the Rnd field. The Rnd Step option causes the Heads to execute the FX in a constantly changing random order.
This works particularly well for FX that use a Width such as Dim Chase, Ramp, 2 Col. This enables more of a random strobe type effect. To get the best result use width < 30% or greater than 70%. Using parts (e.g. parts = 3) will ensure the randomness kicks in quicker when first activated.
Prior to v1.9.3.0 the Random field was assigned permanently to a FX in the FX Editor and it was not selectable within the Prog/Cue window.
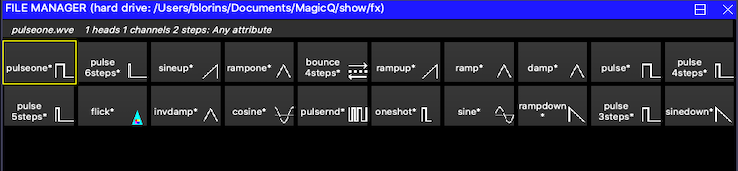
MagicQ has support for one shot FX – i.e. FX that play back only one cycle and then stop. FX can be set to One Shot from the One Shot field. The FX will cycle through all heads one time and then the FX will be removed. The FX will restart if a new Cue with the same FX is executed.
There are two example one shot FX in the FX library - PulseOne and RampOne. Custom waveform FX can be created and set as one shot in the FX parameters.
When in the Programmer, pressing BLIND BLIND will restart the FX.
Prior to v1.9.3.0 the One Shot field was assigned permanently to a FX in the FX Editor and it was not selectable within the Prog/Cue window.
The Timing field on the right side of VIEW FX in the Prog and Cue windows can be set to Per Head or Per Step.
When set to Per Head, the FX bases its timing on the number of heads in the FX, or if Parts are selected the number of Parts. Segments are also taken into account.
When set to Per Step, the FX timing is for each step in the Waveform FX.
Note that if the FX is under control of a Speed Master set to Per Head timing, then this will override the Per Step timing in the FX. If either the FX or the Speed Master is set to Per Head timing then PEr Head timing is used.
The default for the Timing can be set in the Cue Stack window in View Options, View Defaults, FX. In new and old shows this is set to Per Step by default. Changing it to Per Head will affect any new FX created.
There is a new soft button in the Cue Store window to convert all FX in Cues between Per Cycle and Per Head timing. This can also be used with the filtering to select a sub set of the Cues to change.
FX can be configured to fade in and out rather than snapping in and out.
The fade times are configured in the View Times view of the Programmer Window and the Cue Window. In older versions of software they were available in the View FX view of these windows (use the PAGE RIGHT button to move to the appropriate columns).
MagicQ supports a FX Delay Type option for applying individual delay times to FX as well as base levels. When enabled, the individual delay times for the base level of an attribute in a head will also apply to any incoming FX on that attribute. This allows sweeping effects across large numbers of moving heads.
The delay FX option is configured in the Cue Window, View FX, Delay Type. Note you need to cursor right to see it. There is a similar option in the Programmer Window if you want to set it before you record a Cue.
When set to "None" there is no delay - all the FX start to fade in at the start of the Cue.
When set to "Delay start" the FX will delay by the amount set for the individual attribute in View Times. If there are no delay times for the individual attributes then there is no delay on the FX. After the delay for a particular head the FX will start as if it was the start of the Cue - i.e. the offset will start from the position it would normally start from at the beginning of the Cue. The final offset between the heads will be dependent on the delay time. Note that if you include a Cue with FX set to "Delay start" into the programmer then it will look different as when Cues are included the delay times are ignored.
When set to "Delay size" this is like "Delay start" except that after the delay the FX is not restarted. Instead the size is faded in and the offset is therefore exactly as it would have been if there was no delay. This means after all heads have delayed then the final offsets between heads will be as if there had been no delay.
If you don’t want to change the base level, then you just set it at the same levels as the previous Cue - but you add individual delay times so that MagicQ delays both the start of the level change (could be no change) and the start of the FX.
MagicQ does not currently support FX Out Delay times.
Note that the FX In Delay and FX Out Delay times in the Cue Window and Programmer Window, View Times, Simple View are not currently supported. To add FX delay times set Individual Delay times and configure the FX Delay Type in View FX to "Delay Start" or "Delay Size" as above.
If you are running multiple FX from within a Cue then you may wish to select an initial spread between the different FX. Configure this from the Programmer Window and the Cue Window (use the PAGE RIGHT button to move to the appropriate columns). Both a coarse and a fine spread can be configured.
The inbuilt colour FX are designed to work on both CMY and RGB heads - these FX are set with the "Auto Invert RGB" option set in the Waveform FX. This means that, for example, adding the RGB FX to a group of CMY and RGB heads will cause all heads to change colour red, green, blue.
MagicQ includes a number of FX designed to simulate flickers – these can be used to simulate fires, candles and lightning. FX speed, size and spread can be used to generate different effects. The flicker FX available are:
Flicker Random flicker above and below base level
Flicker up Random flicker above the base level
Flicker down Random flicker below the base level
Flicker sync Random flicker – all heads in the FX synchronised together
Flicker crossfade Random flicker with random levels and random crossfades
It is possible to have multiple different FX on a head – e.g. a circle on pan and tilt and a red green blue colour mix on the colour mix attributes.
When viewing and editing multiple FX in the Programmer Window or Cue Window the encoders A,B,C,D,X and Y affect only the FX that the cursor is placed over. When a new FX is added the encoders automatically default to controlling the parameters of the new FX.
If the cursor is placed in the All FX row at the top of the Window then these encoders affect all FX as per previous behaviour. The E encoder can still be used to modify the individual parameter at the cursor location.
There is a function to split some heads out of a FX or to join similar FX together in the Programmer – use SHIFT and the JOIN FX and SPLIT FX soft buttons.
When Split FX is pressed the currently selected heads are moved out of the FX that they are in, into a separate FX. If the selected heads are the only heads in the FX then no change is made to the FX.
When Join FX is pressed MagicQ analyses all the FX in the programmer and joins any similar FX of the same type together. The speeds/sizes/offsets are retained until the enlarged FX are modified.
It is possible to change FX for a specific set of heads by first selecting the heads and then modifying the parameters in the FX Window instead of in the Programmer Window. In the FX Window there are FX speed, size, crossfade and offset encoders. These encoders apply changes to the FX of the currently selected heads. Note they affect all FX running on those heads so if the head has a circle and a CMY colour FX then both will be changed. To change FX individually use the encoders in the Programmer Window, FX View.
It is possible to change the type of FX running on a selection of heads from within the Programmer Window using the CHANGE FX soft button. This enables a different FX to be selected, but with the speed, size and offsets remaining the same. The FX can only be changed into compatible FX – i.e. a circle can be changed into a square or diamond, but not into a RGB effect.
It is possible to reorder the heads in a FX without having to recreate the FX. Press the REORDER FX button in the Programmer, View FX View. MagicQ prompts for the order, Normal, Reverse, Into Centre, Centre Out, Random. Normal will always return them to head number order.
Note that if the current selection order is different to the one in the Cue then it will automatically use this as the new order rather than prompting for an order.
For Group FX it reorders the Groups within the FX, not the Heads within the Groups. For reordering of heads within a Group FX use the Direction field in the FX.
When the Setup option "Programmer overrides FX" is set then the Programmer automatically includes a "Block FX" option – this means that whenever a channel is in the programmer it has an implicit zero FX – so that any FX running on the channel on Playbacks is ignored. If the channel has a FX in the programmer then the FX will run as expected. This, for example, enables the user to take control of a moving light and place it in a fixed position.
It is possible to generate user FX by programming a chase and then converting it into a FX. The FX can then be applied to any head with the required attributes.
For example, to create a new movement FX, create a position chase by recording the pan and tilt values for one or more heads. Set the chase speed to the speed that you wish the FX to default to. If you wish the FX to snap (not fade) then set the chase contrast to 0%.
Convert the chase into a FX by opening the Cue Stack window and pressing SHIFT and MAKE FX. If the chase only contains 1 attribute then you will be asked whether you wish the FX to always apply to the specified attribute, or to allow it to be applied to any attribute. If the Cue Stack has more than 1 attribute in it, then the user is prompted to choose which attributes to use in the Waveform FX.
If multiple heads are used in the chase then multiple heads will be generated in the FX – this enables different heads in the FX to do completely different FX. (For example, you could record a FX where 2 heads do a tilt and 2 heads do a pan)
To record a FX that can be applied to any attribute, choose 1 attribute only (e.g. dimmer) and create the chase using this attribute. When you press MAKE FX, then select the "Make FX apply to any attribute" option.
Waveform FX support any number of attributes but it is recommended that only a small number of attributes are stored in Waveform FX – e.g. just position, colour mix or intensity. For more complex FX store the FX in the FX Window and save to a FX Library.
Use Record Remove to remove unwanted attributes from entire Cue Stack.
MagicQ includes a FX Editor which can be used to edit the Waveform FX. Note that changing the Waveform FX makes a permanent change to the FX on the MagicQ system including all FX of that type used in the current show and on any new shows made on that console. If users wish to edit the inbuilt Waveform FX then they should use "Save As" to save the FX as a different FX name before editing.
All User FX are shown in the User category - only inbuilt FX are shown in the Intensity, Position, Colour and Beam categories.
All FX are stored in the FX folder as .wve files - MagicQ intelligently filters them into categories.
Some of the inbuilt FX use Palette values rather than absolute values. This enables FX to be built up quickly from existing Palettes. The FX are updated each time the Palette is changed.
Palettes can be chosen when the FX is applied rather than having to create new Waveform FX. Palette selection can be changed directly in the Programmer, View FX and Cue , View FX windows. Changes of Palette selection are immediately updated in the Output.
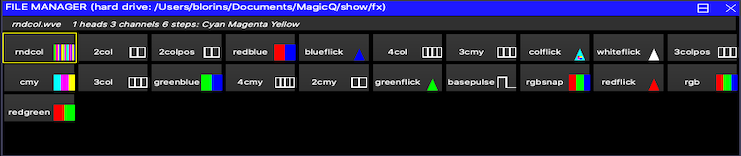
The inbuilt library of FX contains several Waveform FX that allow selection of Palettes - including 2col, 3col, 4col, 2pos, 3pos, 4pos, 2iris and 2focus.
For example, to make a FX that colour changes between yellow and magenta simply choose the 2col FX - then select the "Yellow" palette, followed by the "Magenta" palette. Change the width parameter to vary the proportion of time spent on yellow and magenta.
Note that MagicQ maps Red to Cyan, Green to Magenta and Blue to Yellow, so the 2col, 3col and 4col will work equally as well for CMY heads as for RGB LED heads.
If palettes are moved in the Position, Colour or Beam windows then the reference in the FX will be modified to be the new ID, so that the FX stays the same.
Palette FX can be applied to heads even if the heads do not have all the attributes in the Palette FX.
The 2col, 3col and 4col inbuilt FX include all 8 colour attributes (Cyan, Magenta, Yellow, Col Mix, Col1, Col2, Col3 and Col4) so that when these FX are chosen they will run on all the colour attributes that are stored in the chosen Palette. This enables colour palette FX to be run over multi heads with different attributes - CMY, RGB, RGBA, RGBW etc…
The 2cmy, 3cmy and 4cmy only can be used to limit FX to CMY attributes only - no FX on colour wheel, colour correction, White or Amber.
Users can create their own waveform FX using the FX Editor. To make a waveform FX that has selected palettes, set both the "Use Palettes" and "Use FX Palettes" in the Edit FX, View General. The palettes in Edit FX, View Chans are then Palette indices rather than Palette numbers - e.g. Col 1 refers to the first selected Palette when you apply the FX, Col 2 the second selected Palette.
If a FX uses Palettes and the selected Palettes do not have the attribute then MagicQ will use the default value for those attributes. For example, 2col includes all the colour attributes - so if the Palette only has Cyan, Magenta and Yellow in it, then Colour Wheel would be set to its default value in each FX step.
The Intensity attribute is a special case. If this attribute is included in the Palette FX but is not in the Palette then the MagicQ will change the Intensity between 0% and 100% in each FX step. This enables generation of e.g. TiltDim type effects very easily where the heads move in the dark.
MagicQ supports colour flicks - i.e. FX that apply a different colour over the base colour without mixing the colours - for example running a red flick over a green base without mixing the red and green to get yellow.
The inbuilt FX library now includes Red, Green, Blue and White colour flicks. In addition there is a colflick FX where you select the colour you want from a colour palette. The width parameter can be modified to change the width of the flick.
Users can create their own Waveform FX to perform complex colour flicks. In Edit FX, View General set the Default Add Type to "Abs". In the Edit FX, View Chans set the curve to "Abs" for steps that you want to be absolute and to "Trans" for steps that you want to be transparent (i.e. not affected by the FX - just the base level). The levels for steps set to "Trans" should be 0, or if using Palette based FX then just set them to the first Palette selection (P1,C1,B1).
It is possible to create FX that use any chosen colour rather than just primary colours – a new example Colpulse.wve is included as part of the standard FX library.
When the FX is created, the base level of the colour channel will be used to determine the colour that the FX will use. When the FX is played back the base level is used in the FX itself rather than the FX adding to the base.
To create a new FX based on base colour, in the FX Edit Window, View General, set Use Col Base = Yes.
MagicQ supports FX based on groups. Multiple groups can be selected and then an FX applied to each of those groups rather than to individual heads.
This enables advanced FX over groups of heads. This has the advantage over parts and segments that the groups can split the FX over different numbers of heads - e.g. 6 sports on the front truss, 4 on each of the sides, and 8 on the rear, The FX will be played evenly across each Group as though it were 3 individual FX
It also has the advantage that if you add a head to the group then that head automatically becomes part of the FX in all the Cues that use that FX. This makes managing FX and changing the size of your rig easier from show to show.
If multiple groups are selected then when adding FX, MagicQ automatically requests whether the FX should be applied to the Groups or to the Heads.
FX can be added as a Group FX even if only one group is selected by using the ADD GROUP FX soft buttons in the Group and FX windows. This has the benefit that if the heads of the Group are changed then programmed Cues using the FX automatically change to use the new heads of the group.
Group FX and Palette FX can be used together to create FX that can be easily changed between different size rigs with only minor changes to Groups and Palettes.
If groups are moved in the Group Window then the reference in the FX will be modified to be the new ID, so that the FX stays the same.
As Group based FX contain channels not groups, it is not possible to carry out channel based edits on the FX such as merging changes from the programmer or reordering the channels in the Group based FX.
The groups used within a Group FX can be changed by clicking on the groups in the Programmer and Cue windows.
In the Advanced View, REMOVE can be used to remove a Group from the FX. Pressing COPY COPY (or COPY followed by ENTER) inserts a new Group to the FX - after inserting change it to the required Group.
It is possible to convert Group based FX into channel based FX. In the Programmer Window, View FX press SHIFT and CONV GROUP FX. If the cursor is on the top row all FX will be converted, otherwise the FX at the cursor position will be converted.
The Spread of Group FX can be modified in the Prog Window, View FX and also once recorded in a Cue, in the Cue, View FX Window using the "Group Spread" column. The options are:
Group | Spreads according to the group (all members of group have same spread) - as per previous software |
All chans | Spreads across all chans in all selected groups as if it was a standard (non Group) FX |
Within groups | Spreads within each group as if each group was selected in turn and a FX added to that group |
Grid H | Spreads within each group according to the position of each Head in the rows of the Group Grid |
Grid V | Spreads within each group according to the position of each Head in the columns of the Group Grid |
Parts, Segments and Direction can be used in all "Group Spread" modes. When set to "Group" these will have limited effect unless lots of groups are selected.
The "Within Groups" is particularly useful when running FX on Groups each with different numbers of heads - for example consider a three truss system with 6 heads on the front truss, 5 on the mid and 4 on the rear with corresponding Groups - Front, Mid and Back with 4,5 and 6 heads in each. Using "Within Groups" will run the FX synchronously across each truss.
When selecting FX for channels on Head with duplicated elements MagicQ prompts three options for applying the FX:
Dup Elements treats the elements as duplicated - i.e. all elements in the head do exactly the same thing. This is the default operation which treats all the elements in a head as one. In software prior to v1.6.5.8 this was the only supported mdoe of FX for Duplicated Heads.
Include Elements includes all the elements in the FX enabling separate control of each of the elements as if they were separate heads. For example if you apply a FX to 4 heads each with 3 elements then the FX would be spread over the 12 elements.
Use Elements runs the FX within the Heads, with all Heads performing the same FX synchronously across their elements. This is the same as Include Elements except that MagicQ automatically sets Parts to the number of elements within the heads causing all Heads to have the same offset.
When Group FX are applied to Heads with Duplicated Elements MagicQ will request how to apply to the duplicated elements. If Include Elements is selected then the Group based FX will operate across all the elements of the heads in the group according to the selected Group Spread - Group, All Chans, or Within Chans.
FX can be recorded for re-use in multiple Cues when programming, or when busking live to quickly apply a complete FX over multiple heads.
The FX Window enables the storage of FX and combinations of FX that are used regularly. The FX Window is opened by pressing the FX button.

Record FX into the FX Window in the normal way – set up the FX in the programmer and then press RECORD. All of the different FX currently in the programmer are stored including all of the size, speed and offset information. In addition, any base levels for the channels that are controlled by the FX are also stored.
To recall the FX simply select some heads, and then select the FX from the FX Window. FX can be named, moved and copied just like any windows items. FX can be played back on any head that supports the programmed attributes – not just the heads the FX was recorded with.
Use the VIEW DATA view, to make changes to the core parameters of the FX.
Alternatively, edit FX by including an FX into the programmer and then using Update.
Note that by default FX are actually stored as Cues – you can see them in the Cue Store – however there is no need to access them other than through the FX window.
When FX are imported, exported or the heads that the FX reference are removed, the FX are converted into generic FX enabling them to continue to be used. Generic FX are not stored in the Cue Store.
When you program new Cues using a FX selected from the FX window, a copy of the FX is made so that you can make individual changes in the programmed Cue.
From v1.9.5.0 FX in the FX Window behave like palettes.
Updating the FX in the FX window will update instances where the FX has been used in Cues. The overall FX speed, size, crossfade, width, direction, spread, parts and segments, add mode, initial offset and rnd type can be changed and will be updated to the Cues. Note that changes to individual channel parameters within the FX are not updated, only the overall parameters.
The top text in the window shows which Cue the FX is used in, or if used in multiple Cues the number of times it is used. Filtering by FX in the Cue Store and Stack Store provides further information on which Cues and Cue Stacks are using the FX.
The FX can also be edited by including the FX from the FX Window, edit in the programmer and then update. Note that when updating, any changes to the type of FX, or individual channels will not be updated to the Cues - only overall parameters will be updated.
If users do not edit the FX in the FX Window and do not include and update FX in the FX Window then MagicQ will operate as in previous versions - the FX in Cues will never be updated from the FX.
Cues that are linked to FX in the FX Window are shown in the Cue Window with FX X preceding the name where X is the FX number in the FX Window. For example, a Cue that is linked to a circle FX in FX 2 in the FX Window will show as FX 2 Circle.
Moving FX items in the FX Window will update the Cues to maintain the link to the moved FX item.
Removing a FX from the FX Window will remove any links to that FX from all Cues - this is similar to when removing Int, Pos, Col, Beam palettes items, which also remove links from all Cues.
Note that FX will only be linked to Cues that have been recorded in v1.9.5.0 or above.
Cues created in older versions of software will not have a link to the FX Window. Prior to v1.9.5.0 editing the FX in the FX did not affect the programmed Cues – only new Cues programmed using the FX.
Use SHIFT + EXTRACT FX soft button in the FX Window to extract FX from the Cues in an older show. The FX are extracted from the Cues and created in the FX Window, with the Cues linking to the FX. Where identical FX have been used in multiple Cues only one FX will be created in the FX Window.
Cues can also be linked to FX already in the FX Window using the CHECK FX LINKS and CHECK ALL LINKS soft buttons. The CHECK FX LINKS soft button checks for identical FX to the cursor item FX that in all Cues, creating a link if the FX match. The CHECK ALL LINKS checks for all FX. No new FX are created in the FX window - it only creates links where FX are identical between the Cues and the FX Window.
The REPLACE FX soft button can be used to replace a FX with another FX in specific Cues, or all Cues on the system. This works in the same way as REPLACE GROUP in the Group Window and REPLACE PALETTE in the Pos, Col and Beam windows.
The FX in the FX Window can be stored to a FX library file so that the FX can be reloaded and reused in any MagicQ show. Use the SAVE FX LIB to make a FX library file – all the FX in the FX window are stored to the file. The FX are saved as generic FX – i.e. they can be played back on any type of head as long as it has the same attributes. Reload a FX library using the LOAD FX LIB.
| | ||