| |
| |
Multiple MagicQ consoles can be used together on a single network – either to allow control of many different heads, remote control or to provide master/slave configurations.
MagicQ supports synchronisation (tracking) of Playback & Programmer between consoles to enable one or more consoles to follow the playback state of the master console.
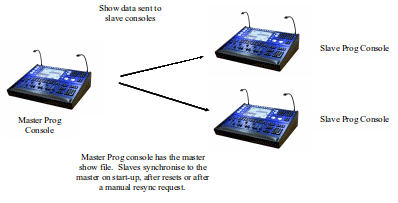
MagicQ supports synchronising of show file data between consoles so that one console on the network acts as a master console with the master show file whilst slave consoles synchronise to that show data. Programming changes can be made on any of the consoles with the show file on the master being updated and then all other systems synchronised to the master.
MagicQ enables multiple consoles to be used on a network and shows on the separate consoles to be merged together and split up again. Zoning of universes enables consoles to be working on different universes all within the same network. MagicQ supports programming of a single show file from multiple consoles. MagicQ does not currently support programming by multiple users on a single console.
MagicQ supports automated copying of shows between consoles – for example to automatically keep a slave console updated with the same show that is running on the master console. This function can also be used as an "archiving system" to enable a PC to automatically grab the shows from the consoles on the network for back-up purposes.
MagicQ PC/Mac systems have reduced multi console support. Shows files can be synchronised, but syncing of playbacks is restricted to the main playbacks only. Other playback banks are not synced. For full show backup we recommend the use of two full consoles.
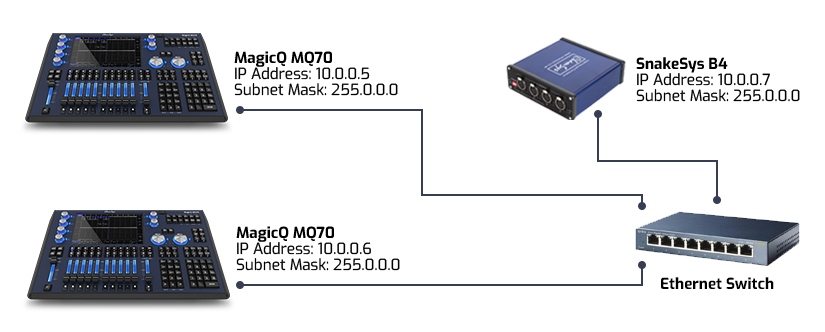
All devices on the network, including MagicQ consoles and PCs, must have a unique IP address and host name. On MagicQ consoles the IP address and host name are configured in Setup, View Settings, Network. On PCs, a static IP address must be created in the control panel of the operating system you are using (Windows, Mac or Linux), then the same IP address set in MagicQ SETUP, VIEW SETTINGS, Network.
MagicQ MQ50,MQ70 & MQ250M consoles ship from ChamSys with a randomised 10.X.X.X IP address, MagicQ MQ80 and MQ500(M) ship with a fixed 2.9.200.176 IP Address. On all consoles the default IP address can be user configured.
For example, a typical network with two MQ70 consoles and a SnakeSys B4 node might look like this:
The exact method will depend on the version of Windows.
On Windows 10, open the start menu, search for "View network connections".
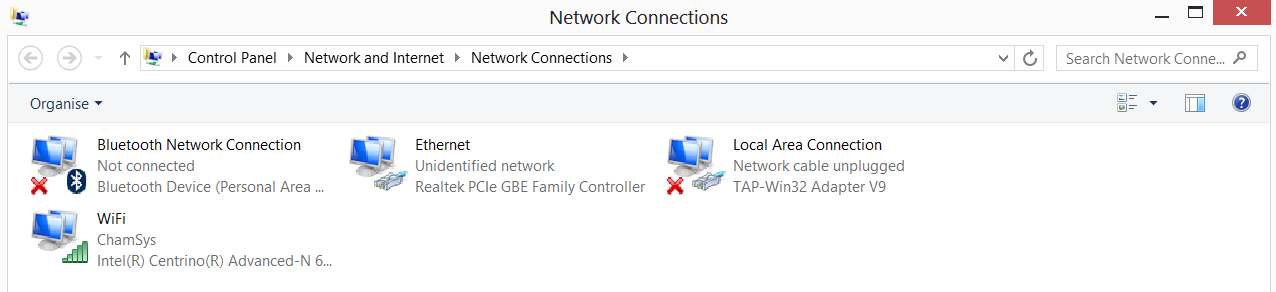
This will open a window with a list of network interfaces, including any wired, wireless and virtual interfaces.
Identify the ethernet interface you are using for lighting, right click on it and select Properties. Choose Internet Protocol Verision 4 (TCP/IP) and click on Properties.

A dialog box will appear with the title Internet Protocol (TCP/IP) properties.
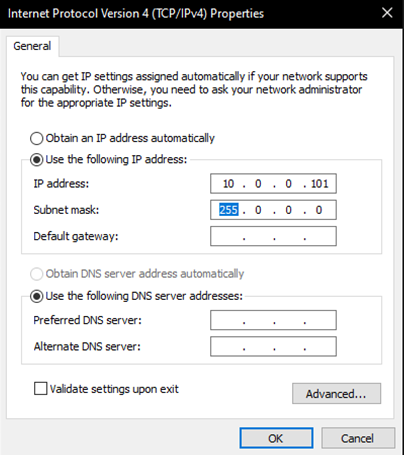
Choose "Use the following IP address". Enter the IP address (e.g. 2.0.0.10) and the Subnet mask (e.g. 255.0.0.0). The default gateway can usually be left blank. Click Ok then Ok.
MagicQ includes a ping test for resolving network problems. At the command line type ping followed by the IP address, e.g. to test network connection to IP address 2.0.0.3
ping 2.0.0.3
There is a short cut for use on the console keypad - enter three dots and then the IP address (no space)
…2.0.0.3
Entering just … will ping the last tried IP address.
To check which MagicQ consoles are on the network go to Setup, View System, View Status and select the Network tab.

It is possible to grab a show that is running on another console onto the current console. Press the Grab Show soft button in the View DMX I/O view of the Setup Window. Choose which console you wish to grab a show from. The show is copied from the other console to the show folder on this console, and the show is loaded into memory.
Grabbing shows from other consoles requires "Enable remote access" in the Setup, View Settings, Network Settings to be enabled on the consoles you are grabbing the show from.
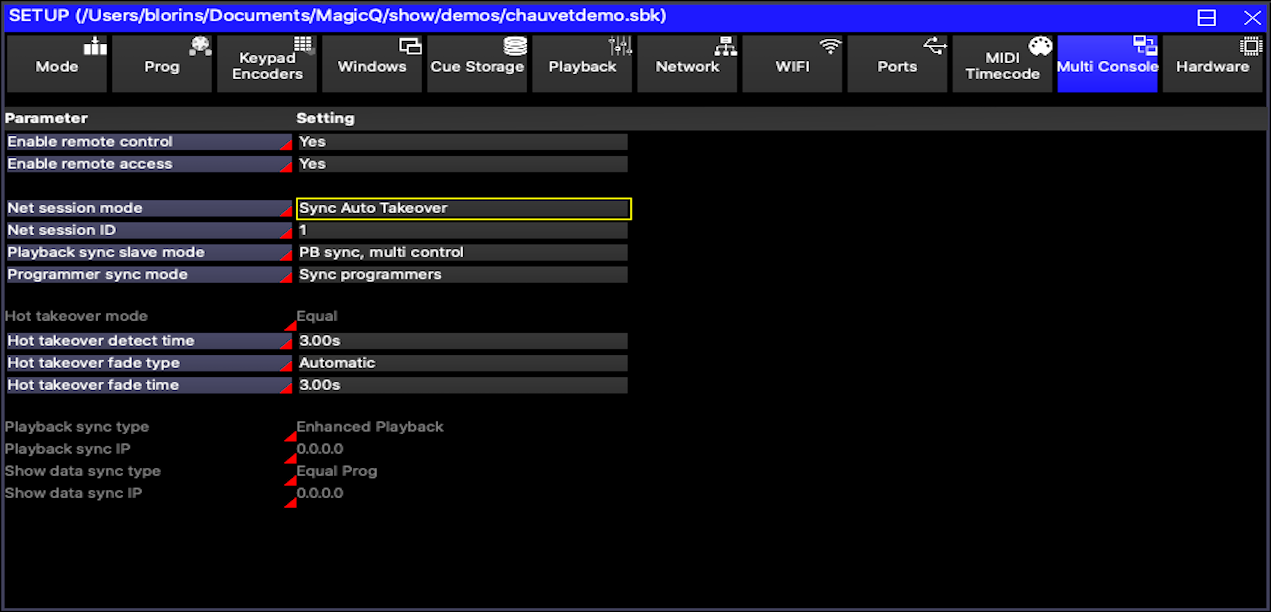
Network Sessions allows easy configuration of multiple MagicQ consoles in a network:
Within a network session
It is possible to inhibit all network output from the consoles in the network session using the Inhibit All feature. All consoles outputs within the network session are disabled. It is still possible to change Master but the outputs remain disabled.
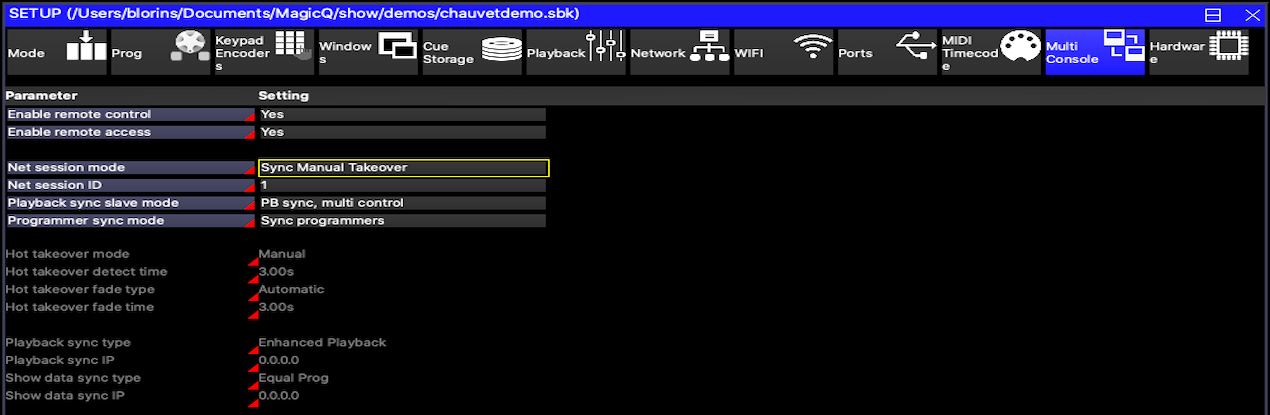
When the Network Session Mode is enabled (set to Manual Takeover or Automatic Takeover) then it is not necessary to set up any other settings relating to Hot Takeover, Playback Sync Type, Playback Sync IP, Playback Sync Port, Show Data Sync Type or Show Data Sync – MagicQ sets this automatically within the network session.
In Net Sessions when a Slave syncs to the Master it configures its universes in DMX I/O to the same as the Master console. Only universes that have one or more Heads patched on them will be modified - other universes will remain unchanged. These changes only occur when the Slaves resync the whole show file from the Master. If users change Universe settings on a Master console once in Net Settings then they must manually resync the Slaves.
Up to 10 MagicQ consoles can be in the same Net Session. Just set Net Session Mode and Net Session ID for all the consoles you wish to be part of the session.
This is the recommended mode for Net Sessions.
The first console to start becomes the Master. In Setup, View DMX I/O, Take Control and Release Control can be used to swap which console is the Master at any time. If you use Release Control, then you will need to also press Take Control on the other console.
Once one console is Master on the network then any other consoles starting that were previously the Master will be demoted to "Disabled". This protects in case a console has been accidentally connected to the network. To make them part of the network session press "Release Control".
Auto Takeover is useful in unmanaged systems where there are no operators. Where there are operators then we recommend using Manual Takeover to give the operators more control.
The first console to start becomes the Master. In Setup, View DMX I/O, Take Control and Release Control can be used to swap which console is the Master at any time.
If the Master console stops for any reason then one of the Slave consoles will take over.
The Hot Takeover Fade Type can be set to Manual or Automatic. When set to Manual the operator has output is frozen until the operator decides what new look to change to.
When set to Automatic, a gradual fade is made to the look set on the Playbacks – in this mode an operator will often put up a "safe" state on the standby console which can be used if the main console has a problem.
With manual fade type when MagicQ determines that it should take over a universe it will load a snapshot of the last data from that universe into its Programmer. The universe will be completely controlled from within the Programmer and not from the Playbacks. The operator can then set up the playbacks as they wish and then clear the programmer to change to this new look. Clearing the programmer with time enables the operator to specify a fade time to the new look.
With automatic fade type, MagicQ loads the snapshot of the last data from that universe into the Programmer and then automatically clears the programmer using the hot-takeover fade time.
Since both options use the programmer, it is recommended that the programmer is kept clear on the standby console.
If there is a Master clash on the network then MagicQ keeps the Master that has been running the longest and demotes all other Master consoles to Slaves.
If Net Sessions is set to "Manual Takeover" then Masters are demoted to "Disabled" instead of "Slave". A flashing warning is shown in the Status Window. In the "Disabled" mode the console does not output on the network and does not try to sync the show to a Master. The user can then decide whether to "Take Control" or "Release Control" on that console.
When a Master is demoted to Slave or Disabled, MagicQ saves a copy of the show file that was running on the Master using the existing show file name but with the "_swap" appended to the end before the file extension .shw - for example "myshow_swap.shw". If the Master show file gets lost then the original show file can be recovered by reloading the "_swap" file from the original Master and saving as a new file name. In order to prevent MagicQ repeatedly overwriting the "_swap" file with invalid data from the Slave, it only saves the file if it is at least 60 seconds since it was last demoted to Slave.
To make a "Disabled" console part of the network session, press "RELEASE CONTROL" on that console.
It is possible to inhibit all the outputs within the network session so that none of the consoles within the network session output onto the network – for example if a "guest" console is in use.
In Setup, View DMX I/O press the INHIBIT OUTPUTS soft button. Outputs will continue to be inhibited even if the Master console changes. When UNINHIBIT OUTPUTS soft button is pressed the Master Console within the network session will resume outputiing.
Within a network session MagicQ supports programming of one show from multiple MagicQ consoles / MagicQ PC systems on the network.
Multi programming enables multiple consoles to access one show file held on the master console with all consoles being able to make changes to that show file. MagicQ ensures that the slave consoles are synchronised to the master console show data. Updates from any console are synchronised across the network.
When synchronised the consoles have the same show data, however they still operate as separate consoles with a separate programmer.
Recording and updating of Groups, Palettes, FX, Cues, Cue Stacks, Macros, and Grids will be synchronised between the consoles. Note however that changes to the Patch must be made on the master console and they will clear any programmer information on the slave consoles.
From v1.9.0.2 show settings are automatically synchronised between consoles in a Net Session whenever a setting is changed - previously the Slaves would only be updated on startup / resync.
The exception is when Users are in operation and then if the current user does not match between consoles and the current user has the user option set to Load Settings. In this case maintains its own settings, and updates from other consoles are ignored.
When a user has the option set to Load Settings then when changing to that user (or logging in as that user from a Slave console) the following user specific settings will be reloaded from the state when the user last logged in:
The status of the slave synchronisation is shown in the status bar. Initially the status window will show "NoCon" with a red background.

Once the Slave has a connection to the Master over the network (but not yet synchronised) it will show "NoSync".

Once synchronised it will show "Sync":

It is possible to force a show slave to resynchronise by holding the left and right cursor keys and pressing SET. It is also possible to resync by restarting or soft resetting the show slave console.
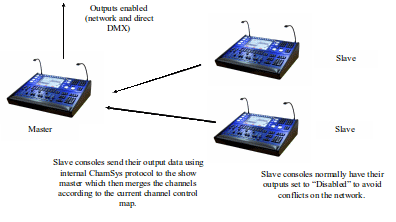
Selective channel control enables Slave consoles to select and control different channels on the master consoles outputs. This allows any console on the network to take control of a set of channels in the lighting rig.
With selective channel control the slave consoles send their output data to the show master and then the show master merges the data from all the slaves onto its outputs.
MagicQ allows different ways of selecting which of the output channels are controlled from which console on the network – selected channels, active channels, groups of channels, universes and universe zones. MagicQ defaults to the Master console having control of all the channels.
Slaves request control of output channels using the Setup, View DMX I/O, Multi Prog Select soft button.
Note that the Slave can still program channels that it does not have control of - but it will not have control of the output to the physical fixtures.

None | The Slave does not control any channels. |
One Head | The Slave controls the first selected head only. If Next Head is used to sub select heads then the first sub selected head is controlled. |
Selected | The Slave controls the currently selected heads. When no heads are selected, none are controlled. |
Programmer | The Slave controls all channels that are active in the programmer. |
Active | The Slave controls all channels that are active in the programmer or on its playbacks. |
Last Active | Each console controls the channels that it was the last console to change in the programmer. Also for last executed on playbacks when not in playback sync. |
User | The Slave controls all the channels allowed as the current User |
Group | The Slave controls the group that was selected when this option was chosen. |
Uni Zones | The Slave controls selected universe zones (as set up in DMX I/O) |
Universes | The Slave controls selected universes |
All | The Slave controls all channels |
When multiple slaves are in use then different slaves can control different channels on the lighting rig. If the same channel is requested by multiple slaves then the latest selection will take precedence. The show slave shows the multiple control method in the status bar – e.g. for selected heads it shows "CC-Sel".

When the slave has no channels under control it shows "CC-None".

At any time the Master can take control of all channels using the Setup, View DMX I/O, Multi Prog Select soft button. When the Master is controlling all channels then it shows "MCC" in the status bar. When some channels are under control by a slave console then it shows "SCC".

Most MagicQ functions can be accessed from both Master and Slave consoles.
Load Show, New Show and Import Show are not supported on Slave consoles. Users can only be configured on the Master console.
Prior to version 1.9.2.2 Slaves could not perform any Patch operations. From version 1.9.2.2 Multi Console operation has been enhanced to enable all Patch operations from Slave consoles with a few exceptions. The following operations are not currently supported on Slave consoles:
There are four Playback Sync Slave options which control whether the playback state of the Slave is synchronised with the Master.
In Setup, View Settings, Multi Console the options for "Playback Sync Slave mode" are "PB sync", "Inbibit, sync on swap", "Inhibit PB sync" and "PB Sync, multi control".
In "PB sync" mode the Slave playback state is always synced to the Master. It is not possible to change playback state (such as page, activation/release state, level of Playbacks) on the Slave.
In "PB sync, multi control" mode the Slave playback state is always synced to the Master. The playback state (such as page, activation/release state, level of Playbacks) can be changed from Master or Slave consoles.
In "Inhibit PB sync" mode the Slave playback state is never synced to the Master. If the Slave becomes Master then the playback state will not be changed - this allows for example a safe state to be set on the Slave console which is not synced to the Master playback state.
In "Inhibit, sync on swap" mode the Slave playback state is not synced to the Master whilst it is a Slave. If it gets promoted to be the Master then it will sets its playback state to the last received state from the original Master.
Note that MagicQ PC systems will only sync playbacks when a MagicQ Wing or Interface is connected, and then only Playbacks 1 to 10. When a PC Wing or Maxi Wing is connected to PC in addition to a Rack Mount dongle then Playbacks 1-34 are supported. When a Stadium Connect is conncted then Playbacks 1 to 30 are supported.
There is no limit to the Playback sync between MagicQ consoles.
By default each console in Net Sessions has a separate Programmer. Any changes in the Programmer on the Master are completely independent to changes in the Programmer on the Slave. Each console can record, and update different Cues independently.
The Programmer Sync Mode option can be set to enable synchronisation of Programmers. To use Programmer Sync Mode the Master console must have Programmer Sync Mode set to "Sync Programmers". Each Slave Console that should have its Programmer synced with the Master must also have its Programmer Sync Mode set to "Sync Programmers".
Where Net Sessions is in use with more than two consoles it is allowed that one or more Slaves use "Sync Programmers" and other Slaves operate independently.
A Slave can be changed in and out of Programmer Sync at any time by changing the "Sync Programmers" option. When enabling "Sync Programmers" the Programmer of the Slave will be overidden with the entire contents of the Master consoel programmer. When disabling "Sync Programmers" the contents of the Slave programmer will be unchanged - but will no longer be synced with the Master programer.
There are key shortcuts: hold the CURSOR LEFT and CURSOR RIGHT keys down. Then press * to turn on Programmer Sync. Press / to turn off Programmer Sync.
When a Slave is in programmer sync then its programmer will always be synced with the master and therefore any changes will go direct to the output. For this reason selective channel control is generally not required when running in programmer sync.
When in Net Sessions with separate programmers for each console (no programmer sync) it is possible to Include the Programmer from any of the consoles in the net session into any other console in the Net Session.
Press CTRL and INCLUDE. MagicQ shows a dialog box with each of the other the consoles in the Net Session. Select a console to include the programmer from that console.
It is possible to only include selected heads or selected attributes from another console. Press SHIFT + INCLUDE to open the Include Options. Then press SELECTED ONLY and/or choose attributes before pressing the new INCLUDE OTHER CONSOLE soft button. MagicQ then shows the console selection dialog box as above.
The Include Other Consoles is also available from the Include Options toolbar. Toolbars are shown when Setup, View Settings, Windows, Always Show Record Options is set.
When operating with Programmer Sync the programmers are already synced so Include from Other Console is not required.
Include from Other Console is only available when in Net Sessions as the show files must be synced on the consoles to ensure the Patch is the same.
MagicQ supports Uni Zones for controlling multiple rooms / areas in a venue. In Setup, View DMX/IO each Universe can be allocated to a Uni Zone, and then all the Universes in a Uni Zone can be controlled together – e.g. for enabling / disabling of a Uni Zone.
Special items in the Execute Window to enable easy control of Uni Zones, including enabling and disabling Uni Zones and setting and clearing hot takeover in a Uni Zone. This allows complete control of a multi-room system directly from the Execute Window without users needing to access the Setup Window.
It is possible to trigger message boxes from Cues in a Cue Stack. Simply add a comment field to the Cue in the Cue Stack starting with a !. When this Cue executes the message box will be shown.
In Setup, View Settings, View Windows there is a new option, Message Window. This specifies where the message box is shown (main screen, external screen 1, external screen 2) and whether a network message is sent to other consoles.
Setting "Net Only" results in messages only being sent over the network, not shown on the console where the Cue executed.
By default the message box shows immediately for 5 seconds and then closes. The delay before the message box shows and the time it stays visible can be set using parameters in between the !.
!<delay>,<show length>!
!10!Hello World // Delay for 10 seconds before showing message
!10,20!Hello World // Delay for 10 seconds and show message box for 20 seconds
!0,0!Hello World // Show message and do not close message box
If the comment starts with a !! instead of a ! then the console does an alert as well as showing the message. The alert flashes the main screen intensity and the console lamps to try to get the operators attention.
Messages can be sent directly from the keyboard by entering text starting with a ! or a !!.
The control net is a secondary network interface. It must have a different, non-overlapping IP address and subnet mask to the primary network.
The control net is more restricted; things such as Art-Net and sACN will not be useable, however it can be used with the remote app, 10Scene app, remote control and SMB file access.
This provides isolation from the broadcast-heavy traffic of Art-Net, and is ideal for connecting a wireless access point for using the MagicQ Remote App. It can also be used to connect the console to a wide area network (WAN), or the internet.
Although the control net is restricted, there are still unauthenticated protocols available through it. It must be connected to a trusted network with appropriate firewalls and security measures. See the network security section for more information.
Control net is available on consoles through either a dedicated ethernet port (where available), or a USB to ethernet adaptor.
If using a USB adaptor, plug this into the console. Go to the Net tab in Setup, View Settings, View Status. If a MAC address appears under Control IP, then the adaptor is ready to use.
Go to Setup, View Settings, Network. Control net mode can be set to one of three options:
The Gateway address setting can be used for either the primary network or the control net. Set this to the address of the router if communicating with a WAN or the internet.
In Dynamic mode, go to the Net tab in Setup, View SEttings, View System, View Status to see what IP address has been assigned.
The IP addresses and subnets used for the primary network, control net and wifi must not overlap. A sensible setting for the control net would be 192.168.250.10, 255.255.255.0. See the top of this chapter for a list of allowed IP address ranges.
The Control net firewall setting can be used to restrict incoming network traffic. If set to Allow Remote only, then only MagicQ Remote app and remote control can connect to the console via control net. If set to Block all, then all incomming connections are blocked (although the console can make outgoing connections to other devices).
The Control net mode and Control net firewall settings, and USB ethernet support, require version 1.9.1.0 minimum. |
Control net via built-in ethernet port:
Control net via USB to ethernet adaptor (version 1.9.1.0 minimum):
*The MQ80 will also need a Linux Kernel upgrade - follow these steps.
All other consoles do not support control net.
MagicQ PC does not support the control net setting, however some protocols (e.g. remote app) will still work over multiple network interfaces, even if not chosen in the Primary IP setting.
These USB to ethernet adaptors have been tested, however many other adaptors will also work:
| | ||