| |
| |
MagicQ supports a large number of settings that the user is free to change. These settings are divided into two categories – show settings and console settings. Show settings are settings that the user may wish to change on a show by show basis, whereas console settings are associated with the specific console and its connectivity to external devices.
Show Settings
Console Settings
Both show settings and console settings are stored in MagicQ show files, but by default only show settings are loaded when a MagicQ show is loaded. To force consoles settings to be loaded as well use SHIFT and LOAD SHOW+CON.
In MagicQ, console settings are marked with a red tag in the bottom right corner of the text box describing the setting.
The MagicQ console allows the programming mode to be configured in the Setup Window. The modes control several of the different settings of the console. All of the settings can be configured individually – however, the modes make it easy to change between the most frequently used settings.
The programming mode determines how the console is programmed. The options are Normal, Theatre non-track, Theatre tracking and Hog II Warp.
Changing mode during programming does not change Cue Stacks that have already been programmed – it only affects the programming of new Cue Stacks.
The settings affected by changing mode are:
Table 50.1. Setup, Prog Settings
| Setting | Live(Chase) | Live(Cue Stack) | Theatre non track | Theatre Track | Hog II warp |
|---|---|---|---|---|---|
Programmer Tracking | No | Yes | No | Yes | Yes |
Unused Chans return to defaults | No | Yes | Yes | Yes | Yes |
Programmer overrides FX | No | No | No | No | Yes |
Highlight mode | High/Low | High/Low | High/Low | High/Low | High/Low |
Fan mode | Normal | Normal | Normal | Normal | No toggle |
Select multiple groups | No | Multiple | Multiple | Multiple | Multiple |
Recording to Palettes | Selected | All Heads | Selected | Selected | All heads |
Table 50.2. Setup, Keypad Encoders
| Setting | Live(Chase) | Live(Cue Stack) | Theatre non track | Theatre Track | Hog II warp |
|---|---|---|---|---|---|
Select heads on keypad intensity set | Yes | Yes | Yes | Yes | Yes |
Select heads and palettes from keypad | Yes | Yes | Yes | Yes | Yes |
Keypad always selects heads | No | Priorty to Selected Heads | No | No | Yes |
Maintain encoders as Pos, Col, Beam | No | Yes | No | No | Yes |
Keypad Syntax – Theatre Patch | No | No | Yes | Yes | No |
Table 50.3. Setup, Windows
| Setting | Live(Chase) | Live(Cue Stack) | Theatre non track | Theatre Track | Hog II warp |
|---|---|---|---|---|---|
Always Show Record Options | No | Yes | No | No | Yes |
Table 50.4. Setup, Playback
| Setting | Live(Chase) | Live(Cue Stack) | Theatre non track | Theatre Track | Hog II warp |
|---|---|---|---|---|---|
Intensity FX (HTP) can add,subtract | No | Yes | Yes | Yes | Yes |
Table 50.5. Setup, Cue Stack Defaults, Fader
| Setting | Live(Chase) | Live(Cue Stack) | Theatre non track | Theatre Track | Hog II warp |
|---|---|---|---|---|---|
Fader activates | Yes | Yes(single Cue) | No | No | No |
Fader releases | Yes | Yes(single Cue) | No | No | No |
Table 50.6. Setup, Cue Stack Defaults, Flash
| Setting | Live(Chase) | Live(Cue Stack) | Theatre non track | Theatre Track | Hog II warp |
|---|---|---|---|---|---|
Flash activates | Yes | Yes | No | No | No |
Flash releases | Yes | Yes | No | No | No |
Table 50.7. Setup, Cue Stack Defaults, Step
| Setting | Live(Chase) | Live(Cue Stack) | Theatre non track | Theatre Track | Hog II warp |
|---|---|---|---|---|---|
Multi Cue, Controlled as chase | Yes | No | No | No | No |
Multi Cue, Step halts before executing | No | Yes | Yes | Yes | Yes |
Multi Cue, Zero Old HTP | Yes | No | Yes | No | No |
Multi Cue, Zero Old FX | Yes | No | Yes | No | No |
Track | L | HLF | L | HLF | HLF |
Table 50.8. Setup, Cue Stack Defaults, Step Times
| Setting | Live(Chase) | Live(Cue Stack) | Theatre non track | Theatre Track | Hog II warp |
|---|---|---|---|---|---|
HTP in, HTP out, Pos times | 0s | 3s | 3s | 3s | 3s |
For changing between tracking and non-tracking mode simply change the "Programmer Tracking" setting in the Setup Window, "Prog" tab. This automatically sets the Default Cue Stack options (Recalculate state on jumps, Zero old HTP, Zero old FX) correctly.
The playback mode determines how the console plays back cues. The options are Normal and Safe. In Normal mode the user can make changes during playback just like when they were programming the show. In Safe mode, making changes is not allowed and backups are turned off to any possible interference with the running of the show.
The MQ40/MQ40N user interface has a reduced number of options to ensure that it is easy to use for users unfamiliar with lighting programs. More advanced users can access the advanced settings by setting the Advanced Settings = "Enabled" in Setup, View Settings, Mode.
When "Advanced Settings" is "Disabled" then the Patch Window shows a simplified view with one only one tab and simple buttons to CHOOSE HEAD and PATCH IT. Items can be moved around in the Visualiser using the X, Y, Z encoders. For more advanced features of MagicVis, and for patch features like Clone and Morph use Advanced Settings.
From 1.8.0.2 on all MagicQ consoles the Advanced Setting option is saved and will appear on start up and reset as it was before the start up or reset. On older versions of software whenever the MQ40N or MQ40 was first started or reset then it defaulted back to the simple settings - this was intentional to ensure that basic users saw the simple settings on start up and were not confused by all the advanced features.
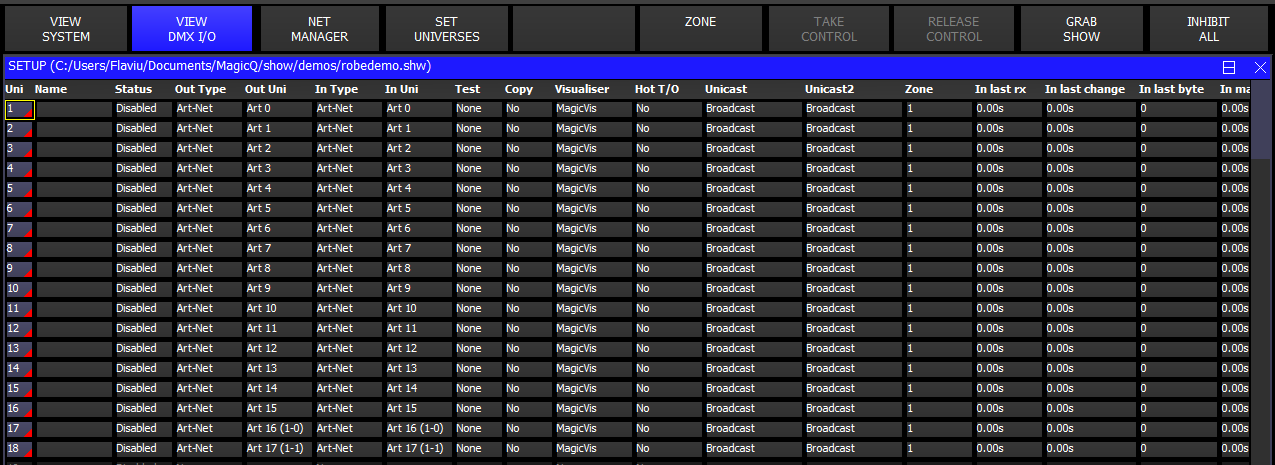
The console universes can be configured to use different protocols. Outputs must be configured and enabled before the console will output data. To set up outputs, open the Setup Window and select the VIEW DMX I/O view.
MagicQ software supports 64 universes but older versions of MagicQ support less universes. To change the number of universes in operation please see Configuring number of universes.
For each of the universes, the output and input protocol can be selected in the Out Type and In Type fields respectively. Press ENTER or double click to change to the next protocol type.
The possible protocols are
Table 50.9. DMX I/O Out Protocols
None | No protocol |
Art-Net | Art-Net 1,2,3,4 protocols (over Ethernet) |
Pathport | Pathport protocol (over Ethernet) |
ShowNet | Show net protocol (over Ethernet) |
sACN | ACN Streaming DMX (over Ethernet) |
MQ Direct | DMX outputs from MagicQ consoles |
MQ Wing | DMX outputs on MagicQ Wings and Connects |
MQ USB Interface | MagicQ Dual DMX interfaces and other MagicQ USB DMX devices |
MagicDMX | ChamSys MagicDMX USB interface |
For network protocols such as Art-Net and Pathport it is necessary to set up the Out Uni and In Uni fields - these determine which the ID of the Universe when carried over Ethernet.
A ! by a Universe indicates a clash whereby more than one Universe is being output on the same network Universes.
Art-Net™ Designed by and Copyright Artistic Licence Holdings Ltd.
To use Art-Net simply configure the Output Universe type to Art-Net, set the Out Uni field to the desired Art-Net universe and set the status for the universe to enabled. MagicQ will broadcast Art-Net over the network. MagicQ does not require any binding with nodes when using Art-Net in the default configuration.
When using Art-Net on a network with 32 or more universes it is recommended to use unicast Art-Net rather than broadcast Art-Net. Set the Art-Net type setting in Setup, View Settings, Network to "V4 unicast". MagicQ then automatically unicasts Art-Net to detected Art-Net nodes rather than broadcasting.
MagicQ can also be manually configured to unicast Art-Net to the IP addresses of two specific devices. Set the Unicast fields for each universe in DMX I/O. The IP addresses of Art-Net compliant devices on the network can be viewed in Setup Window, View System, View Status, Art-Net nodes.
When a Unicast address is manually set and the universe is set to Output Art-Net, MagicQ sends data for that universe direct to the unicast address rather than broadcasting that universe. Note that MagicQ will still broadcast that universe once per second - this allows all other consoles on the network to determine that there is a console outputting Art-Net for this universe. This additional broadcast can be inhibited by setting Setup, View Settings, Hardware, Reduced Rate DMX to "M+C no broadcast". Note that using both Unicast addresses doubles the amount of network traffic.
ACN Streaming DMX (sACN) uses multicast to output DMX data onto the network. When using many universes this often provides a much better solution that using Art-Net in broadcast mode. In sACN, DMX nodes only decode the universes they are interested in rather than having to decode all the universes broadcast on the network.
MagicQ supports unicast of sACN - set the Unicast addresses in Setup, View DMX I/O. When a Unicast address is set for a universe, MagicQ no longer sends that universe to the Multicast address.
MagicQ supports use of the priority field in ACN universes.
The sACN output priority can be set in Setup, View Settings, Network. This should be between 1 - 200 and defaults to 100. When receiving sACN, MagicQ receives the highest priority. If there are multiple sources for a particular universe, MagicQ will only listen to the highest priority. The behaviour of MagicQ is undefined when there are more than 5 ACN sources for a particular universe or multiple sources with the same (highest) priority; this is not recommended.
All current MagicQ consoles have four direct DMX outputs on the rear panel.
By default MagicQ consoles are set to output the first 4 console universes on the direct console outputs.
If the setting "Setup, View Settings, Ports, MagicQ Wings & Interfaces" is set to "Yes (auto DMX)" then the first 4 universes will output regardless of whether they are enabled in Setup, View DMX I/O.
If you wish to patch the direct outputs to other than the first four universes, then set the required universes to "MQ Direct" and set Port 1, Port 2, Port 3 or Port 4. As soon as any of the universes are set to "MQ Direct" or "Cham USB" then this overrides the default settings.
Note that MagicQ consoles support DMX input via Art-Net, Pathport or sACN. The direct DMX ports on MagicQ consoles and MagicQ Wings do not support DMX Input. In order to receive DMX into a MagicQ console we recommend to use a SnakeSys interface to convert from DMX to Art-Net or sACN.
The MagicQ MQ500M Stadium Wing is designed to connect to an MQ500M console to add extra playbacks and DMX outputs. Older versions of MagicQ supported the Stadium Wing on some other MagicQ products - in order to simplify the product range this is no longer supported.
MagicQ MQ500M Stadium Wing has four DMX outputs. When connected to a MQ500M the DMX outputs are by default set to output console universe 5 to 8. If you wish to patch the direct outputs to other than universes 5 to 8, then you will need to set all required universes to "MQ Direct".
MagicQ Mini Connect & Wing have one DMX output, MagicQ Compact Connect, PC Wing and PC Wing Compact have two DMX outputs and the Stadium Connect & MagicQ MaxiWing have four DMX outputs.
By default MagicQ is set to output the first universes on the system to the DMX outputs on the Connects and Wings. For MagicQ Compact Connect & Mini Connect Universe 1 will be output from the DMX port, for Compact Connect, PC Wing and PC Wing Compact universes 1 and 2 will be output, and on Stadium Connect, MaxiWing universes 1 to 4 will be output.
If Setup, View Settings, Ports, MagicQ USB Wings & Interfaces is set to "Yes – auto DMX" then MagicQ will automatically output DMX on the Wings starting from Universe 1 – provided that none of the Universes have been explicitly set to "MQ Wing".
To use different universes, set the required universes to MQ Wing and enable them. The universes set to MQ Wing will be output to the ports in order.
Note when using the Direct DMX Output on the Mini Wing with some PCs/operating systems the USB driver for the MiniWing runs slowly, this can cause FX/Chases to run slower than expected. Unfortunately this is not under ChamSys control as the FTDI driver is closed software. Setting Setup, View Settings, Ports, MagicQ Wings and Interfaces = Yes instead of Yes, auto DMX and ensuring universes are not set to MQ Direct or MQ Wing will prevent MagicQ sending DMX to the MiniWing which should then avoid the slowing of the system. Other MagicQ Wings and Interfaces are not affected by this.
These Wings can be used in the standard Panel modes in MagicQ PC. They are not supported in the Stadium Panel modes.
For MagicQ Dual DMX Interfaces select MQ Dual DMX. In older software this was ChamSys USB. Then select the module and port in the Out Uni field. For example, select Mod 1 Port 1 and Mod 1 Port 2 for the two outputs. Any of the universes can be output to MagicQ Dual DMX interfaces.
When connected to MagicQ consoles and some laptops the MagicQ Dual DMX Interface may need external power from a 12V power supply. Check Setup, View System, View Status, DMX Interfaces, DMX Modules.
When connected to MagicQ consoles the module should be configured as Mod 2 Port 1 and Mod 2 Port 2 since the console internal DMX module is considered to be module 1.
MagicDMX Interfaces automatically output on universe 1 when Setup, View Settings, Ports, MagicDMX mode is set to DMX Out.
It is possible to set the Out type for Universe 1 to be MagicDMX – this automatically sets the Setup setting MagicQDMX mode to DMX Out.
It is not necessary to set the Out type for Universe 1 – only the MagicDMX mode setting.
MagicDMX devices do not need any additional drivers – they use different HID drivers within the operating system.
Note that the MagicDMX Basic version is limited to 5 hours of continuous use. When the time is close to expiring warnings will be shown. On expiry the MagicDMX will send out DMX levels of 0. The MagicDMX Basic interface must then be unplugged and MagicQ software restarted to use the device again.
The MagicDMX Basic version only supports DMX Out. The MagicDMX Full Interface supports both DMX Out and DMX In.
The newer MagicDMX Full manufactured from May 2023 with USB C Connectors support RDM. Older MagicDMX Full with USB A connector do not support RDM.
The MagicDMX interfaces do not remove the automation and remote restrictions when used with MagicQ Software – this requires a MagicQ Wing, or MagicQ Dual DMX Interface.
MagicQ supports the Lumen Radio CRMX Nova TX USB dongle for controlling one universe of DMX via Lumen Radio. This allows Heads from many manufacturers including Robe and Ayrton to be controlled over wireless direct from the console.
In MagicQ simply set the Output Type in Setup, View DMX I/O for Universe 1 to Lumen Radio and enable the universe. When connected the interface should be shown under Setup, View System, View Status, Interfaces, Port Type as "En". The Lumen Radio can only be configured on Universe 1. To output a different universe to the device set the copy field on Universe 1 to copy from the required universe.
The Lumen Radio device is supported on all MagicQ consoles except MQ40 and MQ40N.
Only one Lumen Radio device is supported per console.
MagicQ software previously had some support for 3rd party DMX dongles - these are no longer actively developed or maintained and have been removed from v1.9.5.0. ChamSys are unable to offer support for these interfaces - we recommend the use of our low cost MagicDMX interfaces. 3rd party DMX dongle are supported on Universe 1 only. Note that some of these devices rely on the PC to do the DMX framing and therefore results may be unpredictable on some systems. Many of these devices are unable to transmit full DMX frames at the full DMX refresh rate.
MagicQ supports some simple options for testing complete output universes, including sending all ‘0’s, sending all ‘255’s, and several additional test patterns. Tests can be performed on individual universes using by selecting the test in the Test field of the Setup Window, DMX I/O view.
Selecting "Input" automatically routes all 512 input channels received on the universe to the 512 output channels. This is useful for loopback and network protocol conversion.
Selecting "Merge" automatically merges the received 512 input channels with the consoles 512 output channels. All 512 channels are HTP merged - i.e. the output is the largest of the input value and the console calculated value.
When any of the universes are in test mode a warning flashes in the Status Display.
MagicQ supports copying of entire universes to multiple outputs – this may be useful where you wish to duplicate an output universe onto different outputs of an Art-Net interface, or you want to set MagicQ wing outputs to be the same as Ethernet outputs. Select the universe you wish to copy in the Copy field of the Setup Window, DMX I/O View.
Select the Universe to copy – e.g. Uni 1 for the first Universe. You can enter the universe number. Enter 0 to turn off copying.
MagicQ supports hot take-over to enable a second console (or MagicQ PC) to take-over running the show if the first console has a problem.
When using Net Sessions, then all Hot Takeover fields in DMX I/O should be set to No.
For how to use hot take-over see Using Multiple Consoles.
The options are No, Yes and Yes, Loop. When set to "Yes", MagicQ will disable the universe if it receives incoming DMX for that universe. The Hot Takeover Mode option in Setup, View Settings, Multi Console, determination which console has preference.
When set to "Yes, Loop" MagicQ will show the universe as disabled, but will loop through the received DMX data for that universe. In Setup, View DMX I/O the In Type and In Uni determine where the data for a universe is received from and the Out Type and Out Uni determine where it is transmitted to. The Out Uni and Out Type do not need to match the In Type and In Uni - it is normal to receive into MagicQ one universe and output to a DMX node on a different universe.
MagicQ supports the same number of input universes as output universes. Input universes can be used for grabbing DMX data from other consoles, remote triggering via DMX, and merging with MagicQ calculated data. The Input universes can also be used to monitor lighting data on the network.
By default the Input universes are configured the same as the Output universes. If you wish to receive data from other consoles then you must use different universes for input from the ones you are using for output. For example if you have universe 1 to 16 set to output on Art-Net 0-0 to 0-15 then you must not uses these Art-Net universes for Input. We recommend using much higher universes for input - e.g. Art-Net 4-0.
The Input types supported are None, Art-Net, sACN, Pathport, Shownet and console.
When MagicDMX Mode is set to Input, data from the MagicDMX Full will always be received on universe 0 regardless of the settings of universe 1 in the DMX I/O window.
If data is received on the input from another console then MagicQ will detect a conflict and change the status field to show "En Cflct" and "Dis Cflct" dependent on whether the universe is "Enabled" or "Disabled".
Data being received on Input Universes can be viewed in the Output Window, View Chans, View DMX by selecting DMX Inputs. Make sure to change back to View Outputs after you have finished viewing the Outputs otherwise it may cause confusion later.
Data received on input universes can be merged into complete universes or merged in the Patch, or to trigger playbacks (Setup, View System, View Wings) or used to trigger Automations. It can also be used to grab palettes from DMX.
The Input universe type can also be set to "Console" to loop the output back into the input. This enables output channels to be used coming back in for automations.
The DMX I/O window shows the status of the Input universes (page right) including:
In last rx | Time since last received input |
In last change | Time since DMX data last changed |
In last byte | The value of the 1st byte in the last DMX data received |
In max gap | The maximum gap between DMX packets received |
In last period | The period that this universe was last receiving data for |
In IP | The IP address that data was last received from |
In conflicts | The number of conflicts - where data transmitted/received from 2 or more sources |
The maximum gap only starts counting once a valid DMX data is received on that universe. It is set back to 0 when changes are made in DMX I/O.
The period that the universe was last receiving data counts up whilst data is being received. If there is a gap of greater than 60 seconds then it is reset to 0.
The IP address shows the IP address of data received over the network and does not include data transmitted from this console.
The number of conflicts is increased if data for a particular universe is received from 2 or more consoles within 5 seconds. It is also increased if MagicQ transmits on a universe where data has been received from another console within the last 5 seconds. Note that MagicQ will not count conflicts when master/slave hot swaps are in progress.
To merge data from another console into MagicQ you need to set the other console to output Art-Net/sACN on a different universe range to the MagicQ.
The MagicQ console outputs Art-Net/sACN as normal to the nodes.
The other consoles sends either Art-Net or sACN to MagicQ on a different range of Art-Net / sACN addresses.
On MagicQ set the Input Universes to receive the universes from the other console.
For example, consider a MQ500M merging 256 universes of data from another console.
Then you need to choose how you merge:
If you just want to HTP merge some universes you can do this in the Setup, View DMX I/O window by setting the Test field to Merge. It does a HTP merge for the whole universe.
If you want to be able to control from MagicQ or from the other console then in Patch set all channels to over-ride. When those channels are used in MagicQ playback/programmer they will be controlled by MagicQ, otherwise they will be controlled by the oher console. (i.e. MagicQ over-rides the other console)
Note that the MagicQ MQ500M is capable of merging 256 universes - but this means 256 universes output and 256 universes input. This means that you need 512 universes on the network, which can be achieved on a 100M network - but there will be a fairly high network utilisation.
To minimise network load we recommend disabling any unused universes.
Visualiser universes should be set to MagicVis when not used. Any universes set with the Visualiser field to WYSIWYG in DMX I/O will output network traffic since MagicQ is unable to detect the presence of WYSIWYG and therefore always sends data. Visualiser set to Capture/MagicVis is ok as MagicQ only sends if there is a connection to the Visualiser.
Note that if you use HTP merging you need to ensure that any LTP channels (such as Pan/Tilt) are set to 0 on the consoles when not being used - otherwise they will not be fully controlable from the active console.
ChamSys manufacture the following wings that connect to PCs, Macs and consoles via USB
Table 50.10. Wings
| Product | No of Playbacks | Playback nos. | No of DMX | No of wings supported per PC / console |
|---|---|---|---|---|
Mini Connect | 10 | Main (1-10) | 1 | 1 |
Compact Connect | 10 | Main (1-10) | 2 | 1 |
Stadium Connect | 10 | Main (1-10) | 4 | 1 |
Extra Wing | 24 | 1 * Wing Playbacks | None | 8 |
MQ500M Wing | 30 | 2 * Wing Playbacks | 4 | 1 (MQ500M only) |
These products do not require any special drivers.
To enable the wing ensure that Setup, View Settings, Ports, MagicQ Wings & Interfaces is set to "Yes (auto DMX)".
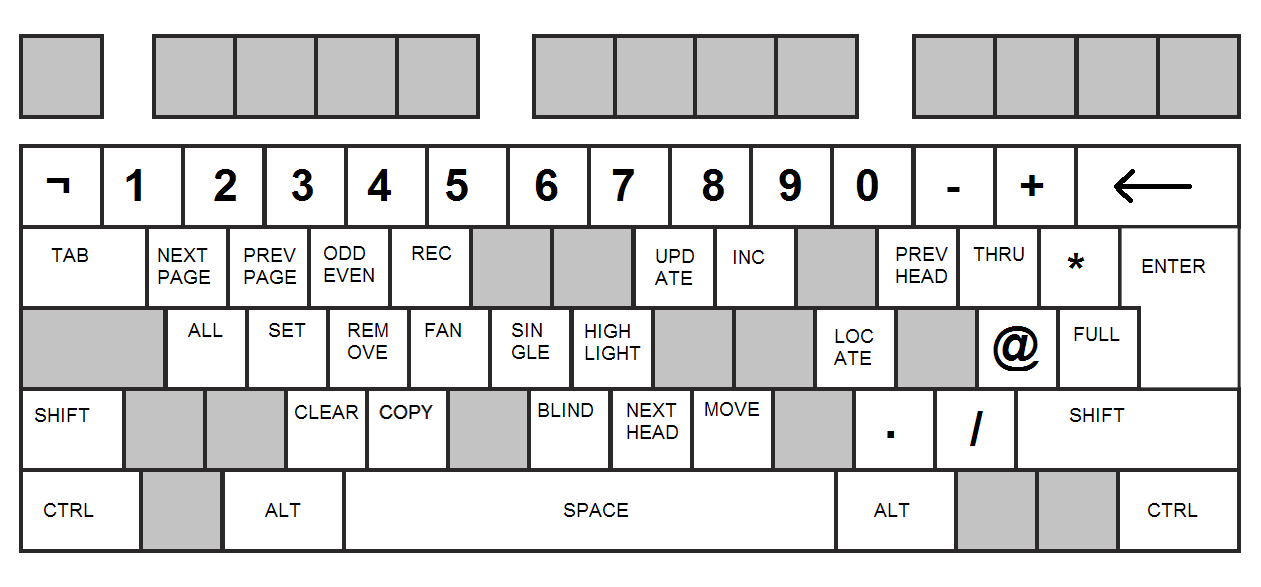
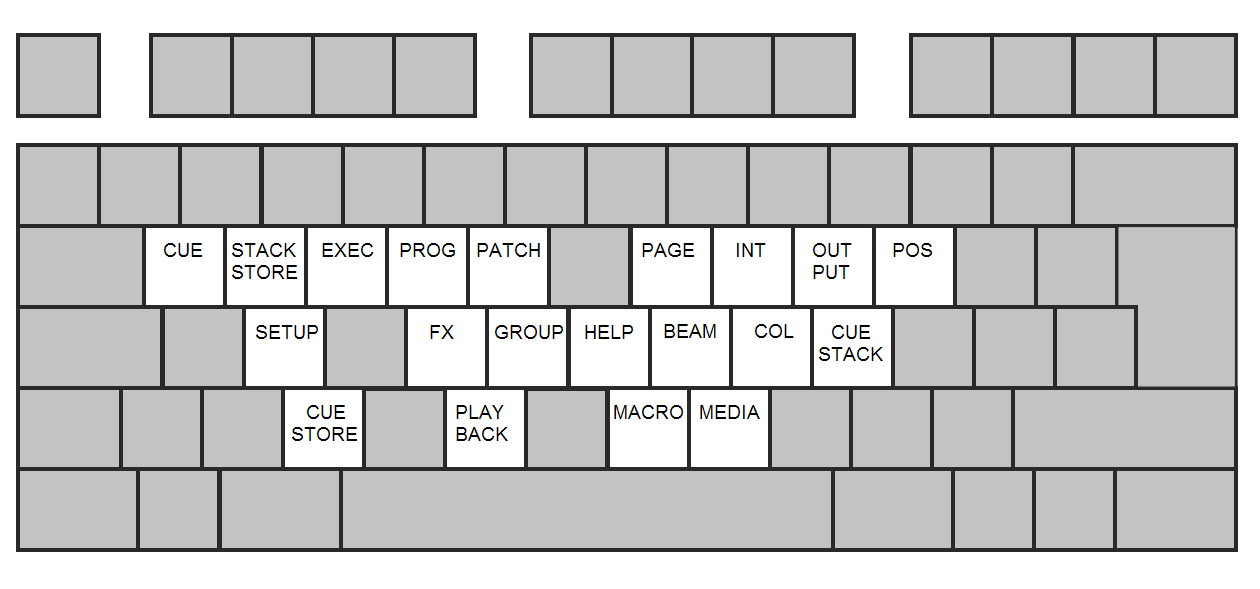
The following short-cuts make programming on MagicQ PC Wing easier. The short cuts also work on MagicQ console.
Table 50.11. Programming Wing Shortcuts
Hold ALL and press a playback Select | Selects groups 1 to 10 |
Hold POS and press a playback Select | Selects position palette entry |
Hold COL and press a playback Select | Selects colour palette entry |
Hold BEAM and press a playback Select | Selects beam page or beam palette entry |
Hold ALL and press Next Head | Selects next group |
Hold ALL and press Prev Head | Selects previous group |
Hold POS, COL, or BEAM and press Next Head | Selects next range for last encoder changed |
Hold POS, COL or BEAM and press Prev Head | Selects previous range for last encoder changed |
GeNetix GN2, GN5 and GN10 nodes can be connected via USB.
These products do not require any special drivers.
To enable detection of the GeNetix ensure that Setup, View Settings, Ports, MagicQ Wings & Interfaces is set to "Yes (auto DMX)".
To configure Playback Wings and Extra Wings open the Setup Window and choose View System, View Wings view.
In the Type field, choose "Playback / Extra Wing". When the console has detected the Playback wing it will show as "Fitted" in the status field.
If you wish to connect more than one Playback or Extra Wing then enable the required number of Wings.
Make sure you enable enough or the same number of wings as you connect to MagicQ. Connecting more Wings to MagicQ than you enable will cause unpredictable results.
Playback Wings and Extra Wings with Blue LCDs can have a Wing ID set for systems with more than one Playback or Extra wing. Hold down the lower NEXT PAGE and PREV PAGE buttons when powering on the Wing to get into the Wing config mode. From the menus you can then set a Wing ID.
In MagicQ, Setup, View System, View Wings you can configure which Wing IDs are expected.
The Playback Wing was last manufactured in 2016 and newer versions of software may not support it fully.
Table 50.12. Old Products
| Product | No of Playbacks | Playback nos. | No of DMX | No of wings supported per PC / console |
|---|---|---|---|---|
Mini Wing | 10 | Main (1-10) | 1 | 1 |
PC Wing | 10 | Main (1-10) | 2 | 1 |
Maxi Wing | 10 | Main (1-10) | 4 | 1 |
Playback Wing | 24 | 1 * Wing Playbacks | None | 8 |
Execute Wing | 48 | 2 * Wing Playbacks | None | 4 |
Stadium Playback Wing | 30 | 2 * Wing Playbacks | 4 | 1 |
Before you can use the MagicQ PC Wing the driver must be installed.
These wings are supported in the MagicQ PC standard panel modes. They are not supported in the Stadium panel modes.
The Execute Wing has 48 playbacks arranged as 12 fader playbacks and 36 button only playbacks. This corresponds to the 48 playbacks whereas with standard Playback Wings there are only 24 playbacks.
The upper 3 rows of playbacks control playbacks in the usual way. Note that as they do not have a fader, the value the attributes that would normally be controlled by the fader (generally Intensity values) will automatically default to 100%. The Playbacks can still have times in the normal way, so that Intensity values can be faded in and out.**
The Execute Wing was last manufactured in 2016 and newer versions of software may not support it fully.
It is possible to connect multiple MagicQ consoles together in order to control a larger number of Universes. The master MagicQ console then outputs some channels which act like playbacks for the slave consoles.
On the slave consoles, one of the wings is configured as "DMX In" and select a range of channels for it to respond to. Note that the universe that contains these channels must have input enabled in the "View DMX I/O" view. This causes the playbacks on the wing to be controlled by up to 24 DMX channels received into the console. The level of the playback is determined from the received channel.
It is possible to use an external DMX console to gain extra playback controls when using MagicQ consoles. This is not a replacement for a MagicQ Playback wing with its electronic legending and Cue Stack controls.
On MagicQ PC this option is only available to control Playbacks PB1 to PB10 and is only enabled when a MagicQ Wing or MagicQ USB Interface is connected. This feature allows synchronisation of MagicQ with other consoles.
Configure an unused wing to be "DMX In" and select a range of channels for it to respond to. Note that the universe that contains these channels must have input enabled in the "View DMX I/O" view.
In order to allow use of FLASH buttons on the external DMX console, MagicQ uses the top 5% of the channel range as an indication that a FLASH button has been pressed. On the external console the playback master fader should be configured at a maximum of 95% with the flash master set to 100%. If it is not possible to set the master levels independently on the external DMX console then set the grand maser on it to 95%.
On the MQ500(M) one external touch screen is supported up to 1920x1080 resolution. The MQ500(M) has a DVI-D connector which supports connection to an external DVI Digital monitor via DVI. The DVI-D connector does not support the use of DVI-VGA adapters.
In Setup, View System, View Monitors set Monitor 1 to the required resolution in the Resolution column, and enable it. You will be asked to restart - confirm No and set up the Type field.
On the MQ250M one external touch screen is supported. The MQ250M has a DP connector (display port ), which supports both direct Display Port monitors and HDMI monitors using a Display Port to HDMI cable (MQ250M consoles are supplied with a Display Port to HDMI cable)
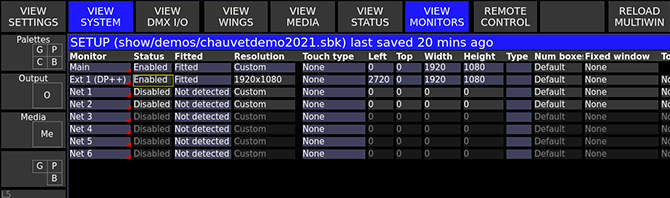
The MQ250M will auto detect supported monitors (note the use of HDMI/DP splitters/switchers with the console is not recommended and may cause issues with the detection of the external monitor). In Setup, View System, View Monitors, the External Monitor is shown as EXT1 DP++. The Status field will automatically change to enabled when the monitor is connected.
On the MQ50 and MQ70 one external touch screen is supported up to 1920x1080 resolution - display via the HDMI connector and touch via USB. The MQ50 and MQ70 will auto detect supported monitors
On the MQ80 one external touch screen is supported up to 1920x1080 resolution. The MQ80 has a DVI connector which supports connection to an external monitor via either DVI or VGA cable - unlike other MagicQ consoles you must configure which cable you are using.
In Setup, View System, View Monitors set Monitor 1 to the required resolution in the Resolution column, and enable it. You will be asked to restart - confirm No and set up the Type field.
Set the Type field to VGA or DVI depending on which input socket you are using on your monitor - VGA or DVI.
After configuring View Systems, View Monitor, the external monitor may still be showing as a clone of the internal monitor. Power the console off and on for the changes to take effect.
On MQ40N consoles one external monitor (not touch screen) is supported. The monitor is always fully enabled on the MQ40N, there are no settings to be set for this functionality.
On the MQ60 and MQ70 one external touch screen is supported. We recommend using a 1024x768 resolution monitor for best performance.
Touch screens are supported but note that the Linux operating system on use on these consoles does not currently support multi touch touch screens.
When using multiple monitors on a PC first enable the monitors in Windows by putting the Windows desktop onto all the monitors. Then start MagicQ PC and in Setup, View System, View Monitors enable the required monitors.
The first monitor is the main MagicQ Window and must always be enabled. Enable all the monitors that you wish to use for Multi Windows.
From the Toolbar select View, External or press the EXT button to move a Window between the different monitors.
Sizing of Windows on the other monitors occurs just like in the Main Window – you can select full windows, half windows and quarter windows.
The entire space on the other monitors is used for MagicQ Windows. When a Window is moved to another monitor the size is kept the same – for example, if it was a quarter window on the Main MagicQ Window it will be a quarter window on the other Window.
You can change the size on the other windows, just like on the Main MagicQ Window from the View menu on the Toolbar or by using the SIZE button.
Press EXT to move a Window to the External Monitor. The window that is currently in focus is transferred to the external monitor. Press EXT to return the window to the main monitor.
Press SHIFT + EXT to bring all windows to the internal monitor. On Compact consoles type 0 and press ALT MEDIA (EXT).
MagicQ includes an option to force a single window to one of the external monitor output(s). The Window will remain on the external monitor except when a SHIFT CLOSE is performed. This option is set in the Setup Window, View System, View Monitors Window in the Fixed Window column.
MagicQ supports additional windows - accessed by pressing CTRL and the Window button or by typing 2 and the Window button to get the second window.
Up to four Output Windows are supported by pressing 2 OUT, 3 OUT and 4 OUT. Up to 3 Execute Windows are supported by pressing 2 EXEC and 3 EXEC.
Up to three Group Windows are supported by pressing 2 GROUP and 3 GROUP.
For instance by using both the Outputs and the Outputs Info windows you can view both the plan view and the data values simultaneously.
Similarly, the Cue Stack Info window is designed as a master window to keep track of the Cue Stack on the currently selected playback. The columns have been rearranged so that the comment field is shown as one of the first columns.
This is ideal for theatre playback where the operator wishes to see notes about the Cues during playback – you could for instance put a comment on a Cue "Call spots when actor enters stage right".
The MagicQ Stadium, Compact, and older MQ100 consoles support an external monitor directly from the rear panel.
It is possible to connect more monitors using the MagicQ Multi Window Client application running on one or more external PCs to display windows from remote MagicQ systems. These additional monitors can be touch screens if the PC supports them.
The MagicQ Multi Window Client application comes as part of the MagicQ PC installation.
The MQ500M supports up to 4 external monitors off one external PC, whilst other MagicQ consoles support 1 external monitor on an external PC.
In order to enable Multi Window connection on MagicQ, enable the net monitor on the console in Setup, View System, View Monitors.
Connect the MagicQ console to the PC/Mac using a network cable and ensure that both PC/Mac and MagicQ console are on the same network IP address range (e.g. 2.x.x.x subnet 255.0.0.0).
On the PC or Mac, run the Multi Window Client application; it should automatically detect the console.
Note this function is not supported on the MQ40N console, and that the Curve editor and MagicHD windows are not supported. MagicHD has its own networking capability in standalone mode.
On PC / Mac systems touch monitors are set up under the operating system, not under MagicQ.
MagicQ consoles support many different touch protocols - however we are reliant on the drivers available in Linux, so not all touch screens will be supported. We strongly recommend you check the protocol is supported and test a sample with a MagicQ console before purchasing a touch screen. We can not guarantee that any touch screen will work with MagicQ - the list below is for guidance only.
We generally recommend ELO AccuTouch, ELO IntelliTouch and iiyama touch screens. ELO Acoustic Pulse Recognition (APR) touch screens are NOT supported. We currently do not support touch screens with multi touch support on the MQ60 Compact consoles.
For MQ500M, MQ500 and MQ80 the following touch screens have been tested and proven: Asus VT207N, Dell S2240T & P2418HT, Hanns G HT225HPB, iiyama Prolite T2336MSC, iiyama T2235MSC-B1, Lenovo ThinkCentre TIO22 / TIO24 (gen 4) and Viewsonic TD2421 touch screens.
For MQ250M, MQ50 and MQ70 consoles the above monitors listed as supported on the MQ500M, MQ500 and MQ80 are also supported with these consoles, in addtion the Acer UT220HQL is supported.
These monitors above are not supported on MQ60 or MQ100 Pro2010 consoles.
For MQ60 consoles we recommend the iiyama Prolite T1531SR-B1, or Iiyama Prolite T1561SR-B3 connected via RS232 serial port for the touch - these monitors are not supported via USB on the MQ60. For USB connection on the MQ60, we recommend the ELO1919L model no. E176026 and Viewsonic TD2210 touch screens.
MagicQ will show any detected touch screens in Setup, View System, View Monitors.
Tested another touch screen monitor with a MagicQ console? E-mail us at support@chamsys.co.uk with the make and model, so we can add to the list of tested monitors.
To configure an external serial touch screen:
To configure an external USB touch screen:
If the Touch Screen shows a status but does not give consistent values in Board Test then try a different Touch Type.
If the Touch Screen shows consistent values in Board Test but does not respond correctly then recalibrate the touch screen.
The Settings View of the Setup Window uses tabs to group similar settings together.
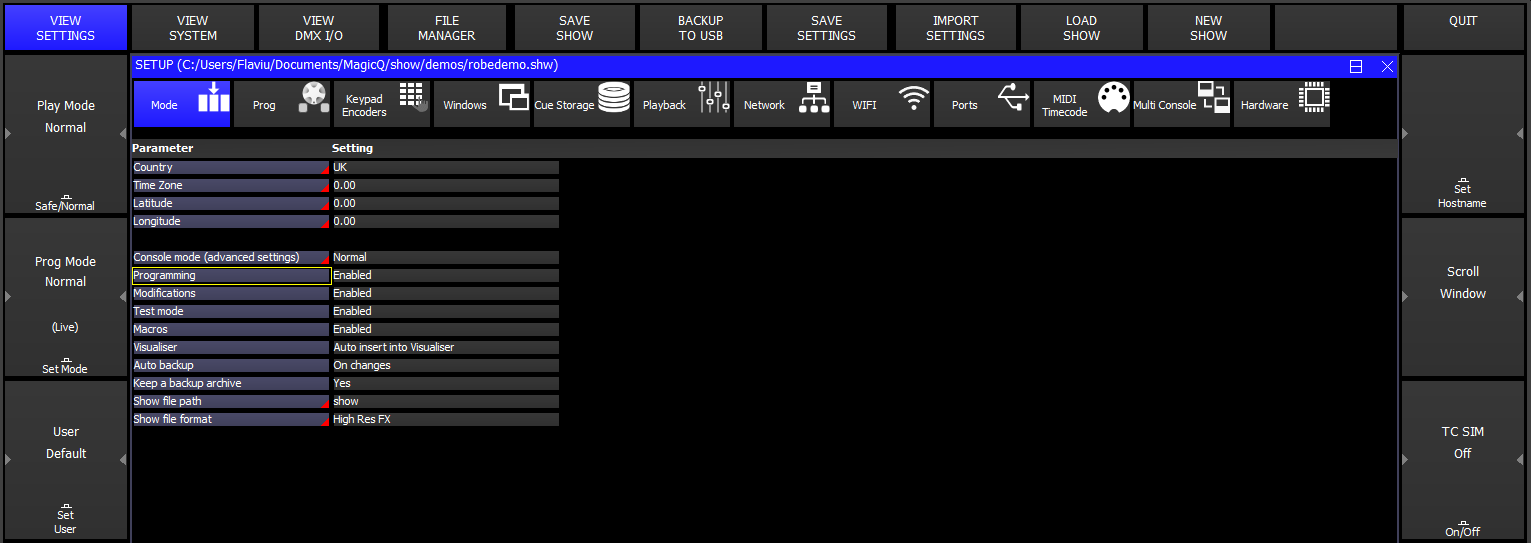
The country setting determines the locale of the installed MagicQ system. Currently MagicQ supports: UK, US, F (French), D (German), E (Spanish), P (Portuguese), I (Italian) and NL (Dutch). When selected, menu items will be displayed in the appropriate language.
The time zone setting determines the current global time zone offset of MagicQ for systems where the system time zone is configured as UTC but the system time is set to local time.
The time zone setting is used when programming with scheduled events based on sunset and sunrise times.
For MagicQ PC versions, your system will be likely configured to the correct local time zone, and this setting should be set to "0.0". For MagicQ consoles where the system time matches your local time, configure the time zone value to be the offset from your local time to UTC.
Enter the time zone offset in relation to UTC in decimal hours. For example, if 8 hours behind (West Coast US) enter "-8". For time zones using fractional hours, enter these as decimals, so UTC+5:30 should be entered as "5.5".
The latitude setting determines the current latitudinal position of the installed MagicQ system.
The latitude setting is used when programming with scheduled events based on sunset and sunrise times.
Enter the latitude in decimal degrees, e.g. "50.91". Positive values are North and negative values are South.
The longitude setting determines the current longitudinal position of the installed MagicQ system.
The longitude setting is used when programming with scheduled events based on sunset and sunrise times.
Enter the longitude in decimal degrees, e.g. "-1.41". Positive values are East and negative values are West.
This setting defines the operational mode of the console. The options for console mode are: "Normal", "Simple" and "MQ500M Banking".
When this option is set to "Simple", some of the more advanced settings are hidden to simplify the user interface.
The "MQ500M Banking" is for use with MQ250M and Stadium Connect. When set, it uses MQ500M Banking - i.e. 15 playbacks per bank rather than the default 10 playbacks per bank.
In versions prior to v1.8.7.3 there was an option "MQ500 as MQ100" which has now been removed. Playbacks can now be easily moved around in the Playbacks Window, View All.
Default: Normal
This setting enables and disables the recording of show data. When set to "disabled", show data can not be recorded, moved, copied or updated, preventing the show from being changed.
Parameters of Cue Stacks and Cues such as Chase Speed, Shape Size and times can still be modified.
Default: Enabled
This setting enables and disables modifications of Cues and Cue Stacks.
Parameters such as Chase Speed, Shape Size and times can not be modified, ensuring Cues and Cue Stacks are played back exactly how they were programmed.
Default: Enabled
The Test Mode setting enables and disables the testing of Cues, Cue Stacks, Playbacks and Patched heads from the Cue, Cue Stack, Playback and Patch windows respectively. It also disables play back of Cues and Cue Stacks from the Execute window.
Use this setting to avoid accidental testing of programmed show elements.
Default: Enabled
This setting enables and disables Macros.
Use this setting to turn off Macros where they have been mistakenly assigned to keys or other show programming elements.
Default: Enabled
This setting enables and disables Automs.
Use this setting to disable all Automs. When disabled, the Autom window indicates Automs are disabled in the title bar.
Default: Enabled
The Visualiser setting determines how heads are inserted and operated within the Visualiser
When this option is set to "Disabled", heads are not auto inserted and the user is prompted when patching the first head within a show.
When this option is set to "Auto Insert Into Visualiser", heads are auto inserted into the visualiser upon patching within a show.
When this option is set to "Auto Insert, Auto Previs", heads are auto inserted and Cue previsualistion is enabled by holding the playback S buttons.
When this option is set to "Auto Insert, No Patch Offsets", heads are auto inserted but no patch offsets are added to the Output of MagicQ (both normal and Vis).
Default: Disabled
The Start Mode setting determines how MagicQ should operate when the software is started.
When "Splash Screen" is selected, MagicQ will display an image splash screen when the software is launched.
When "None" is selected, MagicQ will return to the last show loaded into the console.
When "Choose demo show" is selected, MagicQ will present the user with options to load the last show or a selection of preset and demo shows.
When "Visualiser" is selected, MagicQ will display the visualiser when launched.
When "Remote Control" is selected, MagicQ will launch in remote control mode.
When "Net sessions Slave" is selected, MagicQ will start up as a Slave console. The console will prompt for which Net Session to connect to and if Users are in use on that session then a User login.
When "Multi Window" is selected, MagicQ will launch in Multi Window mode and await for another MagicQ system’s connection.
Default: Choose demo show
This forces the Execute window into full screen mode when the system starts up.
When set to Cur Grid then MagicQ will start using the current Grid.
When set to Grid 2 to 10 then MagicQ will start using that Execute Grid.
See Execute Window
Default: No
This setting enables the console to create automatic backups of your show file.
When this option is set to "No", no backups will be saved. "No" is recommended during playback of very large show files to avoid slowing the response of the console.
When this option is set to "On Changes", MagicQ will only back up your show file after changes are made. The backup is scheduled up to 60 seconds after the change. "On Changes" is recommended when programming to avoid loss of show data.
When this option is set to "Always", backups will be made every 60 seconds.
Default: On Changes
This setting enables the console to keep periodic archives of previous auto backups created. If the Auto Backup setting is set to "No" then no archives will be made.
See archive.
Default: Yes
This setting defines the location of saved show files and backups.
Users can save show files in custom-named folders, this may be useful within the education environment to separate different users.
Default: "show" (Recommended)
This setting defines the format of saved show files.
When set to "High Res FX", MagicQ will use an improved file format capable of saving higher resolution timing values.
When set to "Normal", MagicQ will use a slightly smaller file format, excluding the higher resolution timing values found in "High Res FX".
When set to "High Res FX & Reduced Size", MagicQ will use a compressed file format designed for larger show files.
Default: High Res FX
This setting defines when the show extras file is generated
When set to "On show save", the show extras file will be generated when the user explicitly selects SAVE SHOW or SAVE SHOW TO USB.
When set to "Manual", then the show extras file will only be generated when selecting Shift + SAVE EXTRAS in the Setup window.
Default: On show save
This setting defines the format for loading personality files.
When set to "Original", the personality files are expanded from the heads.all file when updated.
When set to "Unexpanded", the personality files are read directly from the heads.all file, without expanding.
Default: Original
Programming settings are automatically changed when you select the mode – Normal, Theatre non-tracking, Theatre Tracking or Hog II Warp.
This setting determines what is activated in the programmer when you perform a change on an attribute of a Head.
"Chans" only activates the actual channels of a modified attribute within a head.
"Heads" activates all channels within that head whenever any attribute is modified.
"IPCB" activates all the attributes of the IPCB type that is being modified - for example if a position (P) attribute type is changed such as pan, then all other position attributes such as Tilt, Pos Speed are activated.
"IPC" activates all the attributes of the type that is being modified except that Beam (B) attributes are modified individually.
"Col" activates all Colour attributes whenever any Colour attribute is modified.
"IPC B Split" activates Intensity, Position and Colour as per the IPC option, then Beam is split.
Default: Chans
Turns the overall function of tracking On or Off for any future programming once the setting is changed. It does not change any previously programmed items. Tracking can still be modified on a cue by cue basis within the cue stack, via the "Track" column.
When set Yes, then only attributes that have been modified since the Cue was recorded are stored into the new Cue.
Attributes are determined as modified if their value had been changed using an encoder, using keypad entry, using a range button, using a palette or by a locate Head. Note that modifying an attribute to a new value and then returning it to its old value counts as modified.
When set No, then the entire contents of the programmer is recorded into Cues regardless of whether attributes have been change since the last Cue was recorded.
When set to "Yes, all heads" this forces all LTP channels to return to their defaults when not controlled by a playback or in the programmer. The default returned to will be the Default Cue if it exists, otherwise the default value from the Head personality.
When set to "Heads without Intensity only" it only returns to defaults for heads that do not have an Intensity attribute and do not have a VDIM applied.
When set to "No" then no channels return to their defaults.
Note that some channels can be specified in the Head personality not to have a default - in this case those channels never return to defaults.
Default: The default is dependent on the programming mode chosen - in Normal mode it is set to "Heads without Intensity only". In other modes it is set to "Yes, all heads".
Determines whether the programmer overrides HTP (intensity) values on playbacks.
When set to "All Playbacks" any HTP channels on Playbacks are overriden by their levels in the programmer.
When set to "Playbacks except Above Programmer" then it as for "All Playbacks" unless a Playback is set to "Above Programmer" in the Cue Stack, Advanced, Playback Priority setting.
When set to "All Playbacks except HTP base" then any HTP channels with a base value in the programmer will overide the base values from Playbacks. HTP channels that have only an FX but no base in the programmer can be affected by Playbacks if the "Intensity (HTP) FX can add,subtract" is set.
When not set, the highest value of the channel from the Playbacks and the Programmer is output.
Default: All Playbacks
Allows the programmer to override FX on active playbacks. When set to Yes, any channels that have base levels in the programmer ignore FX for those channels from any active playbacks.
Default: No
Changes the function and operation of highlight mode when trying to work with a specific Head within a group of Heads.
"Dims non selected" - the intensities of the selected heads are reduced except for the one (or ones in Odd/Even mode) that are being sub selected.
"Highlight/Lowlight" uses the highlight and lowlight levels from the Head personality and as overriden by the user in the Highlight and Lowlight Cues in the Cue Window.
"Highlight Only (no lowlight)" is the same as Highlight/Lowlight but no Lowlighting occurs.
"High/Low no Reset" is the same as Highlight/Lowlight, but Highlight mode is only exited when you press Highlight again - pressing CLEAR does not exit Highlight mode.
"High/Low no Beam" is the same as Highlight/Lowlight, except that no changes to Beam attributes are made - this enables overiding of any Zoom/Gobo Higligh/Lowlight set in the Head Personality or Highlight/Lowlight Cue.
Default: Highlight/Lowlight
This setting determines the fan mode.
"Normal" is a latch type operation where the user has to turn Fan on and off manually. "No Toggle" is a momentary type operation. "Pan Only No Tilt" allows fanning of all attributes except for Tilt.
Default: Normal
This setting enables multiple groups to be selected without pressing SHIFT. To deselect all groups press the DESELECT ALL soft button in the Group window.
"No" allows the user to choose between only being able to select one group at a time.
"Multiple in one go" allows the selection of multiple groups at one time. The selection resets after an attribute has been modified.
"Multiple always" is the same as above but does not reset.
This allows either all heads, only the selected heads, or only the sub selected heads to be recorded into Palettes
Default: Only selected heads
When set "Yes" then Record Merge allows the time currently in the programmer to be merged into the Cue being updated
When set "No" Record Merge will not modify existing times in the merged Cue.
Default: Yes
When set the programmer is automatically cleared after using Update.
Default: No
The options are Cues, Palettes or Cues + Palettes.
By default the Update only action highlights Cues for updating rather than Palettes. This setting enables Palettes to be the defaulted highlight. If a Cue uses a Palette then updating a Palette will update the Cue as well regardless of this setting. It sometimes may desirable to Update both Palettes and Cues - for instance when updating a Position palette but also adding zoom directly into the Cue.
Default: Cues
Allows the user to choose between two levels of Undo - "Undo Programmer" and "Undo Programmer and Actions".
Undo Programmer is any changes that have modified values in the programmer such as locating Heads, clearing, setting intensities, choosing palettes, or using encoder wheels to change programmer values.
Undo Actions include changes to show data such as recording, moving, copying, and naming.
When set to "Undo Programmer, Action via Ctrl" then pressing Undo by itself will only undo the Programmer. Press CTRL + UNDO to undo action.
Default: Undo Programmer and Actions
This setting determines whether the user is required to press ENTER when defining head intensity via the keypad. If set to Yes, then intensity levels are set immediately when 2 digits or "FULL" have been keyed in after "@". e.g. "1 THRU 4 @ 50" or "1 THRU 4 @ FULL".
Default: Yes.
When set, pressing ENTER in a Spreadsheet view will auto cursor down to the item below.
Default: No.
This setting determines whether the current head selection is modified when setting intensities via the keypad. When set to "No" the intensities are set without modifying the head selection. When set "yes" the intensities are set and then the head selection is modified, for example:
"1 THRU 4 @ 50" sets heads 1 to 4 at 50% intensity and selects heads 1 to 4.
"+5 @ FULL" sets head 5 to 100% intensity and adds it to the current selection.
Default: Yes.
When enabled, select heads by typing the head selection and then pressing the appropriate Colour, Beam or Position window button. For example…
"1 THRU 4 COL" selects heads 1 through 4 and opens the colour window.
"1 THRU 4 COL 5" selects heads 1 through 4 and selects colour palette 5.
This option also enables copying of head data.
Default: Yes.
This setting determines whether heads with levels in a cue or palette are automatically selected when including these cues and palettes into the programmer.
Default: Yes.
When set to Yes, entering head numbers on the keypad followed by the ENTER key always selects the heads, but some advanced features of MagicQ are not available directly from the keypad. When editing numeric fields in the spreadsheet style windows in this mode, the operator must use the SET button rather than editing the field directly.
Setting the "Strict" option means it is not possible to toggle or choose items simply using the ENTER key. You will always need to use SET first.
Default: No (Window items)
This setting adjusts the syntax used for patching Heads. With this option set to No, the syntax for patching is <number of heads> @ <dmx address>. When set to Yes, the syntax is: <head number> @ <dmx address>.
Theatre Patch supports patching multiple DMX addresses to one head when using Theatre Patch syntax. For example, to patch Head no.10 at DMX addresses 1, 2 and 3, enter "10 @ 1 + 2 + 3". There is a maximum of 6 DMX addresses per Head.
In Theatre Patch it is also possible to re-patch dimmer channels. If the head is already unpatched then just enter the new address – e.g. to repatch head number 20 to DMX channel 25, type "20 @ 25". You can also re-patch to multiple DMX addresses – e.g. to repatch head number 20 to DMX channel 25 and 26, type "20 @ 25 + 26".
Default: No (live mode) or Yes (theatre mode).
In "Normal" the encoder wheels function according to the currently active window. For example, when you change to the Colour window, the encoder wheels control colour attributes.
"Maintain Pos, Col, Beam" - The Position, Colour and Beam buttons will act as "Hard Buttons", meaning the encoders will be maintained on Position, Colour or Beam even when the Group, Output or Plot windows are opened. At any time the encoders can be forced to their default settings for the Window by pressing SHIFT and the window button – e.g. SHIFT + GROUP. In addition, the "Intensity" attribute will also appear on Encoder F in the Position window if that encoder is not already in use.
"Intensity on X" - When setting an intensity level from the keypad, MagicQ will open the Intensity Window and the X encoder will control intensity.
"Pos, Col, Beam, Int X" - MagicQ performs both the above options.
"Intensity always on X" - Once the Group or Intensity windows are opened then Encoder X will remain as Intensity until a window is opened using SHIFT and the window button, forcing the normal encoder assignment.
"Keep as Window" - MagicQ will maintain the current window when NEXT HEAD and PREV HEAD are used, rather than jumping into the Position window.
"Maintain Hard Keys" - This is the same as "Maintain Pos, Col, Beam" and "Keep as Window" combined - so the Pos, Col, Beam encoders are maintained, but NEXT HEAD and PREV HEAD do not open the Position window.
Default: Normal (live mode) or Intensity on X (theatre mode)
When set to "Normal" encoders operate at their normal rate.
When set to "Slow" the encoders are slower than normal - i.e. they are less sensitive - a larger encoder change is required to make the same attribute change.
When set to "Slow" (Med Fine) the encoders operate as normal, but when SHIFT is pressed they operate at medium fine instead of fine. This option is provided for users who are used to using SHIFT for fine, but who want the fine to be a bit more sensitive.
When set to "Remote Slow" the encoders operate as normal, except when controlled from MagicQ Remote Control on a remote PC such as a MS Surface. This enables greater sensitivity when using the remote control. Note that this only affects MagicQ Remote Control, it does not affect the MagicQ Remote app on iOS/Android.
The default is "Normal".
Note that this option does not affect attributes set as Slow Encoder in the personality such as gobo wheels and stepped control parameters - they continue to operate as slow encoders regardless of this setting.
This setting swaps over the pan and tilt encoders. By default, the X encoder is pan and the Y encoder is tilt.
Default: No
This setting changes the directions for adjusting values with encoders.
Default: Normal
These options set the function of the keyboard.
In "Normal" the keyboard is used for naming items and selecting heads.
In "Programming shortcuts" the keyboard is set up for shortcuts to programming keys.
In "Playback shortcuts" the keyboard is set up for shortcuts to playback keys.
In "CTRL + Keys for Windows" the keyboard is works as per "Normal" mode, except when CNTRL is held, the keyboard is used to open windows. List of window shortcuts can be found in the Programming shortcuts section
Default: Normal
Windows are opened using CTRL and the alphanumeric keys
CTRL A CTRL D CTRL E Execute CTRL F Fx CTRL G Group CTRL H Help CTRL I Intensity CTRL J Beam CTRL K Colour CTRL L Cue Stack CTRL M Media CTRL N Macro CTRL O Outputs CTRL P Position CTRL Q Cue CTRL R Programmer CTRL S Setup CTRL T Patch CTRL U Page CTRL V Playback CTRL W Cue Stack Store CTRL X Cue Store CTRL Y CTRL Z
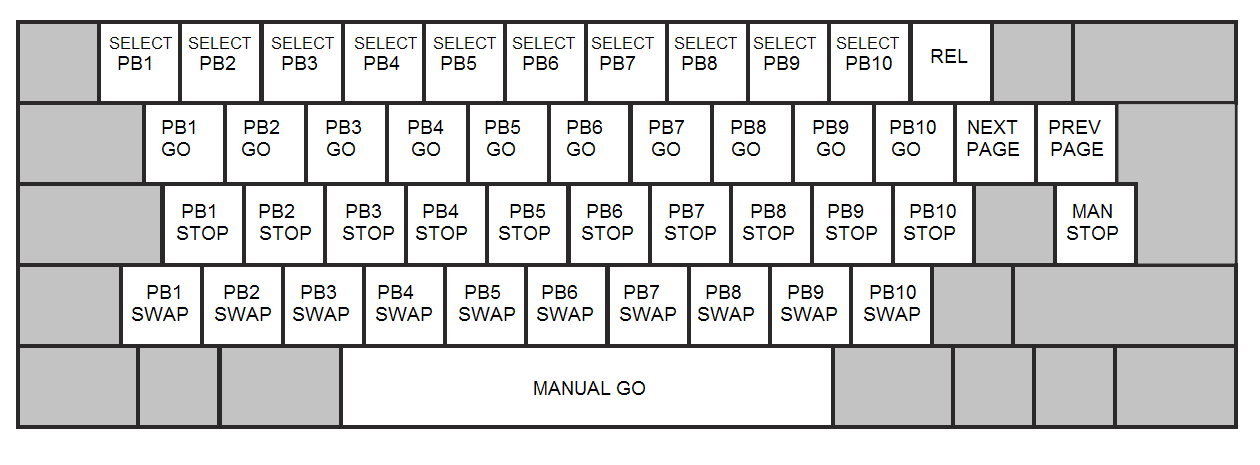
1 to 0 | Select playbacks 1 to 10 |
Q to P | GO button playbacks 1 to 10 |
A to ; | STOP button playbacks 1 to 10 |
\ to | Toggle test playback on at 100%. In Swap mode releases all others tested playbacks |
` | Add / Swap mode |
SPACE | Manual GO |
# | Manual STOP |
[ | Next page |
] | Prev page |
- | Release |
Note that in playback shortcuts mode many programming options will not work as expected because the keyboard keys are used for busking.
This setting allows the THRU, @ and FULL keys to be mapped to different keys on the keyboard. This is useful in some countries where the normal mappings (>, @ and #) are not easy to select. To set this setting, press the 3 keys you want to map to these functions, followed by ENTER.
Default: None set.
This setting enables a mouse or trackball to control pan and tilt. The sensitivity can be selected by choosing any of the "Enabled Div 2" through "Enabled Div 9" options.
Mouse control of pan/tilt is only supported on fully unlocked MagicQ PC systems (Unlocked Mode)
Default: Disabled
Determines the function of the Intensity Wheel on the MQ500, MQ500M, MQ250M and Stadium Connect.
When set to "Intensity" it controls Intensity of the selected Heads.
When set to "Intensity - Require ALT key" then holding ALT and turning the encoder will control Intensity in the Programmer. This is useful in high bass environments where the wheel could get accidentally nudged.
When set to "Sel PB Speed" it changes the Chase Speed or FX Speed of the currently selected Playback
When set to "Playback Rate" it controls the Playback Rate of the selected Playback as per the Playback Rate on soft button X in the Playback Window.
When set to "Global Rate" it controls the Global Rate as per the Global Rate on soft button Y in the Playback Window.
When set to "Audio Volume" it controls the master audio volume.
When set to "Scroll window" it scrolls the top (focused) window.
When set to "No function" it is disabled.
Default: Intensity
This setting defines the colour scheme of the installed MagicQ system.
"Dark" uses a mostly black colour scheme with grey and purple highlights.
"Black" turns the MagicQ interface completely black with grey option boxes and white text.
"High Contrast" sets the MagicQ background to black (On Windows, Mac & Linux) but the central programming area to a lighter grey with black text.
Default: Dark
Big Text Mode defines how text is displayed throughout MagicQ.
"ALL CAPS" displays all text in CAPITALS.
"First Letter" capitalises the First Letter Of Every Word.
"Large", much like "ALL CAPS", displays all text as CAPITALS but at a much larger font size.
Default: No
The Icon Size setting defines the size of all icons used throughout MagicQ.
"Small" will ensure icons only take up a portion of the window item.
"Large" sets icons to fill the whole window item.
"Large when no name" sets icons to "Large" but only where there is no text present within the same window item.
"Auto" allows icons to be auto-sized and auto-generated throughout MagicQ.
"Auto no Snapshot" disables Visualiser snapshotting when recording Cues, Cue Stacks and Playbacks.
"Auto no group / snapshot" disables Visualiser snapshotting and the generating of auto-group icons.
Default: Small
The Col Tags setting allows colour tags to be displayed, identifying different heads throughout MagicQ.
"None" disables the use of colour tags throughout the software.
"Head Types" separates Heads into colour groups depending on their type (Wash, Spot etc).
"Attach Objects" defines Heads based on the object they’re attached to within the Visualiser.
"Groups" separates Heads depending on their current group within the Group window.
"Multi Console Control" separates Heads depending on their current console control.
"Parked" colours parked Heads to separate them from unparked Heads.
"Patch" defines separate Heads depending on their sorting within the Patch window.
"Uni Zones" separates Heads to signify which Uni zone they are assigned to.
"Universes" separates Heads to signify which universe they are patched in.
"Users" separates Heads based on the current user.
Default: None
The Playback Col Tags setting allows the RGB LEDs found in the Stadium range to indicate the different Playback functions.
"Default" sets MagicQ to use the default colour set for different types of Cue Stack. Standard Cue Stacks are blue, LTP faders & Group masters are allocated different colours.
"Cue Stack" uses the colour tag set by the Col tag setting in Cue Stack, View Options, Function. Unused Playbacks are blue.
"Cue Stack (dim unused)" is the same as "Cue Stack" except that unused Playbacks are dimmed so that it is easier to identify free Playbacks.
Default: None (Cue Stack on Stadium consoles)
This setting determines how speed values are displayed throughout the installed MagicQ system. The options are seconds, BPM or frames.
When set to "Normal" MagicQ will determine the appropriate metric for that specific parameter.
Default: Normal
This setting determines how attribute values are displayed throughout MagicQ.
When set to "Normal" MagicQ will display the attribute with the normal expected metric.
When set to "16bit" MagicQ will display all attribute values in 16bit format.
When set to "Percent" MagicQ will display all attribute values as percentages.
When set to "P/T Percent" MagicQ will display only pan and tilt attributes as percentages.
When set to "DMX Values" MagicQ will display attributes in DMX 0..255 values. 16bit attributes will be shown as two 0..255 values separated by a dash.
Default: Normal
This setting defines which unit of measurement MagicQ uses throughout the installed system.
When set to "Imperial" MagicQ will accept measurements of feet, inches and pounds.
When set to "Metric" it is still possible to input measurements in feet using the ‘ or / separator - e.g. enter "12/" for 12 ft and "12/4" or "12’4" for 12 ft 4 inches.
Default: Metric
The Column Sizing setting determines how columns within windows are displayed.
When "Auto Size" is selected, MagicQ will auto size columns and hide any that are unused.
When "No sizing/hiding" is selected, the columns are set to a fixed width and are always present.
When "Hiding only" is selected, are fixed width, but are hidden if not used.
Default: Auto Size
This option is used to force the number of boxes wide for all box windows such as Group, Position, Colour, Beam, FX, Page, Cue Store, Stack Store, Macro. This can be used to ensure that the layout of items in windows remains consistent between different console types - particularly useful for the Group window.
It does not affect spreadsheet views.
Note that the per monitor, number of boxes wide in Setup, view System, View Monitors when set to anything other than "Default" takes priority over this setting.
Default: Default
This setting determines how rows are ordered within the Output, Programmer and Cue windows. The currently selected heads appear at the top of the window.
When this option is set to "No" the rows of the aforementioned windows are ordered according to the Sort option within the Patch window.
Default: Yes
This setting determines how confirmation requests are displayed and utilised throughout the installed MagicQ system.
When "Confirm (default no)" is selected, MagicQ will continue to confirm core functions with a default value of no.
When "Confirm (default yes)" is selected, MagicQ will continue to confirm core functions with a default value of yes.
When "Confirm critical only" is selected, MagicQ will confirm only critical functions with a default value of no.
When "Confirm critical (default yes)" is selected, MagicQ will confirm only critical functions with a default value of yes.
When "Never confirm" is selected, MagicQ will never ask for confirmation.
Please note: "Never confirm" should be used with great care.
Default: Confirm (default no)
The Scroll Bars option determines how scroll bars are displayed throughout MagicQ.
When set to "Normal scroll bars" scroll bars are set to their standard width and appear on all scrollable windows.
When set to "No scroll bars", scroll bars are hidden throughout all windows and selection boxes.
When set to "Wide scroll bars" the scroll bars are set to a larger width and appear on all scrollable windows.
When set to "Extra Wide scroll bars" the scroll bars are set to their largest width and appear on all scrollable windows.
Default: Normal scroll bars
Determines whether Tips are shown for settings.
When set to "Mouse Tips" MagicQ shows tips when the mouse is placed over settings fields in the first column of the Setup and Cue Stack windows.
When set to "Dialog Tips" MagicQ shows option details in the select Dialog box.
When set to "Mouse + Dialog Tips" both the above are shown.
When set to "Mouse + Dialog Tips (Menus English)" both the above are shown in the language set by the Country, but Menus are kept in English.
Default: Mouse + Dialog Tips
This settings determines whether the 12 available layouts are always visible on screen.
When set to "Yes", MagicQ will display the 12 layout selection buttons above the display’s top soft buttons.
When set to "No", MagicQ will hide the available layouts, only visible by pressing the CTRL key.
Note that on MQ500(M) the layout buttons are shown on the left side of the main display regardless of this option - therefore this option should be set to "No".
Default: No
This setting determines when the record options, include options and copy options toolbars are displayed.
If set to "Yes", MagicQ will always display the record options toolbar whenever the RECORD button is pressed. The include options toolbar will be shown when INCLUDE is pressed and the copy options toolbar when the the COPY button is presed.
If set to "No", MagicQ will display the full record options when SHIFT + RECORD is pressed. The full include options are shown when SHIFT + INCLUDE is pressed, and the full copy cptions when SHIFT + COPY is pressed.
Default: No
This setting has been moved to the Grid Options in Output Window, View Plan.
This Message Window setting determines where and how the message window box is shown.
When this is set to "Main" messages will only appear on the console’s main screen.
When this is set to "2nd Display" or "3rd Display", MagicQ will only display messages on the defined external monitor.
When this is set to "Main No Net", "2nd No Net or "3rd No Net", MagicQ (when connected to a net session) will only display messages on the main monitor of the current console.
When this is set to "Net only", MagicQ will display messages to all other consoles within the net session but not the current console.
When this is set to "Net Session", all consoles, including the current console, will receive messages throughout the net session.
When this is set to "Main no flash", "2nd Display no flash" or "3rd Display no flash", MagicQ will display messages on the defined monitor without flashing.
Default: Main
This option allows you to force Cues to be removed when the Cue Stack(s) that use them are removed.
Default: No
This option allows the user to force Cue Stacks to be removed when Playbacks are removed.
Default: No
By default when making new Cues, Cue Stacks or Palettes, MagicQ will use the lowest free item to save it to.
When set to No, it will record these in the first free item after the last one that was saved
Default: Yes
This setting determines how copies of your Cue Stacks are either linked or unlinked to the Cues that make up that Cue Stack.
When linked, changes you make to the copied Cue will carry through to the original Cue.
When unlinked, changes to the copied Cue do not update the original Cue.
When set to linked, this setting can be overriden using SHIFT + COPY.
The "unlinked, no state" option specifies that when Cues are copied within a Cue Stack only the "delta" values are copied not the state of the Cue at that step.
This setting determines if data recorded to playbacks is ignored when copying data between heads (when set to Prog only).
Default: Prog + Playback
This setting specifies how MagicQ sets the Cue settings for new Cues recorded on a Cue Stack.
When set to No, MagicQ derives cue setting from the Default setting found in Options, View Defaults.
When set to Yes, MagicQ will use the settings found in the previous Cue in the Cue Stack.
Default: Yes
MagicQ supports two different ids for Cues – the Cue Id of the Cue within the specific Cue Stack, and the Qid of the Cue within the Cue Store.
When set to Yes, this will hide the Qid found in the Cue Store from the Cue Stack and Cue windows, only showing the Qid of the Cue within the Cue Stack itself.
Default: No
This setting allows Virtual Dimmers to be hidden from the Patch Window. Vdims are still denoted by a +V next to the head number.
Default: No
This setting allows the building of a palette with one head type to then be expanded to all patched heads of that same type.
It can also be configured to expand to All Heads - it first creates a Default Palette from the existing Heads in the Palette and then uses this to expand the Palette for all Heads.
It is possible to choose just Colours and Beams to be expanded or all Palettes.
The options are
Palettes are expanded when patching a new head, when recording palettes, and when setting this setting.
Default: No
This setting allows enabling and disabling of the creation of Default Palettes.
When Palettes are created and updated default palettes will be created for the specified palette types.
The options are
Default: IPCB
This option determines the behaviour of FX palettes.
When set to "Normal" or "Changes unlink FX palettes" the FX Palettes link into the Cues and any updates to the FX Palette cause the Cues to be updated.
When set to "Disabled" there are no links between the FX Palettes and the Cues.
When set to "Changes unlink FX palettes" any updates to the FX in the Prog Window or Cue Window cause the link back to the FX Palette to be broken.
This setting determines that heads are unpatched rather than moved aside when repatching and morphing at an address with an existing head.
Default: No
This specifies the default value for Mark cues and Move when dark.
Default: 3.00s
This setting determines whether Group Cues are used when programming. The options are Disabled, Prefer Group Cues, Prefer Group Cues (Warn) and Group Cues Only.
See the section on Group Cues for more info.
Note that shows programmed with Group Cues can not be loaded directly into older MagicQ software versions - first in v1.9.2.0 or above, convert the shows to individual Head Cues and save the show, before trying to load into older software versions.
Default: Disabled
By default the Grand Master controls levels of channels from both the Playbacks and the Programmer.
The options enable changing the Grand Master to control only the level of preset faders, only the level of Programmer data, or both. In each of these configurations it does not control Playbacks or Add/Swap levels, as it does by default.
See programmer data, playbacks and add/swap levels for more info.
When set as Cue Stack 1 it controls Cue Stack 1 from the Cue Stack Store, providing an extra Playback fader.
Default: Grand Master
The Sub Master can be configured to control playback faders only, add/swap buttons only, or both (the default). It can also be set as a programmer master, a preset master or both.
When set as Cue Stack 2 it controls Cue Stack 2 from the Cue Stack Store, providing an extra Playback fader.
Default: Playback Master
Configures the Crossfade master in different ways as described below:
The Crossfade master also has a number of rate master configurations. See manual control, rate master for further details.
Default: Manual Cross-fade Master
This option determines the function of the GO buttons in the crossfade master section.
When set to "Default" the function of the GO button is determined by the Crossfade Master function option.
When set to "Tap To Time selected" the GO button affects the absolute rate of the currently selected Playback.
When set to "Tap to Time active" the GO button affects the absolute rate of all active Playbacks.
When set to "Tap to Time SP1", "Tap to Time SP2" or "Tap to Time SP3" the GO button sets the rate for the associated Speed Master.
When set to "Go/Back" this takes priority over the Crossfade Master function, with the master GO, BACK, BCK and FWD buttons all controlling the currently selected Playback.
Default: Default
Used to set up split crossfade functions, as below.
When set to any of the dual playback options, the two playbacks become Crossfade Masters for manual Fade in and out. Pressing the Pause button on either of the playbacks brings the current playback under manual. The faders can then be used to fade in each new Cue with separate control for fade in and out. Pressing the Go button on either Playback returns the current playback to normal Cue execution. When enabled, both playbacks can not be used as normal playbacks.
The "Stadium Split" option is used on MQ500(M) systems to set the two 100mm faders as split crossfaders - by default they are a crossfader and sub master. This option only takes effect if the Crossfade Master Function is set to "Manual Crossfade".
The PB2 option is designed for Theatre use with the main Cue Stack on PB1 and the crossfader on PB2.
Default: No
This setting enables is designed for theatrical use where one playback is the master Cue Stack.
The user can lock the manual playback section of MagicQ to Playback Fader 1, 2, 9, 10 or 15 regardless of the currently selected Playback.
Default: Selected
Sets the function of the crossfaders on the MQ500M Wing and Stadium Wing. The options are:
Default: Manual Crossfade
This setting determines the function of the DBO button.
"DBO Momentary" and "DBO toggle" cause all intensity channels on the output to be set to 0%.
"No FX Momentary" and "No FX toggle" cause all FX size to be reduced immediately to zero size.
When set to "Tap to Time selected", the button sets the rate for the currently selected playback.
The "Flash taps when DBO held" option enables setting of speeds to playbacks by holding DBO and then pressing the flash button of the relevant playback.
When set to "Tap to Time active", the button sets the rate for all active playbacks.
When set to "Tap to Time SP1", "Tap to Time SP2" or "Tap to Time SP3" the button sets the rate for the associated Speed Master.
Default: DBO Momentary
This setting determines the function of the TAP button.
When set to "Tap to Time selected", the button sets the rate for the currently selected playback.
When set to "Tap to Time active", the button sets the rate for all active playbacks.
When set to "Tap to Time SP1" through "Tap to Time SP15" the button sets the rate for the associated Speed Master.
Default: Tap to Time selected
This option enables Stomping, the automatic releasing of Playbacks when they are fully overriden by other Playbacks.
When set to "Yes (LTP)" then when all the LTP channels on a Playback are overidden by other Playbacks then the Playback is released.
When set to "Yes (HTP and LTP)" then when all the channels (both HTP and LTP) on a Playback are overidden by other Playbacks then the Playback is released.
See Playback Stomping.
Default: No
This sets whether one Playback intensity level can subtract from another Playback’s level.
When set to "yes", FX on one Playback can subtract from the level on another Playback.
When set to "no", MagicQ performs pure HTP – i.e. the highest level (including FX) from all the Playbacks is output.
Default: No
This setting determines which channels are reasserted when the Go button of a Playback is pressed.
When set to "All inc tracked", then pressing GO on the Playback will reassert channels that are tracking through the Cue Stack even if they were being controlled by another Playback.
"All no fade" forces an immediate change of the channel values controlled by the Playback.
When set to "Non tracked", only channels that are recorded as "hard values" in the current Cue will be reasserted.
When set to "Non tracked, Step then reassert", then the Cue any Cue Stack macros are executed before the channels that are recorded as "hard values" are reasserted, thus ensuring that it is possible to execute macros to release other playbacks first.
Default: All inc tracked
This setting is used to reassert channels using the fader. When set to Yes, faders reassert the Playback when the level leaves zero. The setting "Go reasserts channels" specifies how the channels are reasserted.
Default: No
This setting defines the operation of faders. When set to Original they operate as before with physical fader levels and fader levels from automations and Execute being treated separately. When set to Combined the physical fader level and the levels from automations and Execute are combined together so that when a Playback is triggered by an automation, the physical fader is set to that level and the level can be adjusted directly using the physical fader. On non motorised systems the fader level must be matched by moving the fader before it can take control.
When set to Auto Motor Moves the automations and Execute will cause the physical faders to move to the level of the automations. This option is not recommended for shows which make heavy use of macro and automations changes of playback levels as it may cause unnecesary wear on the motorised faders.
Default: Original
This setting defines whether or not motor faders will drop to zero when releasing playbacks.
Default: No
This enables page changes using the Next Page and Prev Page buttons to only access programmed pages rather than changing through all pages, including blank ones.
Other pages can still be accessed using the Page Window.
Default: No
This setting makes the Current Playback follow the last Playback fader to be raised. If set to No then the Current Playback is not changed when faders are raised - it is only changed when SELECT buttons are pressed.
Default: No
This setting changes the function of S + GO on Playbacks to be a PAUSE function. This is useful on wings that do not have physical PAUSE buttons. When set to "No", S + GO steps to the next step without time.
Default: No
Enables the SELECT, GO and PAUSE buttons, or a combination, to be set to Tap to Time for Playbacks.
There is also an option to use ALT + FLASH as Tap to Time.
Default: None
This option makes Intensity Masters control any LTP channels that are recorded in the master Cue, rather than just HTP (Intensity) channels. This applies to existing masters, as well as newly created ones.
Default: No
This option enables one or more playbacks to be activated on startup. The options are:
When set to "Last active" then after a reset, MagicQ will reactivate Cue Stacks that were running when the console was powered down or reset. MagicQ will start the Cue Stacks from the step that they were previously on.
All options are Locked on MagicQ MagicQ PC systems in Demo mode.
Default: None
Enabling this option allows the GO and PAUSE Playback keys to control the first two rows of Execute grid 1, 2 or 3. The GO keys will activate items on the first row, while the PAUSE keys will activate items on the second row.
Default: No
The IP address of the console ethernet network interface. This is stored as part of the console configuration; loading a new show does not change this setting.
On PC/Mac this must match the IP address of the network interface you are using. Double click on it to show the available network interfaces.
On PC/Mac you must also set the IP address of your adaptor in Windows Control Panel or Mac System Preferences.
For communicating with Art-Net the IP address is usually set to a number in the 2.x.x.x or 10.x.x.x range (e.g. 2.0.0.10) using subnet mask 255.0.0.0.
When using a PC or Mac with a Stadium Connect, Compact Connect or Mini Connect then the network port on the Connect product appears as a network port on the PC. If you wish to use this network port you must set up the IP address of this port in Windows Control Panel or Mac Preferences. This port must be in a different IP address range to any other network port on the PC/Mac.
The subnet mask for the console ethernet network interface.
On PC/Mac this must match the network interface you are using.
For communicating with Art-Net the Subnet Mask is usually set to 255.0.0.0.
This can usually be set to 0.0.0.0.
If used, it must be either in the primary or control net subnet.
Default: 0.0.0.0
When set to "Normal", lighting protocols such as Art-Net are sent to the IP address specified in Setup, View Settings, Network, IP Address. If this network is not available then the lighting protocols will be sent to any other host adaptor found regardless of IP address range.
When set to "Strict", lighting protocols will only be sent to the IP address specified in Setup, View Settings, Network, IP Address.
When set to "Normal + Loopback IP" or "Strict + Loopback IP", lighting protocols are sent to the IP address as above, but also to the loopback IP address 127.0.0.1. This enables connection to apps on the same PC - e.g. sending Art-Net / CITP to Capture.
Loopback IP is only valid for PCs and Macs only – it is ignored on MagicQ consoles. "Normal" and "Strict" apply to all systems.
This setting used to be called "Send to applications on this PC", and has now been renamed and expanded to include the Strict options.
Default : None
When set to "Normal" MagicQ transmits Art-Net protocol v3. MagicQ receives any Art-Net protocol. This is recommended when the universe count on the network is low.
When set to "V4 Unicast" MagicQ transmits Art-Net protocol v4 via unicast, but also broadcasts packets on every universe once a second. This enables other Art-Net sources to determine that there is a transmitting Art-Net controller already outputting on that universe. This is the recommended protocol when using 32 or more Art-Net universes on the network.
When set to "V4 Unicast only" MagicQ transmits Art-Net protocol v4 via unicast only and does not broadcast any Art-Net packets.
When set to "V4 Sync" or "V4 Sync Unicast Only" MagicQ sends Art-Net sync packets after it has sent all the Art-Net DMX data packets. Art-Net sync enables synchronisation of multiple DMX lines across multiple different Art-Net to DMX nodes.
When set to any of the V4 modes, MagicQ reports the full set of Art-Net universes that are enabled and configured with Art-Net inputs using the V4 bind index messaging. When set to "Normal" MagicQ replies to the Art-Net poll with a single V1 reply indicating the status of the first 4 universes.
Default : Normal
When set to "Sync" MagicQ sends sACN sync messages. MagicQ uses the first enabled universe outputting sACN as the sync universe.
Default : Normal
This is the sACN transmit priority.
If MagicQ receives sACN from more than one source to the same universe it will choose the highest priority source. If multiple sources have the same highest priority then the data will alternate between the various sources - avoid this.
This is the IP address of the broker in RDMNet.
This should always be set 0 unless RDMNet is being used.
MagicQ RDMNet implementation is still under test.
Default: 0
This is the TCP port of the broker in RDMNet.
This should always be set 0 unless RDMNet is being used.
MagicQ RDMNet implementation is still under test.
Default: 0
This controls the operation of the internal network switch (on MQ500M, MQ500, MQ250M and later revisions of MQ50 and MQ70).
When set to "Enable IGMP Snooping" the network switch will only pass multicast messages on a particular network port when a device connected to the network on that network port has joined the multicast network.
When set to "Disable IGMP Snooping" the network switch will pass all multicast messages through the network switch regardless of whether any devices on the network have joined the multicast group. This is the recommended setting, except for systems with very large numbers of universes.
When set to "Original" the network switch operates as set in the hardware and is not changed by MagicQ. MagicQ hardware defaults to enable IGMP Snooping.
"Disable IGMP Snooping" can be useful when connecting to some sACN devices that are not correctly joining the multicast group.
Default: Disable IGMP Snooping
This setting can be used to disable or force enable the IGMP Querier within MagicQ.
When set to "Normal" the IGMP Querier is enabled on MagicQ consoles and disabled on MagicQ PC systems. This is the recommended option in most systems.
When set to "Force Enabled (PC Only)" the IGMP Querier is also enabled on MagicQ PC systems.
When set to "Disabled (external Router is Querier)" MagicQ disables the IGMP Querier. This option should only be used where there is an external router with IGMP Querier enabled - for example where there is a Luminex Gigacore with IGMP Querier enabled. If the Querier is disabled on a network without another Querier enabled then sACN, ChamNet and other multicast protocols may not pass through the network correctly.
Default: Normal
Static IP - manually specify and IP address, subnet mask, and gateway.
Dynamic (DHCP client) - automatically obtain an IP address, subnet mask and gateway.
DHCP Server - Same as Static IP, but automatically issue IP addresses to other devices in the network.
Default: Disabled
A secondary network interface can be created on consoles using a USB ethernet adaptor.
This IP address and subnet must not overlap with the primary and wifi interfaces.
Default: 192.168.250.10
Affects the control net only, not the primary interface.
Firewall Disabled - don’t restrict incoming connections.
Allow Remote only - only allow MagicQ Remote app and MagicQ Remote Control to connect to this console.
Block all - don’t allow any incoming connections.
The console can still make outbound connections to other devices, regardless of this setting.
Protocols such as Art-Net and sACN can only be used on the primary interface.
This IP address is used to specify an IP address for the Visualiser when sending Art-Net or sACN direct to an external Visualiser. This can be used to send data from Slave consoles to their own Visualisers when using Net Sessions. It can also be used to send a dedicated Visualiser feed from the Master console in Net Sessions that does not contain any channels controlled by other Slaves. It is also required on MagicQ PC in Stadium modes to output to a 3rd party Visualiser over Art-Net or sACN.
This field is only valid when one or more universes in Setup, View DMX I/O have the Visualiser field set to Art/sACN (Same PC) or Art/sACN (remote) and those universes Out Type are set to Art-Net or sACN.
Visualiser data is always unicast direct to the Visualiser IP Address - it is never broadcast or multicast. Broadcast and multicast addresses can not be entered in this field.
Visualisers may still receive broadcast or multicast data from other consoles on the network - so it is important to ensure that the protocol and universes used are unique to the Visualiser.
Note that on MagicQ PC when running Stadium panel mode, MagicQ runs in a PreVis mode where the normal Art-Net and sACN outputs are inhibited. In order to use external visualisers in this PreVis mode, the Visualiser IP address must be set up to the IP address of the external visualiser and the Visualiser fields in Setup, View DMX I/O set to Art-Net or sACN.
Default: 0.0.0.0
This is used to determine the protocol used for unicasting the console output data to a Visualiser direct from the console. This is useful if you wish to use a different protocol or different universes for your Visualiser from those being used to output to the lighting rig.
Use DMX I/O | Unicast to the Visualiser IP address using the protocol and universes as specified in DMX I/O. |
Art-Net DMX I/O Unis | Unicast to the Visualiser using Art-Net but using universes as specified in DMX I/O. |
sACN DMX I/O Unis | Unicast to the Visualiser using sACN but using universes as specified in DMX I/O. |
Art-Net Seq Unis | Unicast to the Visualiser using Art-Net using universes 0..255 |
sACN Seq Unis | Unicast to the Visualiser using sACN universes 1..256 |
When set to "Use DMX I/O", MagicQ does not output direct to the Visualiser if the console is already outputting broadcast Art-Net or multicast sACN to the network as the Visualiser will already receive this data. It will output if the universes are disabled (e.g. on Slave consoles), or if the Art-Net or sACN is being unicast (DMX I/O unicast fields set or Art-Net v4).
When set to all other types, MagicQ will always output direct to the Visualiser, regardless of the enabled/disabled state of the DMX I/O universes.
Default: Use DMX I/O
This is an offset that can be used to offset the Art-Net / sACN universes sent to the Visualiser.
It applies to all Visualiser Types.
If Visualiser type is set to any of the Types with "DMX I/O" then the offset is applied to the Art-Net / sACN universe specified in DMX I/O.
When Visualiser type is set to the Types with "Seq Uni" then the offset is applied to the console universes starting from Art-Net 0 and sACN 1.
Default : 0
Enables transmit and receive of ChamSys Remote Ethernet Protocol (CREP) for communication over Ethernet (UDP/IP) with external 3rd party systems.
When using network sessions or multi console operation this option should be set to None.
There are options to enable tx, rx and both tx and rx. There are also options to use ChamSys Remote Ethernet Protocol without the header. Note that on receive (rx) MagicQ auto detects whether a header is present so can accept data CREP data with our without a header regardless of the header setting.
When set to rx echo then any received data is processed and then transmitted back out (echoed).
If set to None then any data received is ignored. When transmit (tx) is enabled, data can be transmitted from the Macro field of Cue steps in the Cue Stack.
See ChamSys Remote Ethernet Protocol and Multiple Consoles for more details.
Default: None
It is possible to configure the port used for synchronisation of playback between multiple MagicQ consoles. If this port interferes with other equipment for any reason then it is possible to change it.
Note that this port is also used for Net Sessions - so it must be the same on all systems using Net Sessions.
Default : 6553
This is used for custom connections to external 3rd party equipment over TCP/IP.
The options are None, TCP and UDP.
When set to TCP or UDP then the "Y" Cue Stack macro sends messages over this connection instead of over ChamSys remote protocol.
Messages received from the remote equipment are logged as Custom TCPIP log messages and can be viewed in VIEW LOGS in the Help window.
Default : None
The IP address for the Custom TCPIP. When Custom TCPIP Type is TCP then this is the IP address that MagicQ connects to.
When Custom TCPIP Type is UDP then it it the IP address MagicQ sends to. The IP address can be a broadcast IP address.
Default: 0
The TCPIP port number for the Custom TCPIP connection or messages.
Default: 0
This is used to enable the in-built Web server which enables remote access to the console functions from other equipment using web browsers.
The option "Enabled CSS" uses improved CSS style sheet web pages.
Default: Disabled
The UDP port used for messages transmitted from MagicQ to external systems.
Default: 9000
The UDP port used for messages received from MagicQ to external systems.
Default: 8000
The IP address to send OSC messages to. When set to 0 the OSC messages are broadcast on the network.
Default: 0
Enables connection to a remote tracker system. Remote tracker protocols are only supported on MagicQ consoles and MagicQ PC systems connected to MagicQ wings and interfaces or Rack Mount Dongle.
The options are None, DMX Input, MQ Track, PSN/SpotMe, Generic XYZ Tracker, Internal and Simulator.
When set to DMX Input, MagicQ receives tracker data for each Head directly on the DMX input corresponding to the output - for example if a Head is patched to Universe 1 channel 1 with pan and tilt on channels 10 and 12 respectively, then it will take the tracker data input for pan and tilt from input channels 10 and 12.
When set to MQ Track, MagicQ receives tracker data over a simple UDP protocol on UDP port 6549.
When set to OTP, MagicQ receives tracker data over Object Transform Protocol (OTP). The OTP function setting must be set to Tracker (rx).
When set to PSN/SpotMe, MagicQ receives tracker data from Robert Juliat tracking system.
When set to Generic XYZ Tracker the XYZ track information is received from a patched Generic XYZ Tracker head.
When set to Simulator, MagicQ generates a test pattern on the x and z positions of Trackers 1 and 2 in opposing directions for testing purposes. The simulator does not require MagicQ hardware.
When set to Internal, MagicQ does not receive tracking from any external devices, but it enables tracking from internal Trackers and MagicVis objects. When set to None, then Tracking is not enabled at all, even from internal Trackers and MagicVis objects.
The current value of received trackers can be seen in the Macro Window, under View Autom.
When tracker data is active MagicVis shows the tracker points as a green cross within the 3D space. If the tracker data is lost then the cross will turn red, and then after 2 seconds of not receiving any tracker data for that tracker the cross will disappear altogether.
The information from Trackers can be used by Palettes set as Track and also by Tracker Automations.
Default: None
Enables transmitting of Tracker information to remote systems. Remote tracker protocols are only supported on MagicQ consoles and MagicQ PC systems connected to MagicQ wings and interfaces or Rack Mount Dongle.
The options are None, MQ Track, OTP, and Generate Track1, Generate Track2.
When set to MQ Track, MagicQ transmits tracker data over the MQ Track protocol whenever data for a Tracker changes. MQ Track protocol is a simple UDP protocol on UDP port 6549.
When set to OTP, MagicQ transmits tracker data over Object Transform Protocol (OTP). The OTP function setting must be set to Tracker (tx).
When set to Generate Track 1 or Generate Track 2 MagicQ transmits the respective Tracker only over MQ Track protocol.
Generate Track 1 and Generate Track 2 can be used on secondary MagicQ consoles / systems to send the Focus Hold XY position from the Plot view to a primary MagicQ console (using MQ Track protocol), thus enabling separate operators to control the tracking points in real time.
Default: None
MagicQ supports E.159 Object Transform Protocol (OTP) for transmit and receive of tracker data and for transmitting and receiving MagicVis object position and rotation data.
When set to "Tracker (rx)" MagicQ receives Tracker data over OTP and acts as an OTP consumer. MagicQ assumes OTP System 1, Group 1 with the Point number mapping to the Tracker ID in MagicQ.
When set to "Tracker (tx)" MagicQ transmits Tracker data over OTP and acts as an OTP producer. MagicQ transmits OTP System 1, Group 1 with the Point number mapping to the Tracker ID in MagicQ and the name set to the relevant tracker - for example "Tracker 1".
When set to "MagicVis object (rx)" MagicQ accepts position and rotation data for the MagicVis objects modifying their position and rotation accordingly. MagicQ assumes OTP System 1, Group 1.
When set to "MagicVis object (tx)" MagicQ transmits position and rotation data for all the MagicVis objects and acts as an OTP producer. MagicQ transmits OTP System 1, Group 1 and Points starting from 1. MagicQ transmits the name for each point as the name of the object within MagicVis.
Receiving and transmitting Object Transform Protocol data is always supported on MagicQ consoles. On MagicQ PC and Mac systems it is only supported when unlocked with a MagicQ or SnakeSys interface.
Some consoles have an inbuilt wireless access point for remote control from an iOS or Android tablet. Set to "Access Point" to enable.
This is only supported on MQ50, MQ70 and MQ250M. It is an option on Pro 2010 and Pro 2014 consoles via a USB adapter.
On all other consoles and PC/Mac this setting must be set to "Disabled" - on these systems you can use an external wireless access point.
Default: Disabled
IP address of the console when using the inbuilt wireless access point. Must not be in the same range as the wired network address in the "Network" tab.
Default/recommended: 192.168.200.1
Subnet mask of the console when using the inbuilt wireless access point.
Default/recommended: 255.255.255.0
Wireless channel (frequency) of the inbuilt wireless access point.
It is recommended to use either 1, 5, or 11.
Default: 1
Wireless network SSID (name) of the inbuilt wireless access point.
This will be the name that appears in the list of wireless networks on a device.
Wireless encryption type of the inbuilt wireless access point.
Should be set to WPA2. All other options are deprecated and are not supported on new consoles.
Default: WPA2
Wireless password of the inbuilt wireless access point.
Must be at least 8 characters.
When enabled, MagicQ will automatically assign IP addresses to devices connected to the inbuilt wireless access point.
Default: Yes
No - MagicQ will not connect to USB wings, interfaces or SnakeSys network products.
Yes - MagicQ will connect to all available USB wings and interfaces, and SnakeSys network products.
Yes, auto DMX - MagicQ will automatically output DMX starting universe 1 on the physical outputs, but only if there is nothing set to "MQ Direct" (consoles) or "MQ Wing" (PC/Mac) in DMX I/O.
On Mac, you can also choose to use just Virtual COM Port (VCP) devices (PC Wing Compact) or just FTDI devices (all other MagicQ USB wings and interfaces).
This option does not affect MagicDMX.
Default: Yes - auto DMX
The options are None, DMX Out or DMX In. This option defaults to DMX Out.
Setting the Out Type of Universe 1 in Setup, DMX I/O to MagicDMX will automatically set this option to DMX Out.
Note that DMX In is not available on the MagicDMX Basic version.
Default: DMX Output
MagicQ supports 14 bands of audio analysis - 7 frequencies each on a received left and right channel.
On MagicQ consoles with inbuilt audio ports use "Internal sound card". On the MQ250M there are two possible audio inputs. The S2L input uses hardware to analyse the incoming audio system - to use this select "ChamSys Audio Interface". The audio input uses software to analyse the incoming audio - to use this select "Internal sound card".
When using an external USB sound card with a MagicQ console, use "External USB sound card".
On PC or Mac when using a sound card use "Internal sound card". Audio input on PC/Mac is only supported when the system is unlocked by a MagicQ Wing or Interface or SnakeSys device.
The options "Energy only ChamSys audio", "ChamSys Audio Interface" and "ChamSys audio left only" relate to the ChamSys USB Audio interface.
"ChamSys Audio Interface - Energy only" analyses the 14 channels received and creates a single energy channel which is then copied to all the other channels. "ChamSys Audio Interface - Left only" copies the data received on the left channels to the right channels.
"Audio output loopback" will analyse the current audio stream being played back from MagicQ.
See Audio for full details on audio input.
Default: None
The specific audio device to use for audio input. This will show all compatible audio inputs available to MagicQ from the system.
This option is only available on PC systems.
Default: N/A
The minimum levels of the audio input. The minimum is used to adjust for noise.
When set to a non zero value any levels below the minimum are ignored and the levels above the minimum are scaled appropriately.
See Audio for full details on audio input.
Default: 0
The maximum level of the audio input. Useful if the audio signal is particularly weak.
When set to a non zero value any levels above the maximum are ignored and the levels below are scaled appropriately.
See Audio for full details on audio input.
Default: 0
On MagicQ consoles with inbuilt audio ports use "Internal sound card".
When using an external USB sound card with a MagicQ console, use "External USB sound card".
On PC or Mac when using a sound card use "Internal sound card".
Default: None
The specific audio device to use for audio output. This will show all compatible audio outputs available to MagicQ from the system.
This option is only available on PC systems.
Default: N/A
This setting specifies how the remote input port on MagicQ consoles, MagicQ PC Wings and MagicQ Maxi Wing works.
It can be set to None, Make, Break or Make + Break.
It can also be set to MIDI Beat, MIDI Beat Half and MIDI Beat Qtr for triggering from the MIDI Beat Clock instead of from the remote input.
Default: None
This setting specifies specific actions to be taken on a remote trigger input. The options are:
The options are:
The remote trigger can be used on a per Cue Stack basis by setting the Halt field of Cue step in the Cue Stack to "Remote". This is independent of any global action specified by the Remote trigger action setting.
Audio bump simulates audio received at full level. It is processed by MagicQ just as if the "bump" had been received from the audio port or the MagicQ Audio Interface, bumping any Cue Stacks set to Audio Bump.
Default: None
This setting enables use of 10Scene Ports on consoles. Gateways and the 10Scene Remote app.
When set to Inbuilt enabled 10Scene ports on consoles only.
When set to Inbuilt & Gateway enables 10Scene ports on Console & Gateway Interfaces
When set to Inbuilt, Gateway, Remote enables 10Scene ports on Consoles, Gateways and the 10Scene Remote App.
Default: Disabled
Specifies what 10Scene is controlling.
When set to "PB 1 to 10" All 10Scenes control PB1 to PB10
When set to "Execute 1" All 10Scenes control Exec Grid 1, items 1 to 10
When set to "Exec 1 Multi" 10Scenes with Zone IDs 1 to 10 control Exec Grid 1, Zone ID1 controls item 1 to 10, Zone ID2 controls 11 to 20, etc. . .
When set to "Exec 1 Groups" 10Scenes control Exec Grid 1, items 1 to 10, but using Groups named with the Zone ID to determine which heads they control.
When set to "Exec Grids" 10Scenes control Exec Grids - Zone ID 1 controls Exec Grid 1, Zone ID2 controls Exec Grid 2, etc. . .
When set to "Custom" The action for each zone is configured separately using the Type, P1 and P2 fields in Macro, View Zone
Default: PB 1 to 10
MagicQ supports one serial port for remote connections. On MagicQ consoles select COM1.
On MagicQ PC select a COM port from COM1 to COM8 depending on which COM port you wish to use.
Default: COM1
MagicQ consoles support baud rates from 300 to 57600. Baud rates supported on MagicQ PC will depend on the PC.
Default: 9600
MagicQ PC supports None, Odd, Even, Mark and Space. MagicQ consoles only support None, Odd, Even.
Default: None
MagicQ PC Supports 1,1.5 or 2 stop bits. MagicQ consoles support 1 or 2 stop bits.
Default: 1
Determines what protocol is used on the serial port. If set to "None" then any data received is ignored. Data can be transmitted from the Macro field of Cue steps in the Cue Stack.
The other protocols are:
See Controlling MagicQ using the serial port for more details.
Default: None
The timecode type can be set to EBU 25, SMPTE30, NTSC30 and Film 24.
When enabled the Status Display will show the current timecode being received from the module.
Default: EBU 25
When MagicQ is set to external timecode and the external timecode source is temporarily lost MagicQ automatically continues to increment the timecode. This parameter specifies how many frames MagicQ continues generating for before it stops. After this number of frames the timecode will be frozen until a signal is received again.
Default: 50
The timecode jump detect parameter is the number of frames that MagicQ waits before performing a jump. This allows spurious timecode values to be ignored.
Default: 10
This option controls which external source is used for timecode input.
The main options are None, LTC, MIDI, Art-Net, Winamp, Virtual (USB) MIDI, TCNet, and Internal MagicHD.
LTC and MIDI are for use with the inbuilt LTC and MIDI ports on MagicQ consoles and when connecting to a ChamSys MIDI/SMPTE interface.
Art-Net enables receiving timecode over Art-Net protocol whilst Winamp is received from a Winamp instance running on the same PC and Virtual (USB) MIDI receives from any USB MIDI device or another application on the same PC with virtual MIDI.
Internal MagicHD receive directly from MagicHD when it is running as part of the same MagicQ application.
The options "LTC+Art-Net" and "MIDI+Art-Net" provide resilience where the LTC or MIDI is the primary source, but if this is not available then MagicQ will fall back to using received Art-Net timecode.
When set to "None" then timecode is not accepted from any source.
When this option is set to anything other than None, then timecode generation (below) should be set to either "None", or "Art-Net (retransmit)".
On MagicQ PC/Mac systems Winamp, Art-Net timecode and Virtual (USB) MIDI are only available when the system is unlocked via a MagicQ USB Wing or Interface, or a SnakeSys device.
Default: None
The options are None, LTC, MIDI, Art-Net (retransmit) and Virtual (USB) MIDI.
When set to LTC or MIDI the MagicQ system generates timecode. The timecode values can be set be initialised, reset and modified using Cue Stack commands W and Q. W1 to enable, W2 to disable. Q Timecode where Timecode is value in frames.
Art-Net (retransmit) causes any timecode received via sources other than Art-Net to be retransmitted on the network as Art-Net timecode. This allows resilience to be built up in multi console systems where timecode is received into multiple MagicQ consoles and forwarded over the network using Art-Net timecode.
Virtual (USB) MIDI allows 3rd party USB or Virtual timecode interfaces to be used, note the interface must first be configured under the Tools > Virtual (USB) MIDI setup.
When this option is set to LTC or MIDI, then timecode decode should be set to None.
Default: None
The options are Normal, Adv backward Jump, Backward Jumps > 1 second.
Normal is the original MagicQ backward jump handling.
Advanced is the handling that was previously available on a debug option.
Backward Jumps > 1 second ignores backward jumps unless they are greater than 1 second - this option may help with some systems which can send small backwards jumps when they stop.
Default: Normal
The options are Normal, Activate/Release TC Playbacks and Activate/Release TC Playbacks at Full.
When set to either of the Activate/Release options TC Playbacks will automatically activate when the TC value for the first cue is received and release after the last cue TC value is received.
The Activate at Full option can be used to ensure that the Playback activates at Full, ignoring the physical fader level on the console.
Default: Normal
Setting for determining how MIDI channel messages are processed. The options are None, Any Channel or Requested Channel.
When set to Any Channel MagicQ will process MIDI notes received on any MIDI channel.
When set to Requested Channel then MagicQ will only process MIDI notes received on the MIDI In Channel that is set.
This option can be used at the same time as timecode in / timecode generation.
Default: None
The MIDI Channel that MagicQ will listen to. When set to 0 it accepts MIDI commands on any MIDI channel.
Default: 0
Setting for determining how MIDI channel messages are sent.
The options are None, Any Channel or Requested Channel.
When set to Any Channel MagicQ will send MIDI notes on the channel specified in the macro field in the Cue Stack.
When set to Requested Channel then MagicQ will always send the MIDI notes on the MIDI Out Channel that is set regardless of the channel specified in the macro field in the Cue Stack.
This option can be used at the same time as timecode in / timecode generation.
To send notes from the macro field in the Cue Stack:
<note on/off> <note> <velocity>
For example, to send a note for middle C set the macro field to the following:
N144,60,127 // Note 60 on velocity 127
N128,60,0 // Note 60 off
Default: None
The MIDI channel that MagicQ will send out on.
When set to 0 it outputs on the MIDI channel specified in the Cue Stack macro field. When set to non zero it overrides the MIDI channel.
Default: 0
The options are Normal, Cue Stack 1, Playback 1 and None. This determines which Cue Stack is triggered when MIDI Show Control (MSC) commands are received.
In Normal, MSC commands with two parameters (Q number, Q list) will trigger Cue Stacks in the Cue Stack Store. MSC commands with one parameter (Q number) will trigger Cues in the Cue Store.
When set to None, MagicQ does not process MIDI Show Control Messages internally, enabling the messages to be handled by automations.
Default: Normal
Enables devices and consoles to remote control MagicQ using the MagicQ remote control feature.
This setting must be set to Yes for remote controlling one MagicQ console from another, when using external Multiwindow and when using the MagicQ Remote App.
Default: No
Enables other devices or consoles to communicate with MagicQ over the network.
This option must be set to Yes when using Net Sessions, Show Sync, remote file access, and when using MagicQ Remote apps.
It must also be set when operating a MagicQ console with the stand alone MagicVis.
Default: No
Enables network sessions, allowing multiple consoles to communicate show and playback information over a network. The options are:
In most situations we recommend "Manual Takeover" as it gives most control to the operators. "Auto Takeover" is designed for situations where there is no operator.
See Multiple Consoles for full details on using multiple MagicQ consoles in a network.
Default: None
For use in Network Sessions to specify the current session the console is a member of.
Consoles in a session should be set to a number other than 0 when using net sessions, to avoid an unconfigured console attempting to join a session when it is started.
Default = 0
When Network Session Mode is set then this specifies whether the Slave synchronises its playbacks to the Master.
When set to "PB Sync" the Slave playbacks are synchronised to the Master playbacks. Pressing playback buttons or changing fader levels on the Slave has no effect.
When set to "PB Sync, multi control" the playbacks on the Master and Slave are synchronised together, with either console being able to make changes via playback buttons and fader levels.
When set to "Inhibit PB Sync" the Slave playbacks are not synchronised – this is useful during the programming phase when creating a show using multiple consoles.
When set to "Inhibit, sync on swap" the Slave playbacks are not synchronised, but the Slave stores the Master state and if the Slave swaps to become the Master then it starts from the stored state.
For show playback, the Slave playbacks are normally synchronised to the Master.
Default: Inhibit PB sync
When Network Session Mode is set then this specifies whether the Slave synchronises its programmer to the Master.
When set to "No Sync" the Master and Slave consoles operate separate programmers. Any changes in the Programmer on the Master are completely independent to changes in the Programmer on the Slave. Each console can record, and update different Cues independently.
When set to "Sync Programmers" the programmers are synchronised - any changes in either programmer immediately modify the other programmer. This allows to operates to control different lights but to record and update the same Cue at the same time. When a Cue is recorded or updated the complete programmer is used for the record or update.
Default: No Sync
When using multiple ChamSys consoles this option is now superseded by the Network Session Mode. For manual configuration of this option see Manual Configuration of Multi Console.
This option may still be useful when configuring for an install with 3rd party consoles, and for emergency hot takeover.
The options are:
Default: Split Unis
For Emergency Hot Takeover, the Hot Takeover Mode must be set to either Split Unis, Equal or Prefer Slave. Emergency Hot Takeover will not work if this option is set to Manual or Inhibit.
When Network Session Mode is set to "Auto Takeover", this setting specifies how long after a Slave detects there is no Master on the network that it takes over control as Master.
Default: 5.00 sec
When Network Session Mode is set to "Auto Takeover", this setting specifies when a Slave becomes a Master, whether the output state is held or an automatic fade is carried out to the output of the new Master.
Default: Automatic
When Network Session Mode is set to "Auto Takeover" and Hot Takeover Fade Type is set to "Automatic", then this setting specifies how long it takes to fade the output when a Slave becomes a Master.
Default: 3.00 sec
This option is now superseded by the Network Session Mode.
For manual configuration of this option see Manual Configuration of Multi Console.
This setting is now superseded by the Network Session Mode which automatically configures this setting.
For manual configuration of this option see Manual Configuration of Multi Console.
When set to 0, playback sync is accepted from any MagicQ console on the network.
This setting is now superseded by the Network Session Mode which automatically configures this setting.
For manual configuration of this option see Manual Configuration of Multi Console.
This setting is now superseded by the Network Session Mode which automatically configures this setting.
For manual configuration of this option see Manual Configuration of MultiConsole.
This setting can prevent playbacks being triggered in error by reducing their initial sensitivity. Setting this to a level above 0 (e.g. 5) may remove any accidental triggers.
Default: 000
In some circumstances where faders or encoders have become faulty and generate excess noise, setting this to a level above 0 (e.g. 5) may remove the noise.
Default: 000
Use this option on a MagicQ PC Wing to improve the performance of the encoder wheels. This option does not have any effect on MagicQ consoles.
Default: Damped
The console touch screen can be disabled with this setting for cases where it may be faulty and causing issues.
Default: Enabled
The encoders can be disabled for cases where they may be faulty and causing issues.
Default: Enabled
The faders can be disabled for cases where they may be faulty and causing issues.
The following values can be used:
Default: 00000000
Define whether fader motorisation is enabled on supported consoles.
Default: Enabled
The fader motors can be disabled for cases where they may be faulty and causing issues.
Default: 00000000
The fader motors can be disabled for cases where they may be faulty and causing issues.
Default: 00000000
This setting disables power fail detection for the current session in case the console has developed a fault and is falsely reporting power fails.
This setting will return to default upon a reset / power on.
Default: Enabled
This setting can be used to disable screen save for the current session.
This setting will return to Enabled upon a reset / power on to protect display life.
Default: Enabled
This setting can be used to select the operation when the display is closed on the MQ250M.
The options are Screen Save, Lock, and No Function.
When set to Lock the console will automatically lock and screen save when the display is closed. When it is reopened the screen save will be cancelled, but user will need to unlock the console to use it.
Default: Screen Save
This setting determines how output of Lighting data is sent over the network (Artnet/sACN), it does not affect direct DMX outputs on Consoles, Wings or MagicDMX’s.
When set to "Continuous" MagicQ outputs data regardless of whether it is changing. This can cause high network loads.
When set to "Changes only" MagicQ only outputs data only on changes, except once per second where it will send regardless of whether data has changed. This means that when data is not changing it reduces the output data from 39 frames a second down to 1 frame.
When set to "Mixed" MagicQ interleaves the output frames from the different universes so that network devices with small buffers will still be able to decode the correct universes on heavily loaded networks.
When set to "Mixed and Changes only" this has the benefit of both above options - this is the recommended setting.
When set to "M+C Repeat" it is the same as "Mixed and Changes only" except that after data changes MagicQ sends the data one extra time after it changes to give the network device two chances of seeing the change.
When set to "M+C No Broadcast" it is the same as "Mixed and Changes only" except that MagicQ never broadcasts Art-Net packets.
When set to "Reduced" MagicQ outputs at half the normal frame rate. This option does not affect the DMX frame rate of direct DMX ports or of external DMX nodes. It only affects the output of network DMX via Art-Net, sACN, Pathport and ShowNet.
The "M+C, Direct C" and "No Seq" setting should not be used unless directed by ChamSys customer support.
Some older DMX equipment is not able to work at full DMX speed. In these cases, use the "Reduced rate output" to reduce the DMX data and/or refresh rate. This option reduces the rate of data MagicQ sends over the network or via USB to the interface. It may not affect the actual DMX rate as this may be controlled by the interface itself.
Some older DMX equipment may not be able to receive full DMX packets at the required rate. If less than 120 are used in the Patch then the "Short packet (120 chans)" option can be tried - this only affects Lumen Radio. All other DMX ports will send 512 byte packets.
Data packets sent to MagicVis, WYSIWYG and Capture are sent only when the data changes. The reduced rate options do not affect the MagicVis, WYSIWYG or Capture data.
Default: Mixed + Changes only
This setting determines the timing for the direct ports.
This setting only applies to the MQ250M, MQ80, MQ70, MQ50 and Stadium Connect. The setting will have no affect on other MagicQ consoles.
When set to "Maximum (default)" the console will output direct DMX512 data at its fastest speed. The break will be 100 μs, the mark after break (mab) will be 12 μs, and the slot time will be 50 μs giving an inter-byte time of 6 μs.
The "Fast" and "Slow" settings can help when some heads flicker due to missed frames as they can’t keep up with the defalt frame timing.
When set to "Fast" the console will output direct DMX512 data with a break of 150 μs, mab of 50 μs, and a slot time of 53 μs giving an inter-byte time of 9 μs.
When set to "Slow" the console will output direct DMX512 data with a break of 250 μs, mab of 100 μs, and a slot time of 56 μs giving an inter-byte time of 12 μs.
The MQ50 and MQ70 consoles are designed for minimum size to fit in hand carry restrictions and therefore the display edge is closer to the surrounding bezel than on other MagicQ consoles. The display edge option enables the window edge to be modified so that they are more visible.
Default: 0
MagicQ uses buffering for Movie clips. By default (when this is set to 0) MagicQ uses a buffer size of 128 frames. MagicQ will always use a minimum of 128 frames regardless of this setting.
On consoles using a solid state drive, this setting won’t make a significant difference.
Default: 000
For ChamSys internal debugging only. Must be set to 000.
Default: 000
This option should always be enabled, except when directed by ChamSys support.
Default: Yes
Settings for individual Playbacks (Cue Stacks) are configured from the View Options and View Defaults views in the Cue Stacks Window.
If the touch screen does not respond accurately to the position that you are pressing on the screen then you may need to re-calibrate the touch screen. Don’t be afraid, this is a painless exercise!
In the Setup Window press the Cal Touch button - use the physical button rather than the pressing the touch screen. This puts the screen into calibration mode. To calibrate the touch screen simply press the screen in the bottom left corner of the screen and then the top right corner of the screen. Press the screen on the corners where the displayed graphics starts/ends.
It does not matter which order you press the screen in. If you feel you have pressed the wrong bit of the screen just press the screen again in the correct position.
When you are satisfied you have pressed the correct position then press Cal Touch button to leave the calibration mode. Make sure you use the physical button rather than pressing the touch screen, as pressing the touch screen messes up the calibration.
You should now find that the touch screen is more accurate. If you continue to have problems then try pressing the screen with a small blunt object, but don’t use a sharp object as it may damage the touch screen.
When calibrating external touch screens calibrate only 1 touch screen at a time. Pressing in more than one screen will cause unpredictable results.
To modify the brightness of the main display, press CTRL and adjust the bottom right encoder.
To modify the brightness of the LCD displays on the wing, press CTRL and adjust the next encoder up on the right.
To turn all the displays off press CTRL and the button associated with the bottom right encoder.
To turn off the all the lights on the console (i.e. the displays, the console lights and the LEDs) press CTRL and the "All Lights" off button.
To modify the contrast of Playback wings use the Wing Contrast encoder.
When multiple Playback wings are connected press CTRL and the Next Page button of the Wing you wish to change the contrast on.
To modify the brightness of the console lamps press CTRL and adjust the top right encoder. To turn all console lamps on or off, press CTRL and the button associated with the top right encoder.
To modify the brightness of the LEDs on the buttons, press CTRL and adjust the bottom left encoder.
Note that the brightness of the LEDs can only be adjusted from full to dim - they can not be turned off completely. This ensures that there is always an indication that the console is powered.
The console lamp brightness, display brightness and LED brightness can now be controlled as a Head within the programming of the show.
Patch one "Generic MQlamps" at any free address. The Head can be unpatched to ensure that it does not affect any real channel outputs. The Head has the following attributes:
Note that the screen saver will still blank the display.
The console supports a simple locking mode to avoid accidental button presses affecting the output or programmed data. Press CTRL and the button associated with the top left encoder to lock / unlock the console.
Alternatively hold CURSOR LEFT and CURSOR RIGHT and press CURSOR UP to lock and unlock the console.
The console will not accept any button presses, fader moves, encoder moves or touch presses while it is locked.
When Users and passwords are configured in Setup, View System, View Users then login with user and passwords will is required before the console is unlocked.
When a user splash screen has been set up then the lock screen will show the user splash screen. To add a user splash screen add the image file as usersplash.bmp, usersplash.jpg or usersplash.png in the main MagicQ folder.
The console supports a button test mode for checking suspect buttons and faders. To enter button test mode on MQ100/200/300 consoles press the two SHIFT buttons either side of the touch screen together (i.e. hold one down and press the other).
To enter button test mode on Compact consoles MQ40/60/70, press CTRL + ALT + SHIFT together to enter and exit board test mode.
In button test mode the buttons do not have their usual function - instead when pressed a message will be displayed in the status display indicating which button has been pressed. Faders and encoders also can be tested in a similar way.
In button test mode the Window shows a map of all the buttons, encoders and faders. When a button is pressed the map turns green to indicate that the button has been pressed and released o.k.
For encoders it turns green when the encoder has been turned both ways. For faders it turns green when the fader has been lowered to 0 and raised to full.
To test LEDs, enter button test mode and then press CTRL 1 and CTRL 2 to test the different colour LEDs. Press CTRL 0 to go back to normal state of the LEDs.
Button test mode is exited in the same way that it is entered.
On MagicQ PC to enter button test mode type "test" on the keyboard then hold SHIFT and CONTROL. Hold SHIFT and press CONTROL to exit button test mode.
| | ||