| |
| |
MagicQ supports the remote control of other MagicQ consoles and PC/Mac systems. Any MagicQ console or any MagicQ PC system can be controlled from any other MagicQ console or MagicQ PC system on the network. This enables complete remote management of any system from any other system. The remote system appears exactly as if it were running on the local system.
Remote control over a VPN is supported subject to the VPN allowing UDP traffic on port 4910 and TCP traffic on port 4911.
Remote Control must be enabled on the console that is to be controlled – by default it is disabled. It can be enabled in Setup, View Settings, Multi Console settings, Enable Remote Control.
When you install MagicQ on PC or Mac there is a MagicQ Remote Control option under the ChamSys menu that enables MagicQ to run solely in remote control mode.
In remote control mode MagicQ acts only as a remote control system; it does not transmit any network traffic (such as lighting protocols, Art-Net, ACN, Pathport etc…) except for the control of the remote MagicQ system.
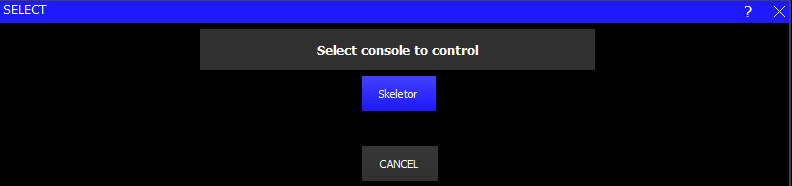
When you start up MagicQ in remote mode it will scan for MagicQ consoles on the network and give a list of the available consoles to select from.
In the list is "Specify IP" to enable connection to a specific IP in case MagicQ is unable to detect the console - e.g. when using a VPN.
To stop remote control of a MagicQ console aned exit click on "Quit".
To stop remote control of a MagicQ console and choose a different console press CTRL CLOSE.

The remote control function can be accessed from MagicQ in Setup, View System, View Monitors. To control another MagicQ press the Remote Control soft button. MagicQ then presents a list of all the other MagicQ consoles / MagicQ PC systems it can find on the network and you can choose which one you wish to control.
If for any reason it cannot connect to the console you can abort the remote control by pressing the backspace ←- key, or by pressing CTRL CLOSE.
You can tell which system you are controlling by looking at the system name in the Status Display (above PB1 to PB5). When MagicQ is remote controlling another console it indicates "REM" at the start of this status line.
To end remote control of another system press CTRL 1 on the keyboard of the controlling system. Alternatively press QUIT or CTRL CLOSE on the controlling system. The status line will change back to be the normal line without "REM".
When a remote system is under remote control it is still possible to control the system locally – the normal system interface is still fully operational. We recommend that you only use one interface at a time – having two operators will cause confusion!
This function is only enabled when the target system (i.e. the one you wish to control) is a MagicQ console, or it is a MagicQ PC system with a MagicQ PC Wing or MagicQ USB interface attached. There are no restrictions on the MagicQ system that you use to control the remote system – for example, this can be MagicQ PC running on a wireless tablet.
You can specify a particular IP address to connect to by entering the IP address in the command line before pressing REMOTE CONTROL or through the "Specify IP" option in the list of consoles.
MagicQ systems can be used together with an Apple iPhone, iPad, iPod Touch or Android phone or tablet for remote control.
All MagicQ consoles support remote control. On MagicQ PC systems remote control support is only unlocked when connected to a MagicQ Wing or MagicQ Interfaces (not MagicDMX).
In order to use the remote with a MagicQ console, connect an external wireless access point to the console via network cable. Some consoles also have an inbuilt wireless access point which can be used instead or, when the app is simply being used as an additional screen the mobile device can be connected directly to the console via an ethernet adaptor.

The MagicQ Remote application can be downloaded free of charge from the Apple App Store. For Android it can be downloaded free of charge from the Google Play Store.
To enable support for the remote application, go to Setup, View Settings, Multi Console, set Enable remote control and Enable remote access to "Enabled".
In order to use a wireless access point with MagicQ you must configure the access point with an SSID, password, IP address and subnet mask.
Most access points have an inbuilt web server that enables configuration from a PC or Mac using a web browser. The web server generally has a username and password - you will need to consult the instruction manual for your particular access point.
Access points usually default to a standard IP addess such as 192.168.1.1 and subnet mask of 255.255.255.0. Most acess points have DHCP support - i.e. the access point will attempt to give out IP addresses to other computers on the network. DHCP may be enabled or disabled by default depending on the type of access point. Consult the manual for your access point to determine how to configure it.
In order for the wireless access point to work correctly with MagicQ, the access point should be in the same IP address range as the MagicQ console / MagicQ PC/Mac.
For example, if the console is set to IP address 2.0.0.5 then the access point should have an IP address on the 2.0.0.x network – e.g. 2.0.0.1. Note that many access points only support subnet masks of 255.255.255.0 instead of the normal Art-Net subnet mask 255.0.0.0. This can be overcome by simply making sure that all your devices are on the same subnet – i.e. all devices have a 2.0.0.x address.
The remote device (iOS/Android) should also have an IP address in the same range.
The access point can be set up with DHCP to provide a range of IP addresses to wireless devices - this removes the need to set the IP address manually on the remote device. For example, you could set up your wireless access point to give out IP addresses in the range 2.0.0.100 to 2.0.0.150.
Security settings should be set up on your access point to avoid unauthorised control of the console.
When using your own wireless access point the WIFI settings in MagicQ are not used - these are only for consoles with inbuilt wireless. Ensure that Setup, View Settings, WIFI, Wireless mode is set to "Disabled".
These consoles have an inbuilt wireless access point:
Inbuilt wireless on Pro 2010/2014 consoles requires the Edimax EW-7711UAn USB device.
For all other consoles, and on PC/Mac, you need your own wireless access point connected via the wired network port (see Setting up an access point above).
Inbuilt wireless can be configured in Setup, View Settings, WIFI:
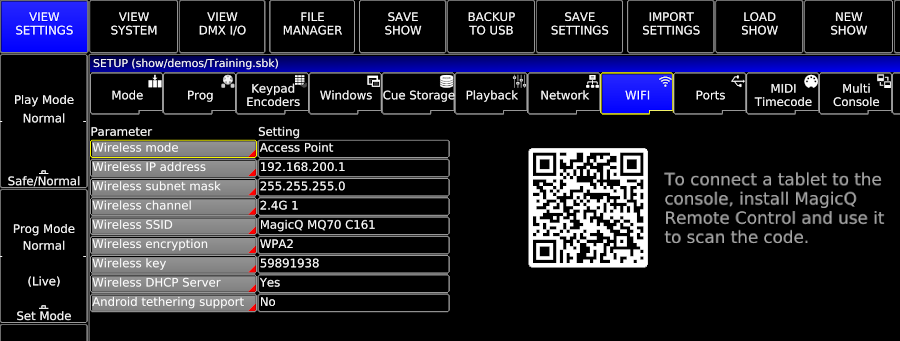
Wireless mode needs to be set to "Access Point" or "Access Point (Hidden SSID)".
The rest of the settings can be left at their default values.
See WIFI Settings for more information on the settings in this window.
The IP address in the WIFI tab should be in a different range from the IP address in the Network tab.
You can scan the QR code from the MagicQ Remote app or your device’s camera app to automatically connect to the wireless network, or you can connect manually (see below).
Pro2010/2014: MagicQ versions 1.5.4.0 to 1.5.6.0 had problems with the Edimx interface. 1.5.6.2 supports it ok, but it is necessary to upgrade the kernel first to kernel version 3.9.2.0. Note that before updating the kernel you must set the Wireless mode to None. |
In environments where there are a large number of WiFi devices or other devices that may interfere with WiFi signals and when the remote app is being used next to the console (eg as an additional screen) it can be beneficial to connect via ethernet network cable rather than WiFi.
To do this an ethernet adaptor is required for your mobile device. The ethernet adaptor plugs into the USB or Lightning port of your Android or Apple device and allows an ethernet cable to be connected (ensure that the adaptor you buy is suitable for your device).
Most devices can be connected either via a network external to the console which provides DHCP or directly to the console by setting a static IP address.
With an ethernet adaptor connected to an Apple device an Ethernet menu option will appear in the device’s Settings menu and under this an item for Interfaces. When connecting via an external network the LAN interface’s Configure IP should be set to Automatic. This will configure the network settings for you. When using an ethernet cable connected directly to the console Configure IP should be set to Manual.
The location of Ethernet settings on Android devices varies depending on the device but on many devices an option, More connection settings, is found under Connections in the Settings app. Under this option is an item for Ethernet which will be greyed out until the ethernet adaptor is connected. Under the Ethernet option is an option, Configure Ethernet device. When connecting via an external network the Connection type under this should be set to DHCP. This will configure the network settings for you. When using an ethernet cable connected directly to the console Connection type should be set to Static IP. To change settings the Ethernet Option will need to be disabled and should be enabled once the changes have been made. Some Android devices do not allow a static IP to be set. If you still require to connect the device directly to the console then you can do so via the Control Net secondary network interface. This should be set to a mode with the DHCP server enabled.
When using a Manual or Static IP connection the IP Address should be set to be in the same range as the console (eg if the console has an IP address of 2.0.0.5 the IP address could be set to 2.0.0.7). The Subnet Mask or Netmask should be set to the same value as set on the console.
To use an ethernet adaptor you may need to disable WiFi on the device.
In the case of inbuilt WiFi, you can scan the QR code in the WiFi settings tab using the MagicQ Remote app.
If you are using your own access point you need to connect manually:
If you are connecting via a VPN then you must specify the IP address of MagicQ in the Settings view of the app. The VPN must allow UDP traffic on port 4920.
The Con tab on MagicQ Remote has a green communication health bar. If this starts to turn red then packets are being missed and there is an issue with communication between MagicQ and MagicQ Remote. Check that the device that the app is running on is in range of the WiFi access point it is connected to. Communication will also be impacted by other devices either using WiFi or interfering with it.
It is easy to modify palettes with the remote application.
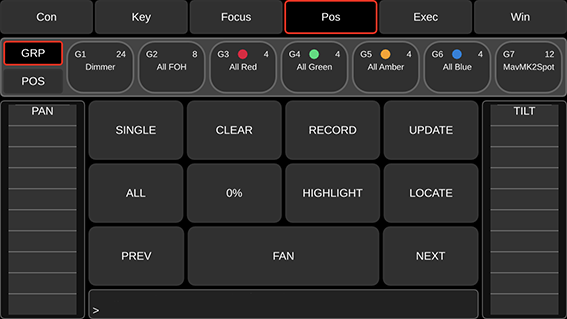
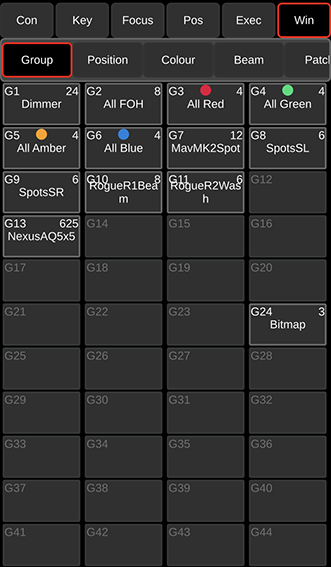
In the Focus tab (Key tab on iPad), select your heads (e.g. GROUP 1 ENTER) then select the position palette (e.g. POS 5 ENTER). If you cannot remember the numbers then change to the Windows tab and select the Pos, Colour or Beam Windows.
In the Focus tab use the encoder wheels to modify the look on stage. On a small screen device like a phone use the Bank button to change the attributes controlled by the wheel. On a tablet or other large screen device you can press the Pos, Colour, Beam buttons.
When you are happy with you look then record over the palette (e.g. REC POS 5 ENTER). MagicQ will ask for a confirmation. Press 1 to confirm yes. Press 0 to cancel.
We recommend you use the Execute Window on the remote app for shortcuts, group selections, focus test, etc… Items from the Group, Position, Colour, Beam, Cue Stack Store, Cue Store, Playback and Macro windows can all be copied into the Execute Window for immediate access from the remote device.
On the MagicQ console press the Execute Window and then press SET GRID SIZE to create grid 1. We recommend a grid size 5/5 for the iPhone/Android phones. For iPad 10/10 or 12/12 is good.
Copy items from the Group, Pos, Colour Beam windows into the Execute Window. You can copy multiple items in one go, by using SHIFT and the cursor keys in the source window to select multiple items. Press COPY. If it says "select source" then press COPY again. When it says "select destination" change to the Execute Window and select the place in the grid to copy to.
This latest version allows the Execute Window images to be shown on your device as images instead of boxes. Custom button images will be automatically downloaded to the app from MagicQ.
The app can be limited to only have access to the Execute Window by modifying the "Enable Remote App" setting in the user settings on MagicQ. (This mode was formally called Install Mode). Access can also limited to selected users. See the section on Restricting Remote App Access for more information. A particular console IP address can also be specified in the app Settings View to ensure the app always connects to the correct console. The Execute Page number can also be specified in the Settings View.
The Settings View in the app has the following options:
The top section of the Help View in the app displays the release notes and copyright notices for the app. Below this are the details of the version of the app and (if the device has an internet connection) the details of the latest available stable and beta version of MagicQ. Tapping the Stable version details will open the ChamSys MagicQ Downloads webpage.
If the app is connected to MagicQ then the details of the version running are also displayed.
At the bottom of the view are a grid of buttons:
These two views can be combined into a single Focus view. This is the default on tablets and other large screen devices and can be toggled view the Large Screen Mode control in Settings.
The Bank control allows selection of a bank of attributes for the Focus View encoders. Tapping the centre of the encoder allows the range to be selected. The Shift button on the combined view will act on the next control selected. If enabled on MagicQ Remote it will not affect a control selected on MagicQ. With Position attributes selected the Enc and Touch buttons will toggle between encoder and touch pad control. The arrow bars on either axis can be used to adjust the value on a single axis. With Colour attributes selected the Enc and Picker buttons will toggle between encoder and colour picker control.
The Position View provides pan and tilt bars and a set of controls specific to positioning.
The Execute Window replicates the window from MagicQ. Custom images will be downloaded from MagicQ. The page shown can be changed by assigning Exec Page, Exec Pg Up and Exec Pg Down special button or by setting the Execute Page # in Settings. From Settings the appearance of the window can also be toggled between Boxes and Coloured.
Select the window type and its sub view to display the view. The Win Status Display at the bottom of the view can be hidden by toggling Win Status Display in the Settings view. The Camera icon in the Window sub view selection bar allows a photo to be taken to use as a Custom Photo Icon for a Window item.
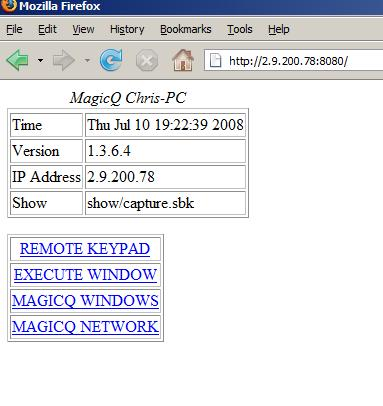
MagicQ includes an in-built web server for enabling access to MagicQ from web browsers on external computers, pocket PCs and mobile phones with web browsers. The web server includes web pages for monitoring of the status of the MagicQ, remote control, and access to the MagicQ windows such as the Patch window for downloading complete patch lists / cue sheets.
By default the web server is disabled – enable it in Setup, Network Settings. The default port is 8080 although this can be changed in the Network Settings.
To browse to the console enter the console name followed by the port number, e.g. for chamsys176, enter the URL in your browser. Note that by default most browsers use port 80 – so you must explicitly specify port 8080 in the URL or it will not work.
chamsys176:8080
or you can use the IP address of the MagicQ (e.g. 2.0.0..5)
2.0.0.5:8080
This URL will get you to the home page on the MagicQ console - a general system overview and a main menu of items, including Remote, Execute, Windows and Network.
On some browsers / PDAs you may need to enter the full http line:
http://chamsys176:8080/index.html
or
http://2.9.200.5:8080/index.html
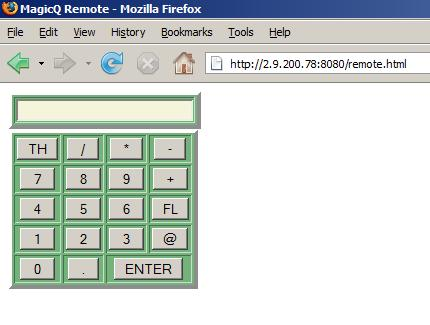
The Remote page is a simple remote focus for setting channel levels. It can also be accessed by adding "/remote" to the URL. This is useful for Pocket PC and mobile phones to go directly to the remote control page.
chamsys176:8080/remote
In order to set up a PC, Pocket PC or mobile phone to connect to MagicQ you must ensure that there is a physical connection to MagicQ – either directly via network cable, or via a wireless router. The IP address of the PC, Pocket PC, or mobile phone must be set to be on the same network as the MagicQ – this is generally the Art-Net IP addressing scheme – so the device must have an IP address starting with 2 (e.g. 2.0.0.2) and a subnet mask of 255.0.0.0.
The Execute page is very similar to the Execute Windows on the console but accessible through any PC with a browser on the network – it enables users to remote manage the console via the Execute window.
The Windows pages enable users to view all the windows on the console remotely within a browser. This is useful for checking the status of a remote console or for easy printing of console show data.

The Network page shows all the MagicQ consoles and PC systems on the networks and enables easy selection of particular consoles for remote control.
The Remote and Execute functions are only enabled when connected to a MagicQ console or a MagicQ PC System that is itself connected to a MagicQ wing or MagicQ interface.
There is now support for user HTML pages. These pages should be stored in the web folder and their name should start with "user" e.g. user1.html, user2.html. The MagicQ remote commands can be sent from the HTML using the button/input types to submit.
<html>

<head><META NAME="HandheldFriendly" content="True"><META
NAME="MobileOptimized" CONTENT="240">

<title>MagicQ User HTML Page</title>

</head>

<body>

<!-- User forms must start with the name user - e.g. user1, user2 -->
<!-- Remote commands can be found in the MagicQ manual -->

<FORM ACTION="user.html" name="user" METHOD=GET>

<!-- Remote commands are sent using input types -->
<!-- Place the command in the value and set the name to "cmd" -->

<input type="submit" value="1T" name="cmd">
<input type="submit" value="1U" name="cmd">
<p>
<!-- Or as button types -->
<!-- Note for Internet Explorer to work the value
feature below is not used and you must put the remote
command in the name after "cmd" -->

<button type="submit" name="cmd1T" value="1T">PB1 act</button>
<button type="submit" name="cmd1U" value="1U">PB1 rel</button>
MagicQ supports a Magic Wand simulator which acts like the MagicQ Playback Wand.
To use the Magic Wand simulator start MagicQ with the command line argument "wand". MagicQ will run just a simulation of the Magic Wand controlling the first 4 playbacks from the first Wing.
If you wish to restrict the Wand simulation to only connect to a specific IP address then include the required IP address as the second command line argument of the IP address.
The MagicQ Wand simulator must be run on a separate system to the one running MagicQ.
| | ||