| |
| |
MagicQ has changed to a completely new Dark colour scheme - all systems will automatically change to this when running on the new software. The old colour scheme is still available - marked as Black (old) but will no longer be developed.
The Select dialog box has now been enhanced for the more complex actions such as show merging and importing palettes to make the options clearer.
Scroll bars now default to wide and the scrolling action has been improved.
The MagicQ PC panel modes have been updated to include the blue soft buttons.
Column headings have been improved in the Output and Programmer window.
The High Contrast scheme is still available for use in bright sunlight conditions on MagicQ consoles. A notification has been added to indicate that this scheme is temporary and is reset when MagicQ is restarted.
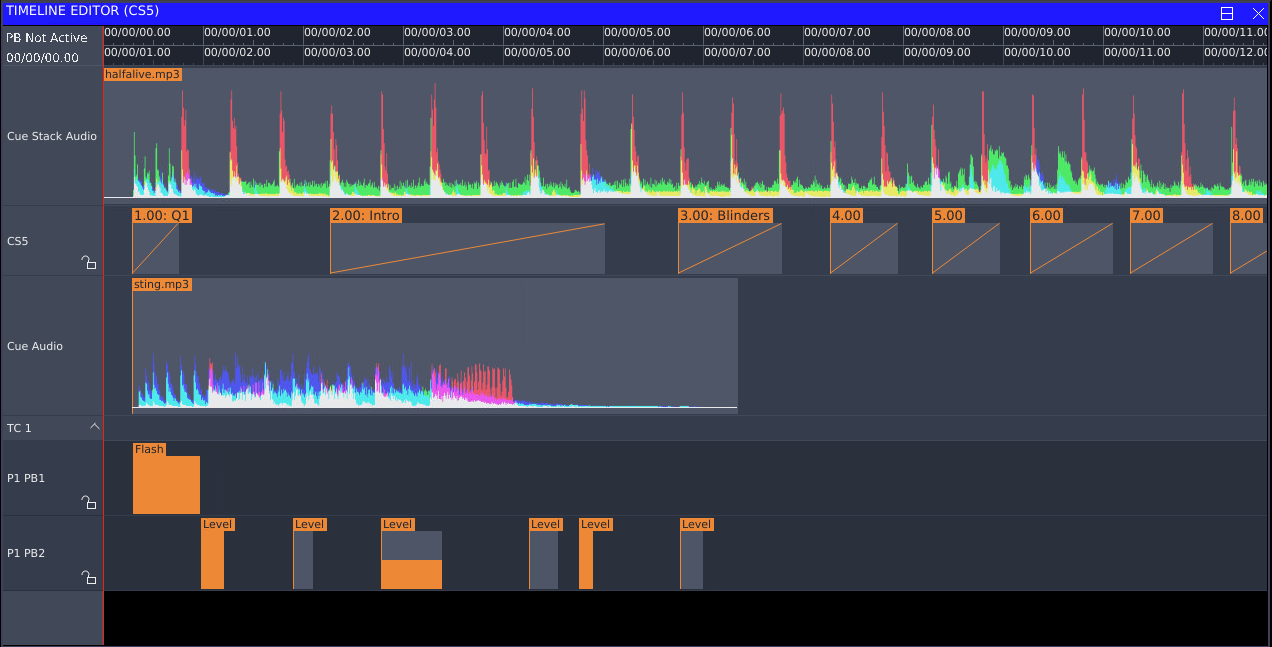
The Timeline Editor is designed to allow you to lay out Cues in a Timecode Cue Stack on a traditional timeline based view. It visualises audio tracks, timecode values, and both Cue and Timecode Track events in rows to allow you to visually see and modify the Cue Stack.
To access the Timeline Editor, select your Cue Stack, and then press the VIEW EDITOR soft button from within the Timeline window.
The timeline is split into multiple rows:
The timeline view can be panned by dragging in any of the background space of the timeline window, or by using the "Horiz Scroll" encoder. The horizontal zoom level can be changed with the "Zoom" encoder, or by pressing on the encoder soft button to zoom in and out.
In its default mode, the cue and timecode track rows are unlocked and will allow movement by clicking and dragging individual items. To prevent accidental changes to a cuestack, a row can be locked and unlocked by clicking the padlock icon next to the row name.
Items can be selected and moved by clicking and dragging on the item. Holding CTRL will allow multiple items to be selected. When selected, items can also be moved using the "Timecode" encoder. Cue fade and delay times can be modified using their respective encoders.
When a timecode offset is enabled in the Cue Stack, then two rulers are shown at the top of the window, with the upper showing timecode from the start of the Cue Stack, and the lower showing the equivalent external timecode with an offset applied.
Audio files are shown in the timeline view as a waveform. If the input audio file is in stereo, then this is mixed down to mono before being displayed.
There are two render modes currently available for audio files. The first will show the peak and RMS values of the overall waveform. The second mode shows the peak values of the hi, mid and lo frequency bands of the audio file as an overlaid red, green, and blue waveform. This can aid in aligning cues to particular beats which may not be easily visible on the standard waveform, but easy to see when just looking at a particular channel. The modes can be toggled by pressing the "VIEW FREQ BANDS" and "VIEW PEAK/RMS" soft button in the timeline editor window.
The Cue Stack audio file will always start at the 00/00/00.00 timecode value as this is started when the Cue Stack is activated. Cue Audio files will move in conjunction with their corresponding Cue in the above row.
The first time an audio file is loaded into the timeline window, the waveform image is generated in the background. Once this has been created the timeline window will show the respective waveform. The underlying image files are stored in a folder named _cache in the audio folder based on the file name. If an audio file with the same name is replaced in the audio folder, you may need to clear this cache folder to regenerate the audio waveforms.
The current timecode value is shown in the timeline using the red playhead bar. This will follow the timecode value for the selected Cue Stack. If the Cue Stack is configured to use an external timecode input, and a timecode offset has been configured, then the playhead will show the relative position in the Cue Stack of the external timecode. If the Cue Stack is either using the TC Sim or internal timecode, then the START TC and STOP TC soft buttons will be able to control the timecode playback. The RESTART TC will set the current timecode value to 00/00/00.00.
The playhead can be moved by dragging in the timecode ruler at the top of the display. If the Cue Stack has a Stack Audio file associated and the Playback is currently active, then the Audio playback will also be scrubbed along with this.
When the timecode source is playing, the timeline window will follow the playhead to keep it in view. If you have scrolled away from the current playhead, the Centre Playhead soft button on encoder Y can also be used to move back to view the current playhead.
Timecode track items are shown on the timeline where each macro target is shown on it’s own row. This means that Playback actions for multiple Playbacks will appear on their own rows. An entire timecode track can be hidden using the arrow in the row name. The timecode track can also be enabled or disabled using the 🚫 icon.
For TC track entries which change the level of a Playback, the level shown in the timeline window is the target level which the Playback will fade to. The level can be modified using the "Parameter" encoder.
MagicHD Quick Mode has been added, which is a slimline version of MagicHD designed for situations where only a single layer of media playback is required. It supports the ability to perform transitions on the one layer between the current and next media files all from a single head without the need to manage multiple layers.
It utilises the same Media Library and conversion process as MagicHD Full Mode, and integrates with MagicQ, providing thumbnails and easy control via the Media window. MagicHD Quick Mode also supports integration with an existing MagicQ Cue Stack, dynamically controlling the transition speed based on the Cue fade time.
To enable Quick Mode in MagicHD, this can be selected from the MagicHD menu bar under Media > Quick Mode when using the standalone MagicHD player, or by selecting a MagicHD Quick server patched in a MagicQ show file. When Quick Mode is enabled and is running in Standalone mode, you can configure which DMX channel it is patched on using the Settings dialog box. For the MagicHD Full mode, the DMX Channel is hard coded at channel 1 due to the size of the DMX personality required.
To patch a MagicHD Quick mode server, go to the Patch window, select CHOOSE DIM/MEDIA > MagicHD Quick, and continue the patch as normal specifying the universe and channel it is configured to run on. The Media Server can be named and managed using the standard sheet in Setup > VIEW SYSTEM > VIEW MEDIA, and should appear as type "MagicHD Quick". An alternative method patching is to select an unused server in the Media window, and select "MagicHD Quick" from the popup dialog which appears.
When MagicHD Quick is running as part of MagicQ, then the IP address field in Setup > VIEW SYSTEM > VIEW MEDIA should be set to "Local". Live thumbnails of the media output are loaded directly from the server. If MagicHD Quick is running on a separate computer via network, then Art-Net or sACN can be configured to control the output. Specifying the IP address of the remote server within the Setup > VIEW SYSTEM > VIEW MEDIA window will enable live thumbnails to be loaded over the network.
Once the MagicHD Quick mode server has been patched, open the Media window by pressing the MEDIA button, and the MagicHD Quick server should appear in the list of media servers. As there is only one head file required for the Quick Mode server, selecting the server will also select the first layer in the Media window.
Media files and folders are selected in the same way as MagicHD Full mode by selecting the thumbnails of the media or by using the Media File and Media Folder encoders under the Media attribute group.
When the Media File or Media Folder attribute changes, MagicHD Quick mode will transition to the new media file based on the current transition and loop settings. A transition type can be chosen using the "Transition Type" attribute. If a media file needs to be looped, then the "Loop" attribute can be used to make the media file repeat indefinitely.
If MagicHD Quick mode will be programmed to a Cue Stack, then setting the Transition Time channel to 255 will make MagicQ use the Cue Stack fade time as the Transition Time.
When MagicHD detects a Media change, it will use the settings as they were when the transition was triggered, and subsequent changes to these won’t affect playback.
MagicHD Quick Mode will scale media to fit the current screen size, and will either letterbox or pillarbox media to preserve their aspect ratio on screen. For finer grained control of positioning and scale, MagicHD Full mode can be used to apply different scaling modes, positioning, rotation and sizing to the media.
For further details of the DMX personality, see the new "MagicHD Quick Mode" section in the MagicHD Manual as part of your MagicQ install.
The orthographic views (Top, Front, Side & Free) are now rendered in wireframe. Rendering the beams in the orthographic views was broken. Wireframe rendering uses a lot less graphics processing so can be useful when a low powered system is struggling.
The camera control in the visualiser can now continuously rotate around the scene.
MagicQ can now import fixture patch and positions from MVR (My Virtual Rig) files. MVR is an open format that allows geometry and parameter data to be shared between CAD software, visualisers and lighting consoles. MVR files can be exported from Vectorworks 2019 & 2020 and imported into MagicQ and MagicVis for patching and visualisation.
In the Patch window View Chans view press IMPORT HEADS to import the patch and positions from a MVR CSV file.
MagicQ can now import CSV files from the L8 visualisation software. In the Patch window View Chans view press IMPORT HEADS to import the patch and positions from a L8 CSV file.
Output grid colour rendering has been upgraded to include extended emitters (amber, white, lime, etc.). This is done through two modes; the default mode uses estimated emitter colours whilst True-colour mode available via GRID OPTIONS uses a fixture’s colourimetry data if available. "True-colour" is mode accurate, but may be slow on consoles with large numbers of heads.
The Cue Stack macro R now supports fade time as an optional parameter - e.g. R2/10 releases PB 2 with a time of 10 seconds.
On MQ50 and MQ70 consoles due to the compact nature of the consoles the display graphics sometimes extended outside of the visible area at the edges of the display. An automatic adjustment has been made. It is also possible to set a specific edge to the graphics in the new Display Edge setting in Setup, View Settings, Hardware.
Fixed a startup crash issue that was preventing MagicQ from starting on some newer Linux distributions. If any further problems are seen with MagicQ startup on Linux, please refer to the "troubleshooting" section of the manual for a possible workaround.
Fixed issue present in MagicHD since version 1.8.0.0 where audio output would sometimes not play back smoothly dependent on the video frame rate. As part of the media conversion process, files with audio will be converted to 25fps to facilitate smooth audio playback.
Fixed problem with shortcut to show Cue Stack Options - pressing playback legend window 3 times - this would not work correctly since 1.8.6.8.
Fixed problem with MQ500 Panel where it was not showing correctly on two monitors when the second monitor was placed to the left of the main monitor.
Fixed various graphical issues with the Touch and other panel views.
Fixed problem when REMOVE UNUSED in Cue Stack window when Execute window item with Cue was active - caused a reset #0024499
Fixed problem when setting the description field in the Autom window and then removing the description - caused a reset. #0024997
In the Colour Picker the SHOW WHEEL button is now disabled when not needed.
File manager: the file manager can now be used to access the user’s home directory on PC; previously it could only access the MagicQ data directory. This only applies if the MagicQ directory is in the user’s home directory; if it is elsewhere, it cannot be escaped.
Fixed issue on MacOS where the OS was preventing access to the internal microphone for audio input. A prompt should appear when MagicQ starts to give permission to use the input.
Fixed a problem with wide angle beams in the visualiser, artefacts would appear in the beam when beam angles were above 90 degrees.
Fixed a problem with the beam length in the visualiser, beams that had an angle of around 90 degrees had very short beam lengths.
Fixed a problem with the camera control in the visualiser. When looking directly down, the strafing control for the camera would not work properly depending on the angle you were viewing the scene from.
Fixed an issue with truss rotation that would cause fixtures to float away from the truss as it was rotated, especially on circular trusses.
Fixed an issue with consoles not shutting down using shortcut keys CTRL & DBO
Fixed issue where external timecode sim would not display the frame values correctly
| | ||