| |
| |
The intensity level of heads (including dimmers) are controlled from the Intensity Window. Press the INT button to open the window.
This window displays a fader for each head (including dimmers) patched onto the console. Pressing the slider part of the fader sets the appropriate level. When a fader is moved from 0 the channel in the programmer is activated – and the fader will turn red.
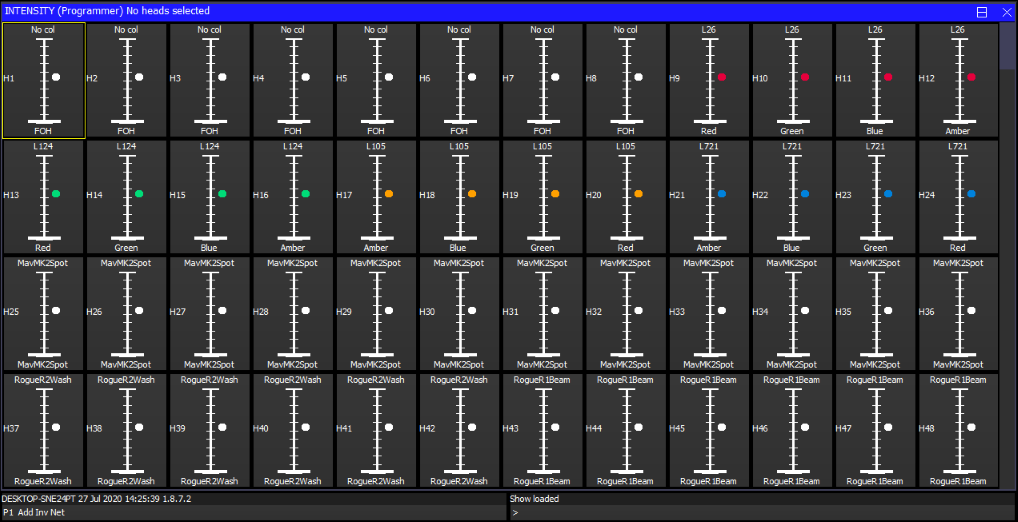
The SQUARE OFF soft button enables fast programming of intensities. Using the touch screen select the channels you wish to have at full and at zero – but don’t bother being exactly accurate with the level of the selection. Pressing SQUARE OFF finishes the job by setting all channels that are less than 50% to 0 whilst setting channels above 50% to full.
Use the ALL TO FULL and ALL TO ZERO buttons to change the level of all the channels.
Press SHIFT and SQUARE OFF to invert the faders - all channels less than 50% go to 100% whilst all channels above 50% go to 0%.
Press the CLEAR soft button to clear the programmer.
A single fader or multiple faders can be controlled using the top right rotary encoder in the Intensity Window. The encoder controls the fader, which the cursor is over. Selecting a block of faders by pressing the cursor keys whilst holding the SHIFT button down enables multiple faders to be selected.
The level of the intensity channel of heads can be set from the keypad. Head numbers are used to reference the required heads.
If you intend to use this method for setting intensities then you should set up the head numbers when patching. It is easy to do - the console can automatically renumber them, or they can be set to be the same as the DMX start address of the dimmer / head. See the section on patching.
Keypad setting of intensities is supported regardless of which Window is currently active.
To set heads 1 to 4 to 40% key in
1 THRU 4 @ 40
To set heads 1 to 4 and heads 8 to 11 to 100% key in
1 THRU 4 + 8 THRU 11 @ FULL
To set heads 1 through 12 but not head 7 to 10% more than their current value key in
1 THRU 12 - 7 @ +10
The console supports theatre style key entry – so you can set head 1 to 40% by typing
1 @ 4 ENTER
and you can set head 1 to 4% by typing
1 @ .4 ENTER or 1 @ 04
Note that if the Setup option "Auto enter on keypad intensity set" option is set, you do not need to press ENTER after you have entered a 2 digit level. The console knows that you are setting an intensity due to the @ key. Valid levels are 0% to 100%.
On MagicQ PC / Mac you can use > to indicate THRU and # to indicate FULL.
Fade times for intensity channels can be entered from the keypad. Ensure that "Auto Enter on Keypad Intensity Set" is set to "No" for this to function correctly.
This can be done when setting levels, e.g. to set heads 1 to 4 at 80% with fade time of 5 seconds:
1 > 4 @ 80 / 5
Or without changing the level
1 > 4 @ / 5
To set a delay time and a fade time (e.g. delay 2 seconds, fade 5 seconds)
1 > 4 @ / 2 / 5
Split fade times can be set from the keypad:
1 > 10 @ FULL / 3 * // Heads 1 to 10 at 100% split times over 3s
1 > 10 @ FULL / 0 > 5 // Heads 1 to 10 at 100% split fades 0s to 5s
1 > 10 @ FULL / 0 > 4 / 1 // Heads 1 to 10 at 100% split delays 0s to 4s, 1s fade
1 > 10 @ FULL / 0 > 5 / 0 > 4 // Heads 1 to 10 at 100% split delays and fades
When using split fade times it is possible to enter max > min as well as min > max.
1 > 10 @ FULL / 4 > 0 / 1 // Heads 1 to 10 at 100% split delays 4s to 1s, 1s fade
IT is possible to set intensity FX "Dimmer chase" directly using the keypad. When setting an intensity level it is now possible to specify a range - for example, to set some channels to run an intensity FX between 10% and 20% this can be set from the keypad:
@ 10 THRU 20 ENTER
Note that for this syntax to be accepted the Setup, View Setting, Keypad & Encoders, "Auto enter on intensity set" must be set to "No".
If the channels already are part of an intensity FX in the programmer then the size of the channel within that FX will be modified and an according change to the base level of that channel in the programmer. If the channel is not part of an intensity FX then if there is already a "Dim chase" FX in the programmer the channel will be added to that FX. If there is no "Dim chase" FX in the programmer then one will be added with this channel.
Once a channel has a FX in the programmer it can not be removed using the keypad syntax - however it can be set to a zero FX (i.e. has no effect) by setting the channel using a fixed range - for example @ 20 THRU 20 will set it to 20% with a zero size FX.
It is also possible to directly add the FX by entering this syntax directly into the Intensity value fields in the Programmer, View Levels view. This view will also show the min and max levels when a FX with a size greater than 0 is in the programmer. This only affects Intensity attributes - it is currently not possible for any other attributes.
From software version 1.6.5.1 the "." operator is now universally used for selecting elements of multiple heads. The repeated element of a multiple head are indexed .1 .2 .3 etc.. whilst the main part of a multi element head in indexed as .0. Note that if a multi element head does not have a main part - i.e. it is just a repeated head then there is no .0 element. The operators +, -, and THRU (>) can be used to select more than one element of a multi element head. Only one . is supported per command.
Examples of supported syntax are:
. 3 // Select 3rd element of currently selected heads . 1 > 3 // Select 1st, 2nd and 3rd elements of currently selected heads . 1 + 4 // Select 1st and 4th elements of currently selected heads
1 > 10 . 1 @ FULL // Set element 1 of heads 1 to 10 at FULL 1 > 10 . 1 > 3 @ 50 // Set elements 1,2,3 of heads 1 to 10 at 50%
Depending on the MagicQ setup options, it may be necessary to enter @@ at the end of the line to select heads or to press ENTER at the end of the line to enter intensities.
MagicQ now supports the multiple elements of a multi element head all having the same head number. By default MagicQ allocates each element of a multi element head ascending head numbers - this can be modified in Patch, View Heads by setting the Head Number appended with /1 to indicate only 1 head number in use for that head.
Note that prior to v1.6.5.1 the "." was used for selecting or setting intensity direct to a DMX channel rather than a head number. This functionality is no longer supported - see below.
To set a DMX channel intensity rather than a head number intensity precede the dmx number with a *. For example to set DMX channel 1-50 to FULL, type * 1 . 50 @ FULL
When you use the keypad to modify heads, by default this does not modify which heads are selected. This ensures that you can be busking moving heads whilst modifying individual dimmer levels at the same time.
However, at any time you can set the levels of the intensities of the currently selected heads using the keypad. To set the selected heads to 70% key in:
@ 70
This method also supports standard key entry syntax such as + and – for relative changes.
You can change which heads are selected at any time through the Group Window – see Selecting Heads.
In the Intensities Window you can change which heads are selected by moving the cursor to a fader and pressing ENTER. You can also select/deselect heads by holding down SHIFT and selecting faders. When faders are shown with a thick stem they are selected. Holding SHIFT and pressing the fader toggles the selection of the fader.
In the Intensities Window press SELECT ACTIVE or SHIFT and SELECT NON ZERO to select the heads you have modified – this can be useful for creating groups.
Programming time is significantly improved by making use of the gel colour facility built into the console. Assigning a colour to each dimmer is quick and easy and then enables the programming of scenes based on colours. In the Intensity Window the dimmers can be selected on a per colour basis, thus easily enabling the operator to identify the colour and position of the lamps to program into each scene.
First ensure that each Dimmer has been given a name and a gel colour. This can be carried out either from the Patch Window or from the Intensity Window.
To name a Dimmer in the Intensity Window, either:
To set a Gel Colour in the Intensity Window, either:
Note, you should not press ENTER in any of the above operations as this will try and use the text or number you have entered to set the level for the fader which the cursor is over.
In the Intensity Window you can filter out faders based on gel colour, head type and head name thus providing a view of only the data you are interested in at the time.
Use the top three left rotary encoders / soft buttons to page through head types and gel types. The display will show only the heads and colours that match the selection.
At any time press the VIEW ALL soft button to revert to viewing all faders regardless of head type, head name and gel colour.
Pressing the ALL TO ZERO and ALL TO FULL soft buttons only affects the faders that match the selected filter. So for example in order to set all the red lamps to full, page through the gel type till you reach RED and then press ALL TO FULL.
Remember that although you only view the gel type that you have requested there may be other gel types that have been previously activated in the programmer. Press CLEAR before starting programming a new look.
The Intensities Window supports two fader views - Programmer View and Presets View. The faders in each of these views behave differently. In the Programmer View the faders control values within the programmer whilst in the Presets View the faders act like individual preset faders. Intensity channels are generally configured to be HTP so the level of a particular channel will be a combination of the faders in the two views - the highest of the two faders.
It is important to understand the distinction - preset faders do not affect the contents of the programmer and therefore can not be used for programming Cues.
When programming a show you should always use the Programmer View. When playing back a show you may wish to use the Presets View - this has the advantage that since it is not part of the programmer, fader values are not affected by actions on the Programmer such as CLEAR. You could, for example, add in some face lighting from some profiles using faders in the Presets View which would not be affected by effects that you are busking on some moving heads.
Faders in both the Programmer and Presets Views are affected by the level of the Grand Master. They are also affected when a SWAP button is pressed - any HTP channels in the Programmer or the Presets View will be reduced to zero.
MagicQ supports an inbuilt Intensity Master for every head and for every group. Master levels default to 100% for all channels and groups.
On Stadium consoles these can be accessed from the Intensity Master bank and the Group Intensity Master motorised fader banks.
On all consoles the Intensity Masters can be accessed from VIEW MASTERS in the Intensity Window. Group Int Masters are only accessible on Stadium consoles.
Individual head intensity levels can be set using the faders in the VIEW MASGTERS. To reset a head to 100% (i.e. no master in operation for this head) press the RESET MASTER soft button.
Press SHIFT and RESET ALL MSTRS to reset all inbuilt Intensity Masters and inbuilt Group Intensity Masters. MagicQ requests confirmation before resetting.
Heads that have a Intensity master or Group Intensity Master active are shown in the Output window with (IM).
The state of Intensity masters is stored in the show file.
Note that on loading a show from a Stadium console onto a non Stadium console, the state of the Intensity masters will be retained - but they will not be changeable via playback Banks as these are only supported on Stadium consoles. The RESET ALL MSTRS soft button in the Intensity window, VIEW MASTERS view can be used to reset (deactivate) all the Intensity masters.
| | ||