| |
| |
MagicQ is ideally suited to controlling media servers through its dedicated Media window - the eight encoder wheels enable quick and easy access to a large numbers of control parameters.
MagicQ has extremely powerful support for media servers. It is possible to connect to up to 50 different media servers or intelligent media yokes each with different media content. MagicQ downloads thumbnail previews for the media content from each media server independently.
MagicQ supports a special window, solely for controlling media servers, the Media Window. This window makes it much easier to control media servers. You can select media server, media layer, attributes and media content all from the same window. You can also see what content is selected on each of the layers of the selected media server. Open the Media Window pressing the Media button.
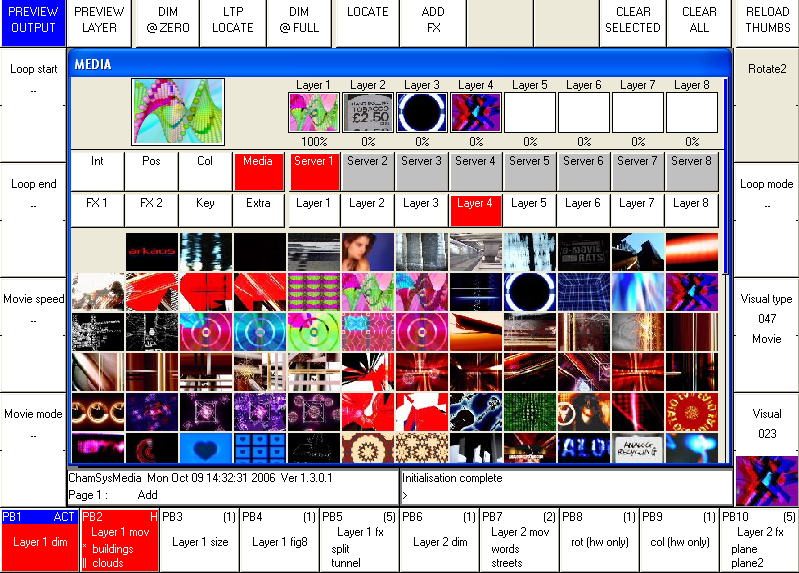
In addition, there is a Live Preview window, which shows the output of the media server, or the output of each of the layers. This is transferred is real time from the media server – so that you can see exactly what the media server is playing. This is particularly useful in situations with many media servers, or media servers that are remote from the control position.
Media Servers are normally connected via network rather than DMX - this enables MagicQ to communicate with the media server to retrieve thumbnails and to show live previews. MagicQ uses a network protocol such as Art-Net, Pathport or ACN to control the Media Server - this is set up in Setup, View DMX I/O. In addition MagicQ uses a network protocol such as CITP MSEX or HMAP to communicate with the Media Server to retrieev thumbnails and live previews.
MagicQ supports many different types of Media Server including MagicHD - a free Media Player inbuilt into the MagicQ software.
Media servers generally consist of a number of layers of one or more types. Each type of layer has a different personality. Each layer is treated as a different head on MagicQ with a different head number. To patch a media server each of the layers must be patched in turn on asscending DMX addresses.
On MagicQ it is possible to patch the media server in one go by using the Choose DIM/MEDIA soft button. This gives a choice of the media servers in their most common configurations. Patching using this method patches all the required layers of different types and configures the media server settings for one media server all in one action.
If your media server is not in the list of media servers then you will need to patch the layers individually as you would for a moving light. MagicQ includes demo show files for most common media servers – try loading these demo shows to see examples of the patch required.
Each media server should have unique head numbers. The layers in the media server should have asscending head numbers.
Connect the Media Server to MagicQ using a network cable.
Ensure that the Media server and the MagicQ system are using IP addresses in the same network range - for example if using Art-Net then the media servers and MagicQ should all be on the 2.x.x.x or the 10.x.x.x network range.
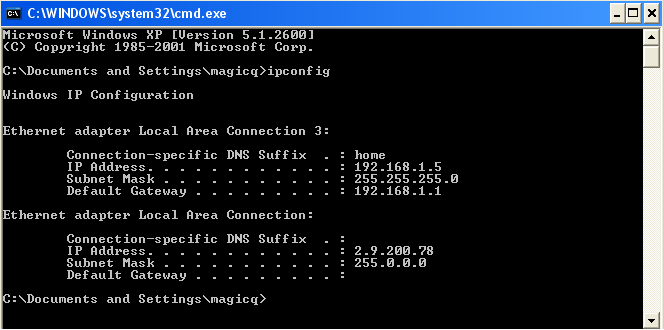
To check the IP settings you can try and "ping" from MagicQ to the Media Server. On MagicQ keyboard type three dots followed by the IP address to ping.
…a.b.c.d
where a.b.c.d is the IP address of the Media Server
The ping should show a "Reply from 2.x.x.x". If you do not get a reply then check the physical connection, check the configuration of the network port on the media server and check there is no firewall software on the media server.
In Setup, View DMX I/O configure the MagicQ universe where the Media Server is patched. Set up the Output type to be the appropriate protocol - e.g. Art-Net, Pathport or ACN.
Ensure that the Output Universe is set up to the same as the Media Server - e.g. if the Media Server is using Art-Net 0-4 then set up the Output Universe on MagicQ to Art-Net and 4.
Enable the universe. The Media Server should now respond to commands from MagicQ.
In the Media Window press the Media Server you wish to configure. If the Media Server has not been configured at all then MagicQ will give a menu of options to choose from. If the Media Server has been previously configured then press the SERVER SETUP soft button to open the menu of options.
If you select "Advanced" then MagicQ will take you to the Setup Window, Media View to configure the media server parameters. Note that the Advanced view is not available on the MQ40 - only simple plug’n'play configuration of MagicHD or Pixel Mapping.
If you have patched using the Choose Media Server method above then the parameters should mostly be set up correctly for you. It is only necessary to enter the IP address of the media server.

Set the IP address of the media server. This will be used to locate the media server on the network and to retrieve thumbnails and live previews. Move to the IP address field and set the IP address. If you have only one media server active on the network then pressing enter should detect its IP address automatically. Note that the media server will respond to commands over Art-Net, Pathport or ACN regardless of whether the IP address of the Media Server is set up correctly in MagicQ.
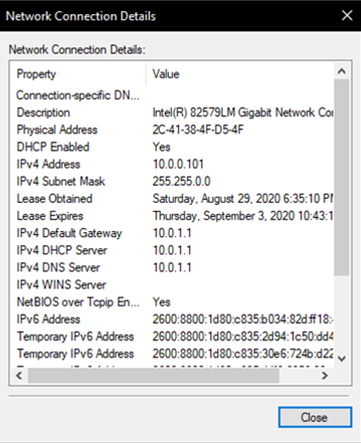
To determine the IP address of media server on Windows XP machines, load the Control Panel, and open the Network Connections screen. Double click on the network connection, choose the support tab, and the IP Address is displayed.
Select the type of media server and the version:
Set the number of layers you have patched – this is the number of media layers, and does not include master layers, soft edge or camera layers.
Set the head number of the first media layer. This tells MagicQ which patched layer is the first media layer on the media server. MagicQ expects layers to be sequential head numbers, e.g. set you head numbers for your layers to 1 to 8.
MagicHD is fully integrated with MagicQ. Set the Media Server type to MagicHD. Set the version number to 0.
If MagicHD is being run from within MagicQ then set the Media Server IP address to 0 - this will appear as "Local". MagicHD will use the thumbnails for the media from the PC/Mac that it is running on.
If you wish to connect to a MagicHD system on another PC, Mac or a MagicHD Box then set the Media Server IP address to the IP address of the external MagicHD system.
For Arkaos 3.6 and above and Media Master choose MSEX (Arkaos). For Arkaos 3.5 select Arkaos. Set the version number to 0. Arkaos supports 8 layers.
Arkaos uses MSEX protocol for retrieval of thumbnails, part of CITP protocol stack.
MagicQ includes the mediamasterdemo.shw in the demos folder.
Select Catalyst and set the version number to 0. Thumbnails are retrieved from Catalyst using html to the inbuilt Mac web server. Catalyst does not support live preivews.
Select Coolux and set the version number to 0. The number of layers should be set to the total number of layers patched.
Arkaos uses MSEX protocol for retrieval of thumbnails, part of CITP protocol stack. In Setup, View Media, the Coolux option is the same as the MSEX option.
Hippotizers now support MSEX - this is the recommended protocol to use.
For older Hippotizer choose either Hippo Stage or Hippo Express depending on which type you are using. For Hippo HD use Hippos Stage. Set the version field according to the version, 2 for Hippo v2, 3 for Hippo v3.
For Mbox choose Mbox and set the version number to 0.
Note that the head numbers for the text and object layers are allocated lower numbers than the ancillary layers such as the ambient, spots, camera, shutter and keystone. This ensures that the text and object layers appear before the ancillary layers in the Media Window.
There is a pre-patched show mboxdemo.shw containing 5 layers and several cues to demonstrate the Mbox EXtreme in the demos folder.
MagicQ has support for the Megapixel VR Helios LED processor. Within MagicQ the Megapixel VR Helios is treated like a media server with control of multi layers (referred to as MP Groups) each with intensity, position and colour control.
Whereas media servers generally take multiple layers of video with different position and size and combine them into one media output, the Megapixel VR Helios takes one media source and distributes it onto multiple LED outputs at different positions. However, from a control perspective it is similar control of multiple items that have Intensity, Position and Colour and have live previews.
Unlike other media servers the Megapixel VR Helios is not controlled over DMX - instead MagicQ connects directly to it over the network using the public REST API provided in the Helios enabling greater control and flexibility. MagicQ converts its internally calculated DMX values to suitable values for sending over the REST API.
The Megapixel VR Helios is patched in the Patch Window by selecting CHOOSE DIM/MEDIA, selecting "media server" and then selecting "megapixel". This will automatically patch 30 Megapixel Group 20ch heads each named MP GrpX where X is 1 to 30. It will also create a Media Server in Setup, View System, View Media set to type of Megapixel VR and referencing the patched Megapixel heads. Each head in MagicQ is automatically defaulted to control a Megapixel Group (1 to 30) - although this can be overriden when programming.
The Magapixel Group 20ch personality has the following attributes:
Chan | Function |
1 | Server No (Defaults to Server 1 - i.e. the first in Setup, View System, View Media) |
2 | Group No - Megapixel Group number - automatically defaulted to 1..30 for the 30 patched Heads |
3+4 | Intensity |
5+6 | Red |
7+8 | Green |
9+10 | Blue |
11+12 | X position across canvas |
13+14 | X position across canvas |
15 | Test pattern. 0 for none, 1-5 for patterns |
16 | Still store - 0 for none, 1-255 for images from still store |
17-20 | Reserved |
Note that there is no correlation between the normal MagicQ groups and the MP Groups on the Megapixel VR Helios. When the Megapixel VR Helios is patched fresh into an empty show on MagicQ then the MP Groups will be patched as Heads with Head numbers 1 to 30 in MagicQ. There will only be one MagicQ Group generated - which has all 30 MP Group heads in it. We recommend that the Megapixel VR Helios is configured with one Megapixel Group for each LED panel controlled starting at Megapixel Group 1.
In order to connect to the Megapixel VR Helios set the IP address of the media server in Setup, View System, View Media to the IP address that the Megapixel VR Helios is using (displayed on its front panel display) and then set Live Preview to Enabled.
The Media window has a View VR view which can be selected by toggling through the views on the top left soft button. In VIEW VR the whole window is used to show a large preview from the media server. Note the Megapixel VR Helios limits the preview refresh rate to every half a second. Unlike the View Servers View in the Media window, the Preview will continue to be refreshed even when the Megapixel VR Server is not selected in MagicQ - thus enabling the Preview to be constantly viewed regardless of selected heads.
The MP Groups are drawn on top of the preview. Pressing within a MP Group selects it within MagicQ. Selecting a MP Group selects that MP Group (Head in MagicQ) enabling it to be controlled. The MP Group can be dragged around the preview to a new position.
MagicQ supports the MSEX (Media Server Exchange) protocol which enables it to communicate with any media servers that support this protocol. Select MSEX (Arkaos) and set the version number to 0.
MagicQ also supports a generic protocol based on accessing the media folder of a media server and a generic csv index file to determine the mapping of thumbnails files to DMX values. Select "Generic" and set the version number to 0.
MagicQ retrieves thumbnails from the media server and shows them on the screen for easy selection of media banks and media images. The media server must be enabled in the Setup Window, Media View for it to retrieve thumbnails. MagicQ can handle different media on each media server thus making it easy to program larger configurations of media servers.
Thumbnail support is available when using Arkaos, Coolux Pandoras Box, Catalyst, Hippotizer, Mbox, Maxcedia and any other media servers that support the MSEX or generic protocols.
To retrieve thumnails press the GET THUMBS soft button in Setup, View System, View Media. This grabs all the thumbnails for the media server which the cursor is on.
To force a reload of all the media from the media server, move the cursor to the required media server in the Media View of the Setup Window and press the ERASE CACHE soft button. Then press the GET THUMBS soft button to retrieve the new thumbs.
Individual pages of thumbs can be reloaded in the Media Window using the RELOAD THUMBS soft button. Press SHIFT and RELOAD ALL THUMBS to reload all pages.
MagicQ can connect to a media server to retrieve a live preview of the master output or of the individual layers. This is very useful where the media server is remote to the console, or in a multiple media server configuration.
Live Preview support is available when using MagicHD, Arkaos and Hippotizer and any other media server that supports the live preview part of the MSEX protocol specification.
Enable the Live Preview option in the Media View of the Setup Window.
The live preview is shown in the large window on the left of the Media Window. Choose using the top soft buttons whether the preview shows the output, or the currently selected layer.
When connected to media servers that do not yet support live previews, the preview window will show the image thumbnail from the 1st layer that has its intensity channel above zero.
It is possible to configure the View in the Media Window – View Servers (defaults), View Groups, View Libraries and View Outputs. View Groups is useful when using a large number of media servers and controlling using groups of media servers rather than individual servers.
View Outputs shows a summary of the Output of all the configured Media Servers.
MagicQ automatically expands the Media Window to show the maximum number of layers that are in use by the configured Media Servers.
MagicQ supports the inbuilt Media Player MagicHD. This is fully integrated with MagicQ and can be used to play back media to a 2nd monitor attached to your MagicQ PC/Mac.
From the toolbar select Media Player, View Media Output and a MagicHD window will be opened.
It is possible to use MagicQ and 3rd party Media Server software (e.g. ArKaos) on the same PC by altering some of the settings given above. In the Media View of the Setup Window, set the IP address of the media server to 127.0.0.1. This is the local loopback IP address and will allow the PC to talk to itself to retrieve thumbnails and live previews.
In the Settings View of the Setup Window, scroll down to Interface Settings. Set the option for Net host options to Normal + Loopback IP.
With the loopback IP and Send to Applications set correctly, you should be able to control your media server and use the live previews and thumbnails.
MagicQ supports live feeds over CITP (MSEX) for use in the MagicQ Pixel Mapper and for user display on MagicQ. Live feeds do not have to come from a Media Server, they can come from any CITP (MSEX) source such as PixelBeetle or MSexLord. Multiple different live feeds from multiple different source PC/Macs is supported. MagicCap can screen capture from any PC or Mac and send the output to MagicQ using MSEX.
To patch an MSEX server, including MagicCap, go to SETUP - VIEW SYSTEM - VIEW MEDIA, find an unused server and change the type to "CITP Live Feed". The Media Server IP address should be set to the IP address of the PC/Mac providing the feed and "Thumbs" and "Live Previews" should be enabled.
To set up multiple live feeds from one PC/Mac then set up multiple identical Media Server entries - each with the IP of the live feed source and "thumbs" and "Live Previews" enabled. The entries do not have to be adjacent media servers in the list. MagicQ will only make one MSEX connection to the PC/Mac but will grab the previews for the multiple sources through this connection.
Live Feeds can be used in the Pixel Mapper by selecting Media Page as "Live Feed" (encoder Y) and selecting Media as the "Serv 1" (encoder X) depending on the number of the MSEX server.
The received Live Feeds can be viewed in the Media Window by selecting View Outputs instead of View Servers on the left most soft button.
Note that a 2nd Media Window can be opened by pressing CTRL and Media or by pressing 2 then Media. This enables the 2nd Media Window to be used for displaying live feeds whilst the first is used for controlling media servers.
If you do not have control of the Media Server check:
| | ||