| |
| |
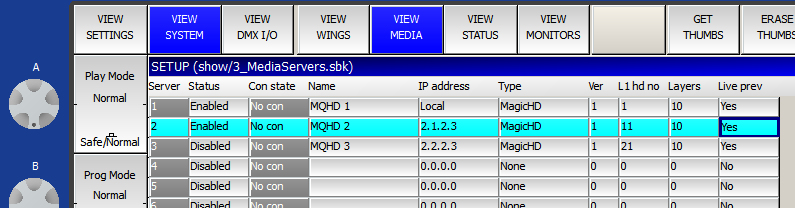
To connect to a MagicHD using Art-Net, the MagicQ media server settings should be as highlighted in this screenshot:
When MagicHD is launched from MagicQ PC it does not use the network. The connection is direct, within the software. The media server settings ( setup → VIEW SETTINGS → VIEW SYSTEM → VIEW MEDIA) should be as highlighted in this screenshot:
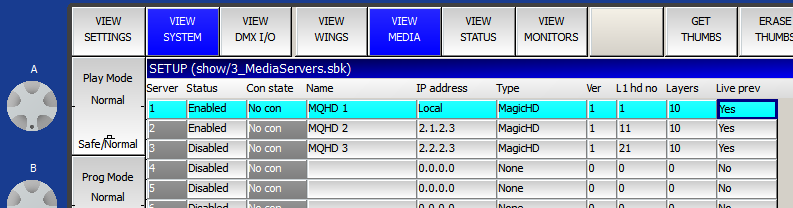
The IP address column shows “Local”. To select Local, enter 0 in that cell. |
If you have networked MagicHDs patched in the show, you can use the local window to duplicate any one of these: from the MagicQ PC application menu: Media Player → Select Player. A dialogue box will pop up listing all the patched MagicHDs:
 |
The players are listed by name: you should ensure that each player has a distinct name. To change a player’s name, go to setup → VIEW SETTINGS → VIEW SYSTEM → VIEW MEDIA. |
Both versions of MagicHD run in an application window like most other software. The window can be positioned, maximised, minimised and closed, in the usual way. Window position is remembered from one session to the next.
The window can be moved by simply dragging it with the mouse. This means it can be positioned even when the border is not present.
If you wish to use MagicHD to drive video output hardware, you can set the window size and position precisely through the window size dialogue.
In full screen mode MagicHD hides the menu bar, and the mouse cursor when it is inside the window, so that they do not appear in the projected image during a show.
To enter or leave full screen mode (i.e. a frameless window occupying the whole screen):
use the keyboard shortcut (the shortcut is also shown next to "Full Screen" in the menus):
The stand-alone version always starts full screen, ready to start (or continue) a show. This is because there will not normally be any user interaction with MagicHD. There might not even be a keyboard connected. To prevent this, select “Fixed size” from the output drop down box in the window size dialogue.
When the combined version detects a PC wing, or other MagicQ console that has encoder wheels, it also starts full screen, if it was last used in full screen mode. The assumption is that this setup is part of a show and the user does not want to waste time positioning the window.
Note that on a system with a single screen, if you press F11, the MagicHD window will take over the screen and the mouse cursor will vanish. This can be confusing because it appears that you have lost control of the computer. Just press F11 again to leave fullscreen mode.
On Mac OSX, the shortcut Cmd-, (command+comma) brings up the preferences window even in fullscreen mode. |
The MagicHD output window can be separated from the application window, so that it can be positioned independently. This means the menus are still accessible in the main window, even when the output window is on a projector or LED wall that might be switched off or too low resolution to see the menus.
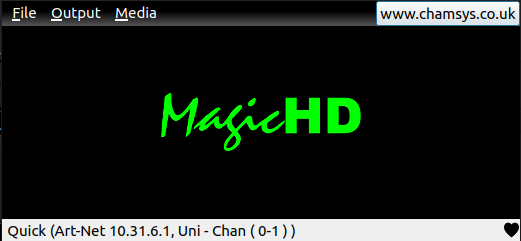 |
The main window shows status bar shows the network configuration, with DMX health on the right. A black heartbeat means DMX data is being received. A green heartbeat means the values are changing. “No DMX” flashes when no data is being received.
Split output mode is selected from the menu, and is on by default. This mode is not available in the combined version because the MagicQ window is always available to control MagicHD.
MagicHD has only a few user configurable settings. Nearly everything is controlled via DMX.
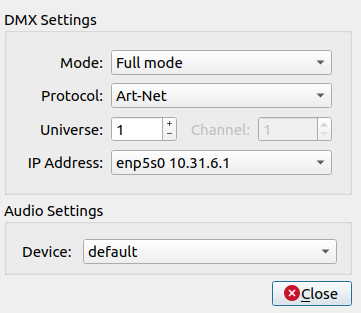
The DMX settings can be configured by opening the "Settings" diaglogue box, the audio output device can also be selected from here.
The mode option allows you to switch between the "Full mode" and "Quick mode". Full mode is for users who wish to use up to use 8 media layers, the output layer and/or the textlayer. Quick mode for users who wish to be able to have a transition style between media.
The channel setting is only enabled when using "Quick mode".
The MagicHD application window has a simple menu:
File | Settings(1) | Change the universe and DMX protocol that MagicHD responds to |
About | Version and status information | |
Exit(1) | Close the MagicHD window | |
Output | Window position | Launch the window size dialogue |
Output on separate window(1) | Toggle split output mode | |
Media | Convert all media | Force conversion of all media in the convert directory |
Convert file | Interactively choose a single file for conversion | |
Stop conversion | Stop media conversion if it is in progress | |
Rebuild index | Force the media index to be rebuilt | |
Rebuild thumbnails | Force all thumbnails to be rebuilt |
(1) Only present on the stand-alone version.
To see the menu bar, the window must not be full screen. In full screen mode the menu bar is hidden. |
In the MagicQ PC application window MagicHD settings are accessed from the Media Player menu:
View Media Output | Toggle the MagicHD window |
Select Player | From the patched MagicHDs in the show, select which one to emulate in the local window |
Load MagicHD Demo | Load the MagicHD demo show, and open the player window |
Window position | Launch the window size dialogue |
Convert all media | Force conversion of all media in the convert directory |
Convert file | Interactively choose a single file for conversion |
Stop conversion | Stop media conversion if it is in progress |
Rebuild index | Force the media index to be rebuilt |
Rebuild thumbnails | Force all thumbnails to be rebuilt |
Deploy Media | TBD |
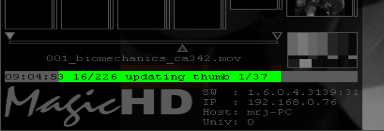
MagicHD is intended to output on a projector or video screen in a show environment, controlled using DMX. As such there is no mechanism to feed status back to the user. Apart from the HUD there is no GUI. MagicHD reports warnings, errors and some supporting information, to its log file, but this is only intended for post mortem analysis.
When there is status to feed back to the user it appears in the status bar on the HUD:
 |
and in the combined version, in the input display window in MagicQ PC:
 |
The window size dialogue box is launched from the menu. It allows the output window to be positioned accurately, and its size to be fixed.

The title of the window shows which screen the output window is displayed in.
The screen’s aspect ratio is not accurate, because the displayed rectangle stretches with the dialogue box. The window is scaled correctly within the screen area. |
This option turns off the title, menu and border for the output window. When the border is hidden, the menus are also hidden. These can either be accessed on the control window if you are in split output mode, or by pressing the ALT key in the output window. The ALT key makes the menu appear while pressed. You can then access the menu by pressing one of the highlighted keys, or by clicking with the mouse.
If you start interacting with the menu it will not automatically hide itself again. Press ALT again to make it hide. |
This option keeps the output window in front of other programs, so it can always be seen.
This option fixes the window size on startup. Normally MagicHD will try to start fullscreen. With this option selected, the last window position and size are remembered and MagicHD will start with the output window in the same place.
| | ||